Versions Compared
| Version | Old Version 23 | New Version 24 |
|---|---|---|
| Changes made by | ||
| Saved on |
Key
- This line was added.
- This line was removed.
- Formatting was changed.
| Div | ||
|---|---|---|
| ||
/wiki/spaces/E2D/pages/29982926 / Web Access Management / Current: Creating a WAM SSO Application for Andy's Beans |
To enable the EmpowerID Agent to protect the Andy's Beans Web site, you neet to create an application for it with URL subcomponents for each URL or group of URLs on the site you want to protect in EmpowerID and link that application to a SAML SSO Connection to provide single sign-on capabilities to all authorized users.
For the Andy's Beans Web site, there are a number of URLs that need to be restricted. These include the following:
| AndysBeans/Employees | AndysBeans/Employer | AndysBeans/ProductManager |
|---|---|---|
| AndysBeans/Employees/Details | AndysBeans/EmployeeManager/Create | AndysBeans/ProductManager/Create |
| AndysBeans/Employees/MyHR | AndysBeans/ |
| EmployeeManager/Details | AndysBeans |
| / |
| ProductManager/ |
| Details |
| AndysBeans/Employees/ |
| MyMedical | AndysBeans/ |
| EmployeeManager/ |
| Edit | AndysBeans/ |
| ProductManager/Edit |
| AndysBeans/ |
| Employees/ |
| UpdatePlan | AndysBeans/EmployeeManager/ |
| Delete | AndysBeans/ |
| ProductManager/Delete |
There are a number of ways in which these URLs can be protected, depending on the granularity of your security policy:
- Add a URL subcomponent that is an exact match for a specific URL, limiting the scope of the subcomponent to that one URL.
- Create a URL subcomponent that uses a JavaScript regular expression to block access to all URLs meeting the condition (pattern match) of the expression.
- Create a path-specific URL subcomponent that restricts access to any URL with a matching beginning path.
This example uses a combination of the second two, pattern matches and beginning paths, to protect the Andy's Beans URLs.This topic demonstrates how to create an application for AndysBeans and add to it URL subcomponents for each path that needs to be protected from unauthorized access.
To create a WAM SSO application for AndysBeans
- In the Navigation Sidebar of the EmpowerID Web interface, expand Applications and click Manage Applications.
- From the Application page, click the Create Application Action link.
 Image Modified
This opens the Application Details form with fields and options for registering applications in EmpowerID. Image Modified
 - In the General section of the form, do the following:
- In the Name field, enter AndysBeans.
- In the Display Name and Description fields, enter Andy's Beans Web Site.
- Leave the Icon field as is.
- Leave the Full URL (Exact Match Path) blank. This field is used with Reverse Proxy applications.
- Fill in the Base URL for HTTP Module field with your base URL.
- Leave Allow Access Requests selected so that the application appears in the IT Shop, allowing users to request or claim an account in the application.
- Leave Allow Claim Account selected so that users can claim their accounts and gain instant access after passing the requisite identity proofs.
- Select Login Is Email Address (Receive OTP to Claim) to receive a one-time password to claim the account and to pass the identity assertion to the application when logging in from EmpowerID.
- Leave Allow Request Account checked. When this option is selected and Allow Access Requests is selected, users can request an account in the application.
- Select Make me the Application Owner so that application owners can manage the application and approve or deny access requests.
- Leave Configure Advanced Claim and Request Account Options cleared.
This is what the General section of the Application Details form looks like after completing these steps.
 Image Modified
- Click the Single Sign-On tab, select Web Access Management (HTTP Header) from the Single Sign-On Connection Type drop-down.
 Image Removed
 Image Added
This opens the WAM Connection Information section of the form. You use this section to build the SSO Connection for the Web application.
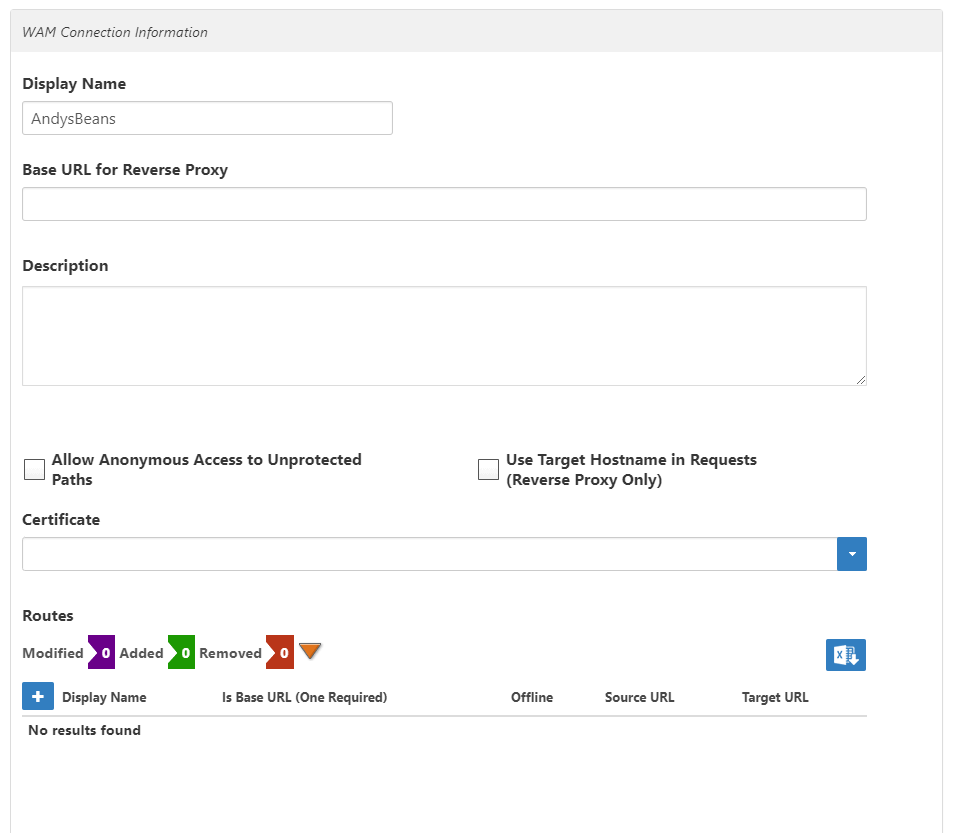
- In the WAM Connection Information section, do the following:
- Leave the Display Name field as is.
- In the Base URL for Reverse Proxy field, enter https://sso.empowersso.com/andybeans, replacing sso.empowersso with the FQDN of the server hosting the application in your environment.
- In the Description field, enter Andy's Beans WAM connection .
- Leave Allow Anonymous Access to Unprotected paths cleared.
- Leave Use Target Hostname in Requests (Reverse Proxy Only) cleared.
Select the certificate used in your environment for signing SAML assertions from the Certificate drop-down.
Info This certificate can be a self-signed certificate that you can generate using the EmpowerID Certificate Manager. The certificate must be mapped to an EmpowerID Person with access to make calls to the EmpowerID API.
For information on using the Certificate Manager to generate the certificate and mapping it to an EmpowerID Person, expand the drop-down below.
Rw ui expands macro Rw ui expand macro title To generate and map a self-signed certificate From your EmpowerID server, open the EmpowerID Certificate Manager by searching for EmpowerID Certificate Manager.
EmpowerID stores each certificate in the CertificateStore table of the EmpowerID Identity Warehouse.
C:\Program Files\TheDotNetFactory\EmpowerID\Programs\EmpowerID.CertificateManager.exeIn the EmpowerID Certificate Manager, click the Generate tab and then do the following:Select the X509 Certificate certificate type.
Enter a password for the certificate in the Password field.Browse to and select an Output Folder for the certificate.Select Import to EmpowerID Certificate store.Next, map the certificate to an EmpowerID Person with the access to make API calls:
- From the EmpowerID Web interface, navigate to the View page for the Person to whom you want to map the certificate.
From the View page for the person, expand the Role, Accounts, and Login Security accordion and click the Edit link in the Mapped Login Certificates pane.
Search for and select the self-signed certificate and click Save.
When you have finished, the WAM Connection Information section looks similar to the following image. Image Removed
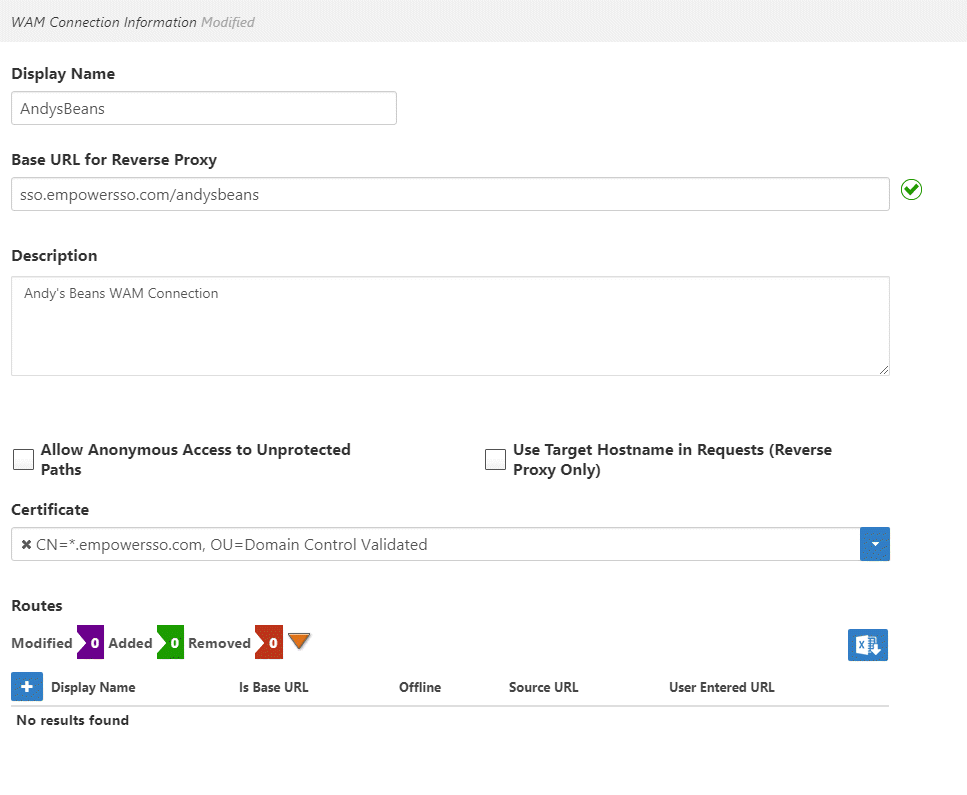 Image Added
- On the Users tab, select Create a New Account Directory to create a "tracking-only" account store that exists as a container within EmpowerID that stores user and group records for SSO or attestation without making a connection to the external application directory.
Info Opting to create a new account store when registering applications in EmpowerID is advantageous in that doing so creates a one-to-one correlation between the account store and the application, as well as the SSO connection for the application.
When you create a new Account Directory, EmpowerID gives the directory the same name as the application.
 Image Removed
 Image Added
 - On the Extension tab, enter 1111 in the AppExtensionAttribute12 field.
 Image Removed
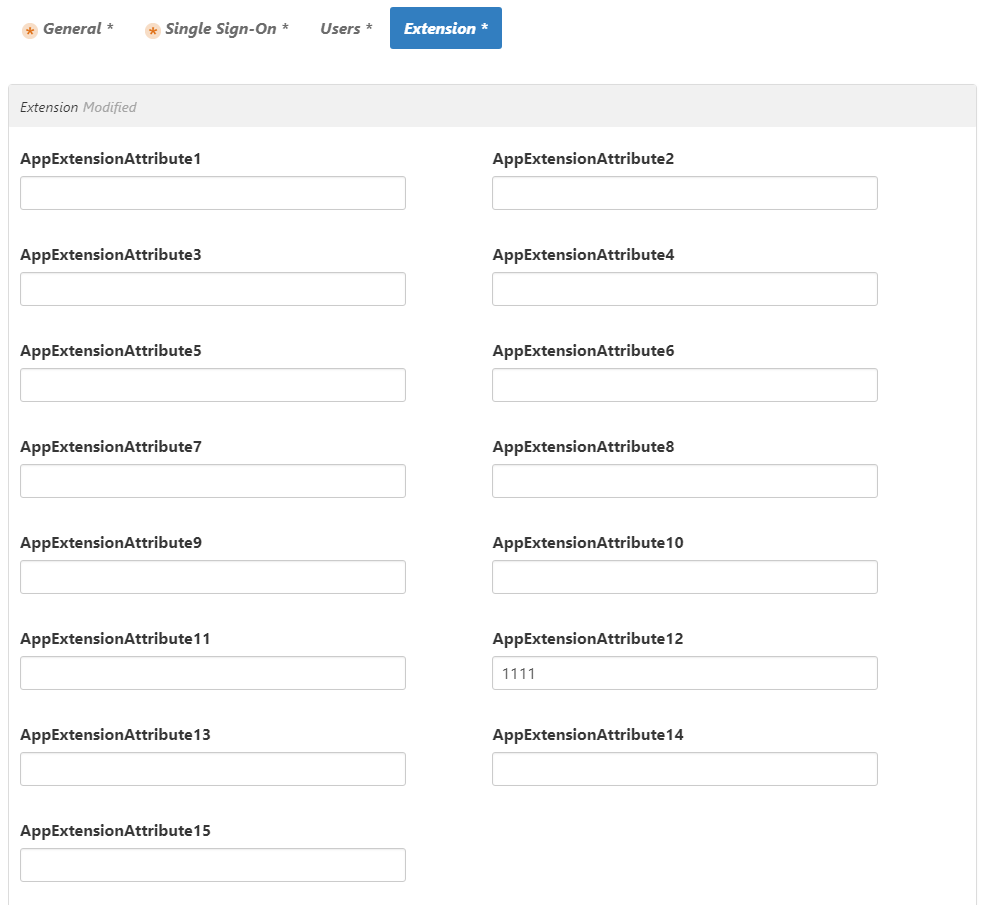 Image Added
 - Click Add to Cart.
- Click the My Cart icon and in the dialog that appears, enter a reason for creating the application and click Submit.
Now that the WAM application has been created, the next step is to add protected application subcomponents for each of the URLs that need to be protected for unauthorized access.
To add protected application subcomponents (URLs)
- From the Navigation Sidebar, expand Applications and click Manage Applications.
- Search for Andy's Beans Web Site and then click the Display Name link for it.
 Image Removed
 Image Added
This directs you to the View One page for the application. View One pages allow you to view information about an object in EmpowerID and manage it as needed. Image Removed
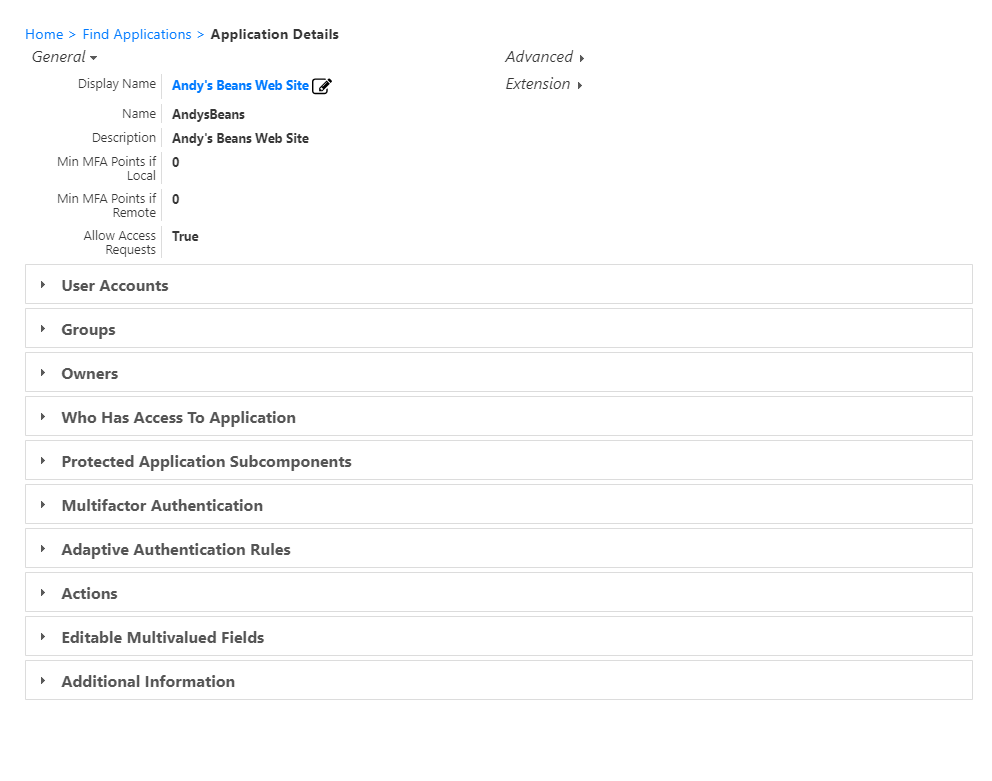 Image Added
 - From the View One page, expand the Protected Application Components accordion and click the Add Protected Application Subcomponent (+) button.
- In the dialog that appears do the following to protect all pages of Andy's Beans that start with productmanager:
- From the Type drop-down, select URL.
- In the Name, Display Name and Description fields, enter AB Product Manager Pages.
- Leave the Icon field as is.
- Select Allow Access Requests to let users request access to the page from the IT Shop.
- In the Starts with Path field, enter andysbeans/productmanager.
- Leave ABAC Check cleared.
The Protected Application Subcomponent dialog looks like this: Image Removed
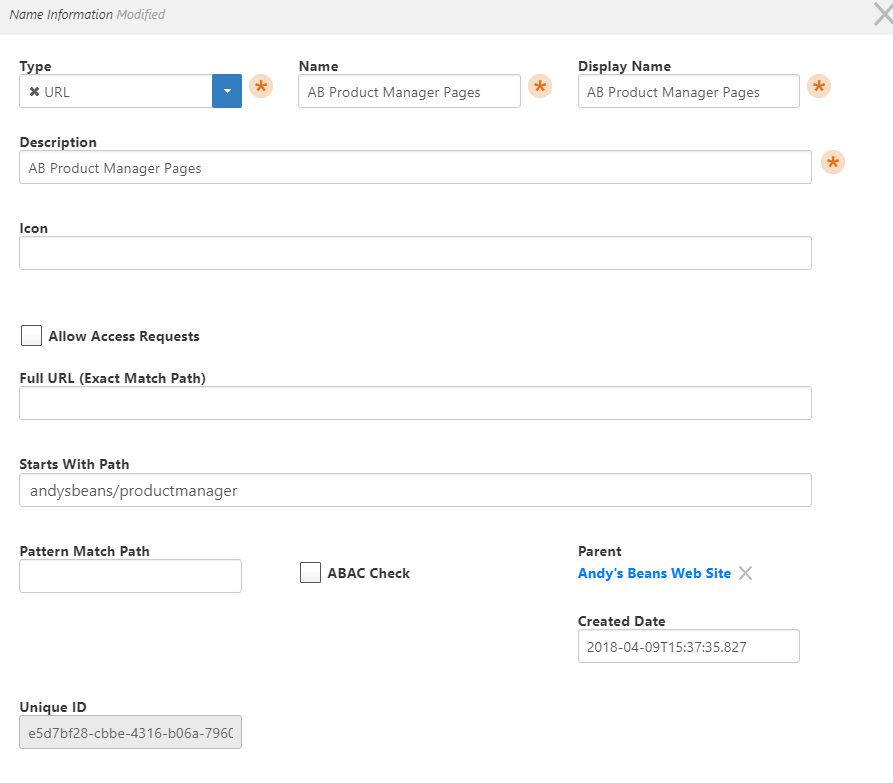 Image Added
 - Click Save.
- Expand the Protected Application Components accordion and click the Add Protected Application Subcomponent (+) button.
- In the dialog that appears do the following to protect the all pages in Andy's Beans beginning with employees:
- From the Type drop-down, select URL.
- In the Name, Display Name and Description fields, enter AB Employee Pages.
- Leave the Icon field as is.
- Select Allow Access Requests to let users request access to the page from the IT Shop.
- In the Starts with Path field, enter andysbeans/employees.
- Leave ABAC Check cleared.
The Protected Application Subcomponent dialog looks like this: Image Removed
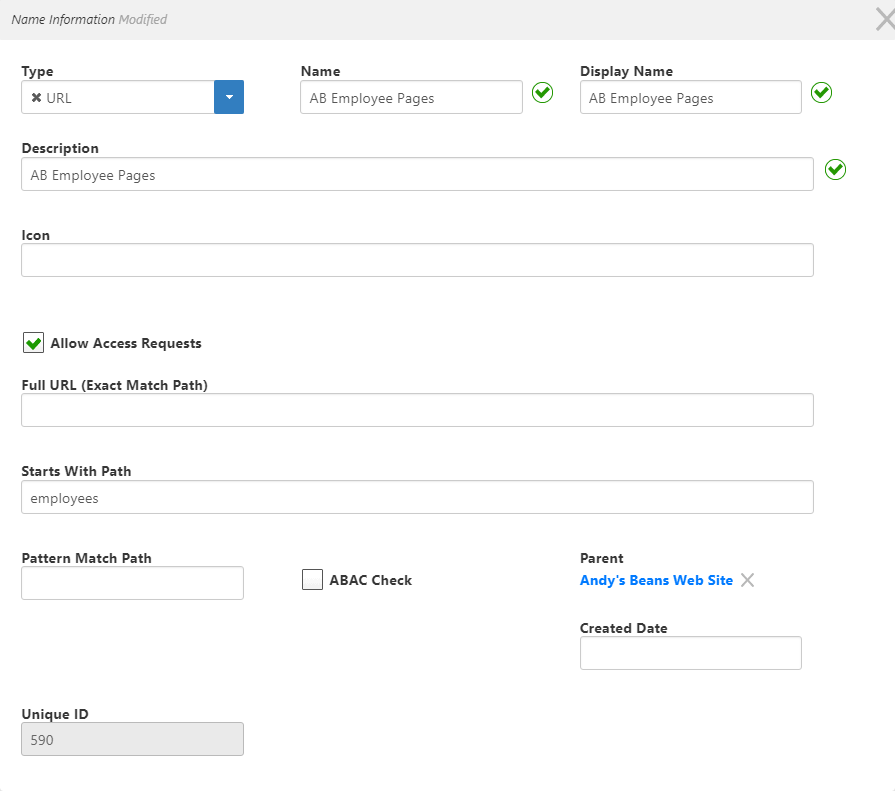 Image Added
 - Click Save.
- Expand the Protected Application Components accordion and click the Add Protected Application Subcomponent (+) button.
- In the dialog that appears do the following to protect all pages in Andy's Beans beginning with employeemanager:
- From the Type drop-down, select URL.
- In the Name, Display Name and Description fields, enter AB Employee Manager Pages.
- Leave the Icon field as is.
- Select Allow Access Requests to let users request access to the page from the IT Shop.
- In the Starts with Path field, enter andysbeans/employeemanager.
- Leave ABAC Check cleared.
The Protected Application Subcomponent dialog looks like this: Image Removed
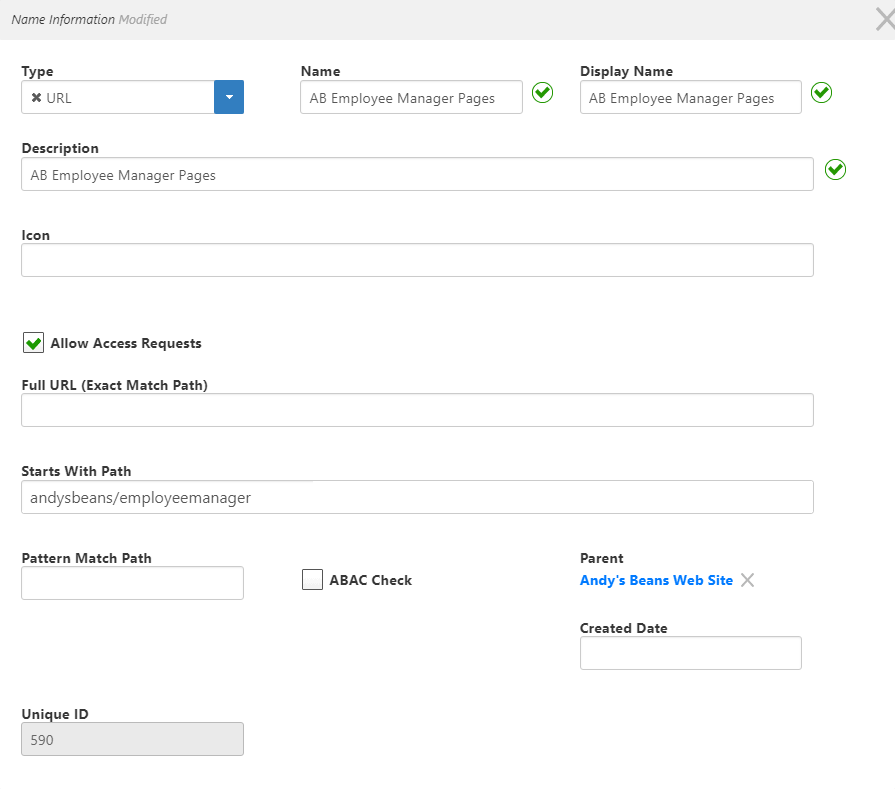 Image Added
 - Click Save.
After completed the above steps, the Protected Application Subcomponents accordion
looksshould look like the below image
below:.
 Image Removed
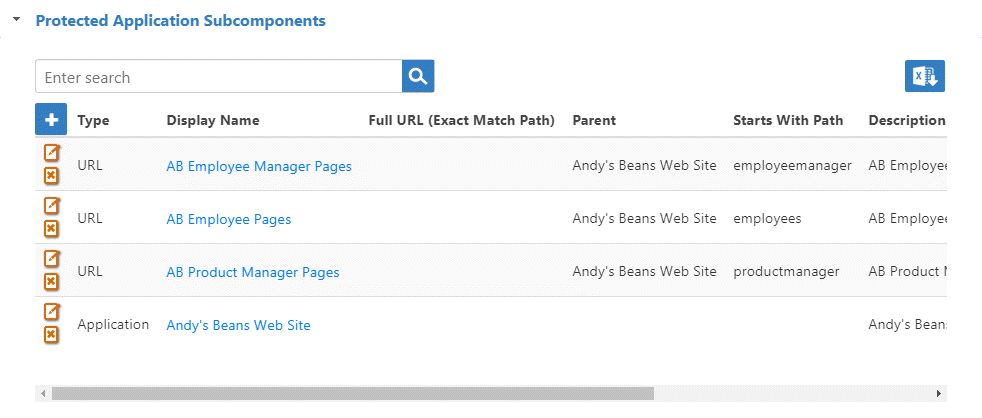 Image Added
Now that the application and the protected application subcomponents for the application are created, the next step is to create a number of people in EmpowerID with accounts in Andy's Beans.
To add user accounts to the Andy's Beans WAM application account store
- Navigate to the User Accounts page by expanding Identities and clicking User Accounts.
- Click the Create User (Person Optional) action link.
 Image Removed
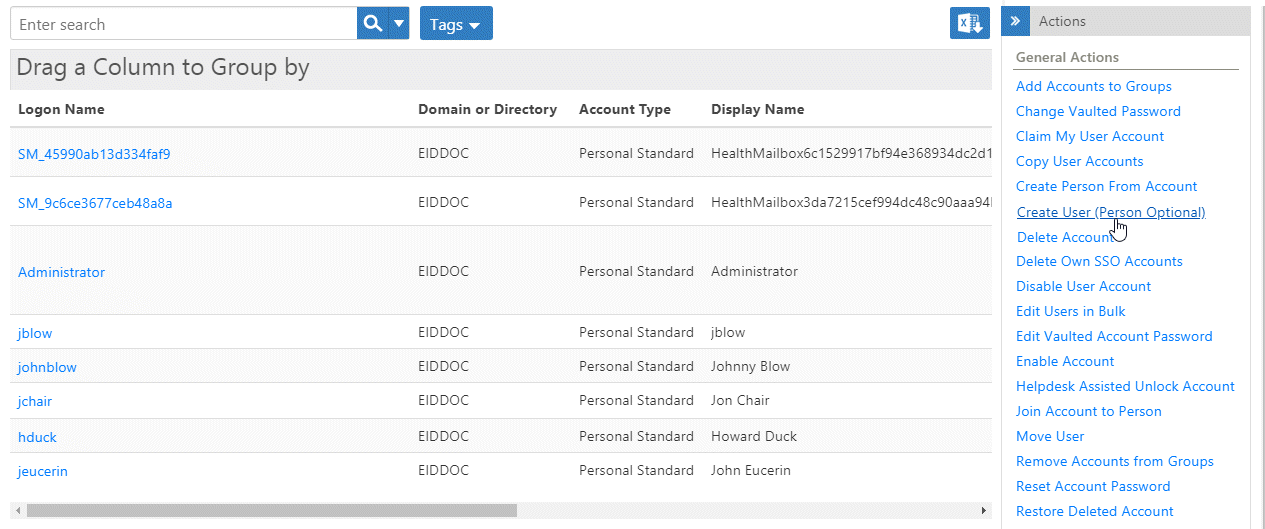 Image Added
This opens the Create User form. Image Removed
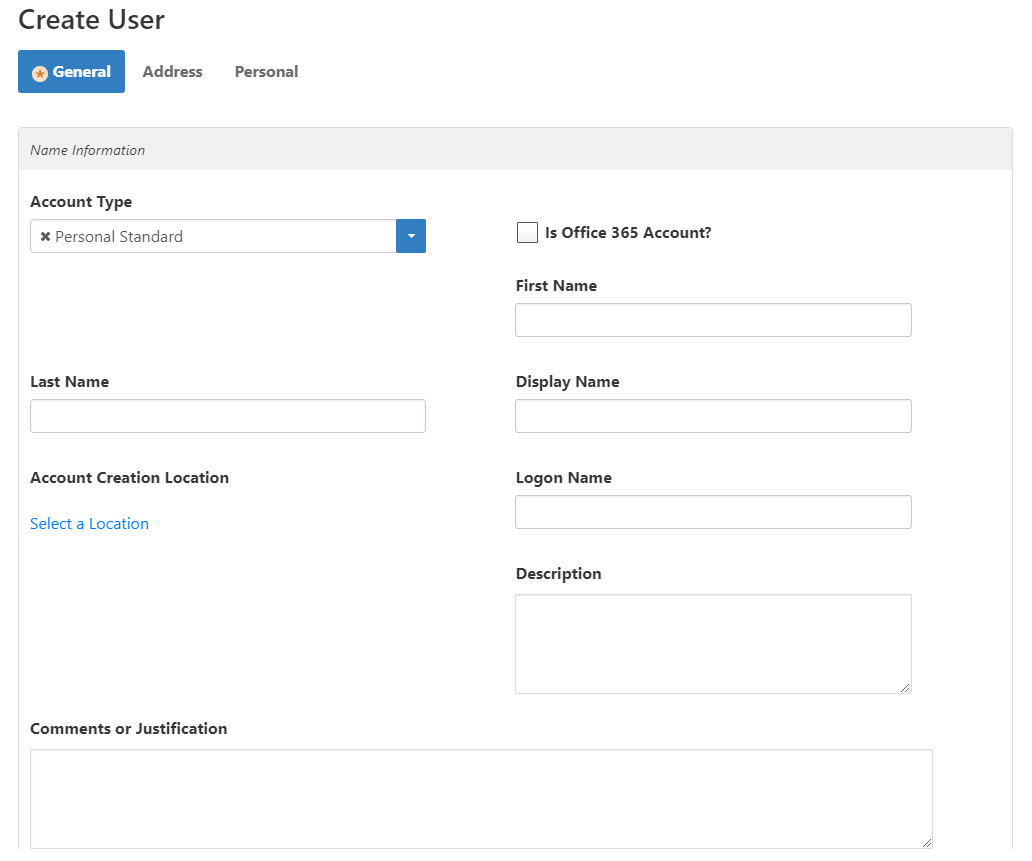 Image Added
 - From the Account Type drop-down, select Personal Standard.
- In the First Name field, enter Charles, and in the Last Name field, enter Stripe.
In the Display Name field, enter Charles Stripe.
Tip Charles Stripe is the Employee Manager for Andy's Beans.
- Below Account Creation Location, click the Select a Location link.
- In the Location Selector, search for AndysBeans and click the node for AndysBeans.
- Click Save to close the Location Selector.
 Image Removed
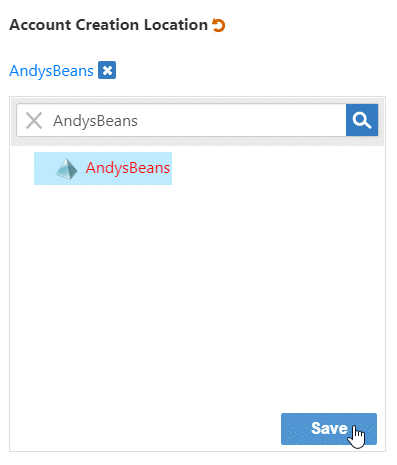 Image Added
- In the Logon Name field, enter charles.stripe@andysbeans.com.
- In the Description field, enter Andy's Beans user account for Charles Stripe.
- Optionally, enter comments in the Comments or Justification field.
- Select Create a new EmpowerID Person object. The person created will be the owner of the user account.
- Below Person Business Role, click the Select a Role and Location link to open the Business Role and Location selector.
 Image Removed
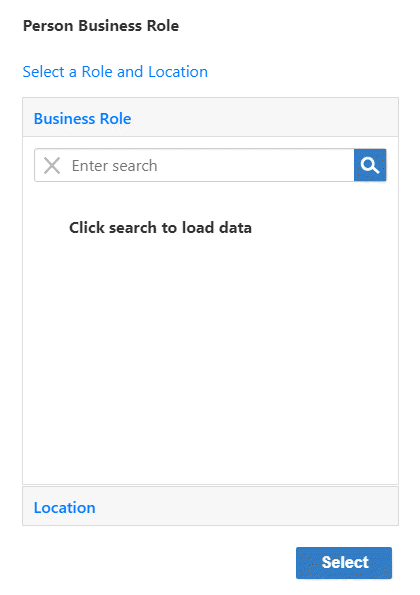 Image Added
- Search for the Temporary Role Business Role and click the node for that role to select it.
 Image Removed
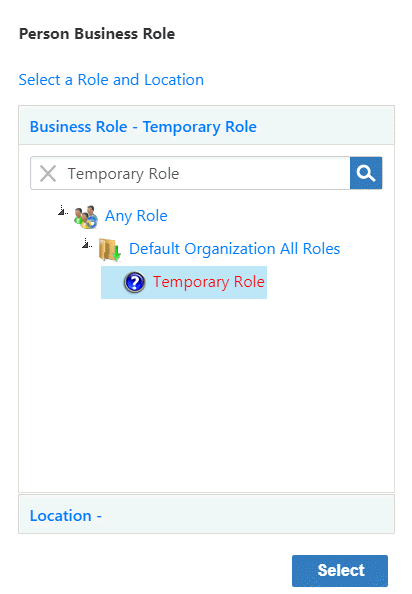 Image Added
 - Click Location to open the Location panel of the Business Role and Location selector.
- Search for the Temporary Location Location and click the node for that location to select it.
 Image Removed
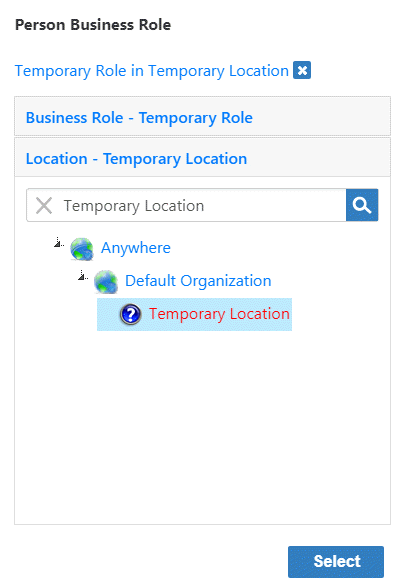 Image Added
 - Click Select to select the Business Role and Location combination and close the Business Role and Location selector.
- Search for the Temporary Role Business Role and click the node for that role to select it.
- Select Allow me to enter a password and then enter pass@word1 in the Password and Confirm Password fields.
 Image Removed
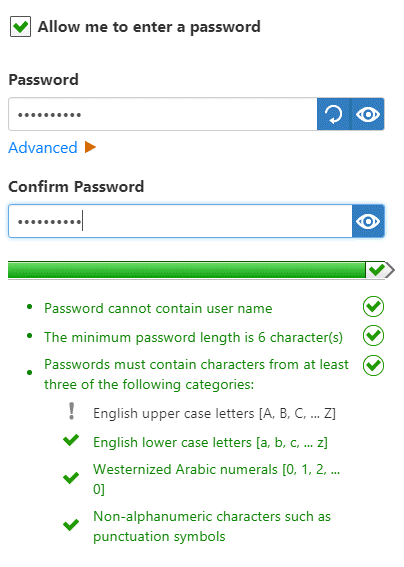 Image Added
 - Ensure that Allow Joining Account to Person and Allow Provisioning a Person from Account are selected.
 Image Removed
 Image Added
 - Click Save.
After EmpowerID creates the user account and the person owning the account, your browser is directed to the Account Details page for the account.
To assign access to the Account Store
From the Account Details page that opens, click the EmpowerID Logon link. This directs your browser to the View page for the Charles Stripe person.
 Image Removed
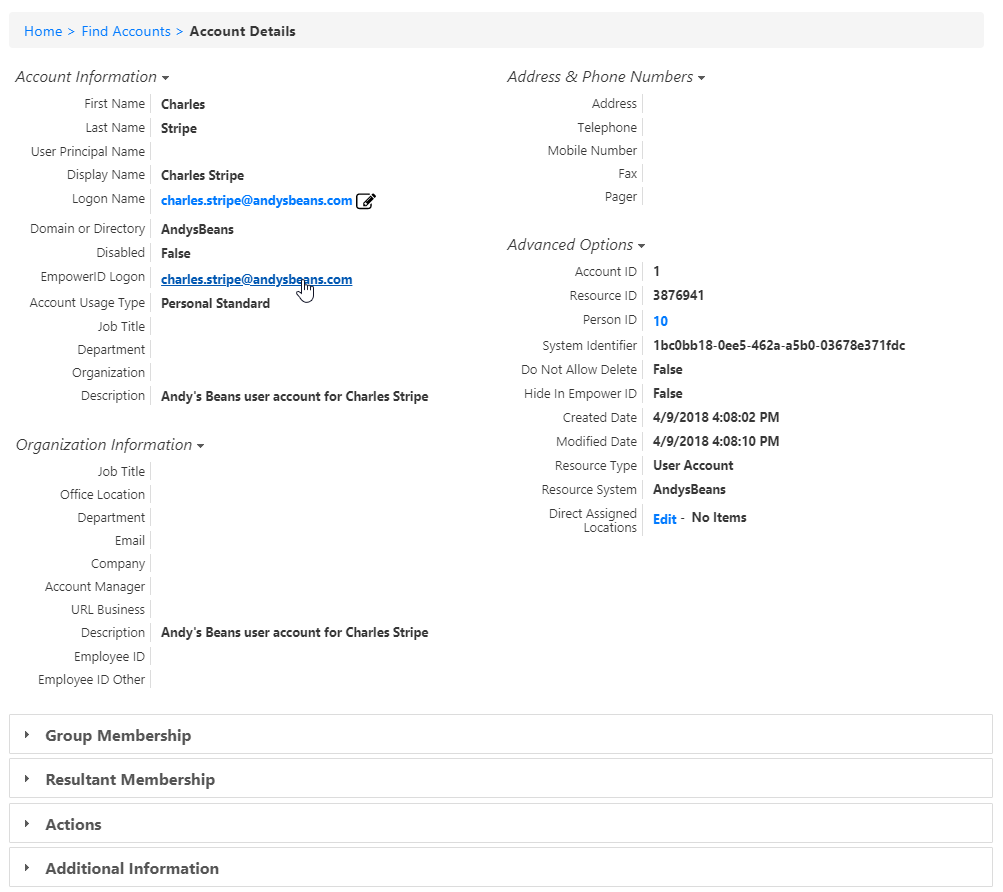 Image Added
From the View page for Charles Stripe, expand the Access Assignments accordion and do the following to give Charles Stripe access to the employees and employeemanager pages of the AndysBeans application.
Click the Add New Assignment (+) button.
From the Assign direct to resource or other method drop-down, select Direct.
From the Resource Type drop-down, select Pages and Reports.
In the Enter a Pages and Reports Name to Search field, enter AB Employee Manager Pages and click the tile to select it.
From the Access Level drop-down, select Viewer.
 Image Removed
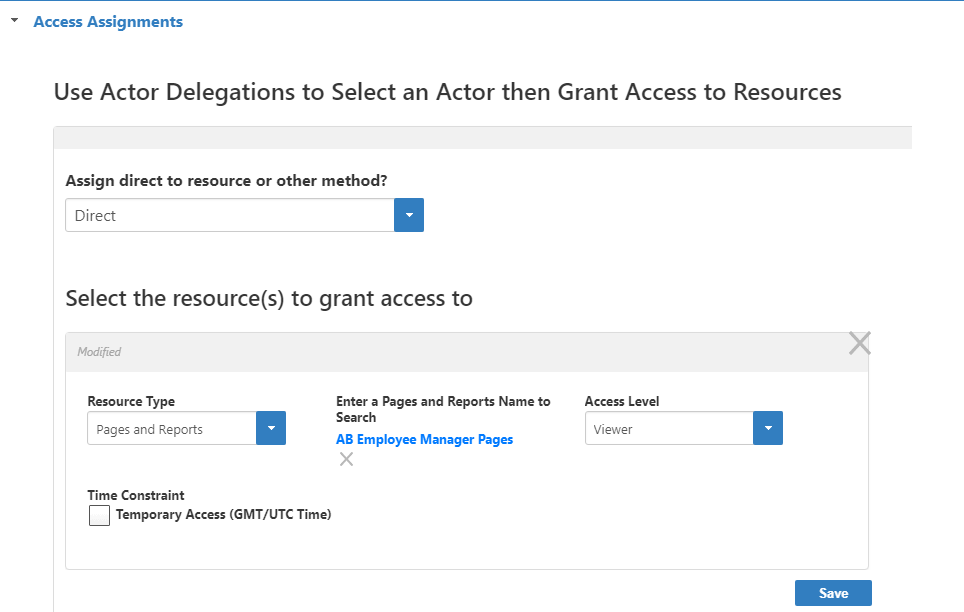 Image Added
Click Save to add the assignment to the Shopping Cart.
Repeat the above, this time giving Charles Stripe Viewer access to AB Employee Pages.
- From the View page for Charles Stripe, click the Edit link to put the page in edit mode.
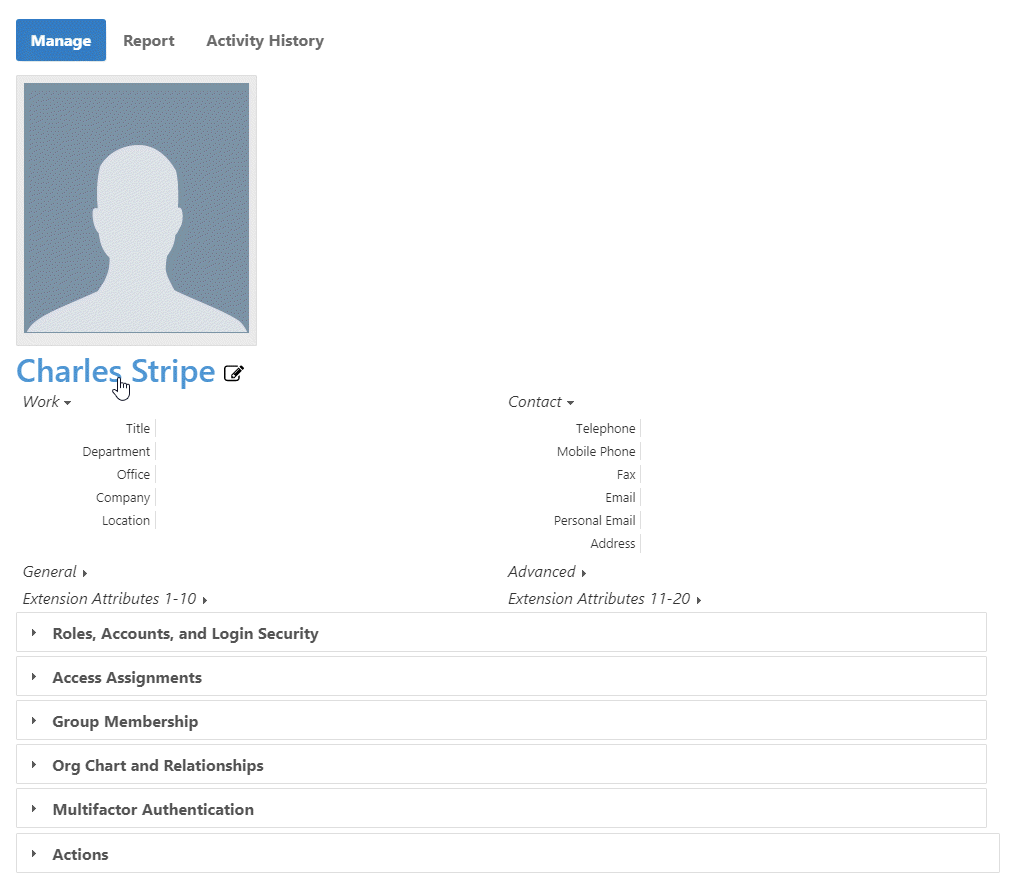
- Locate the Login field and change the value from charles.stripe@andysbeans.com to charles.stripe.
- Enter Self-Service User in the Management Roles field and click the tile for the role to select it.
 Image Removed
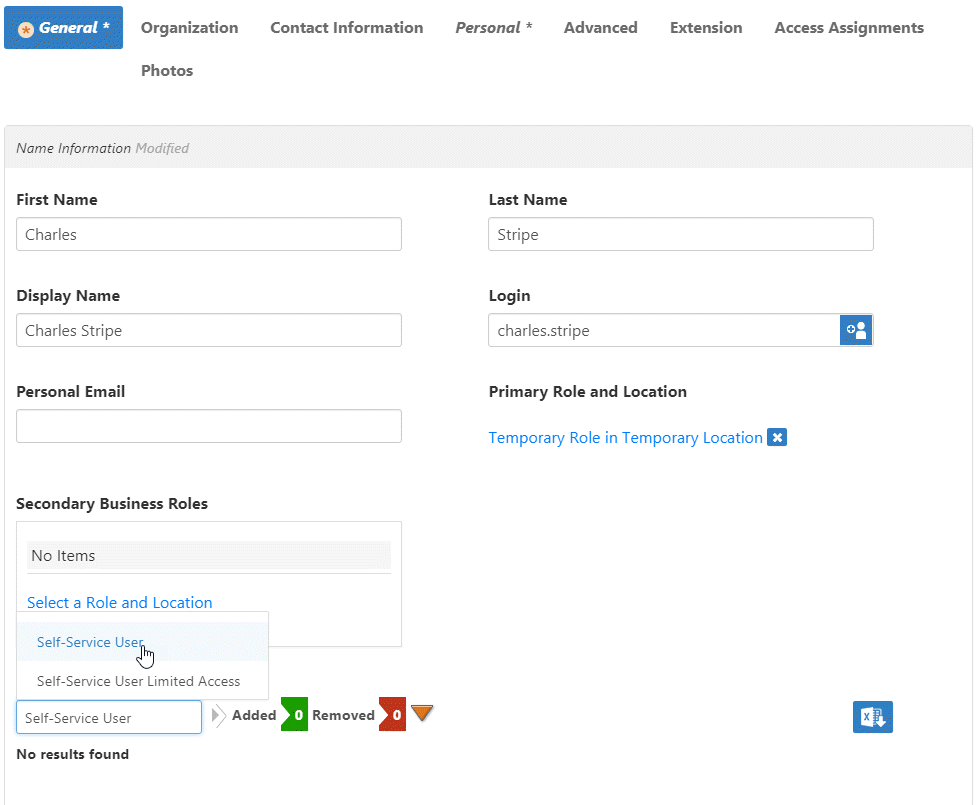 Image Added
 - Click Save.
- Finally, click the Shopping Cart and in the dialog that appears, enter a reason for the assignment and click Submit.
 Image Removed
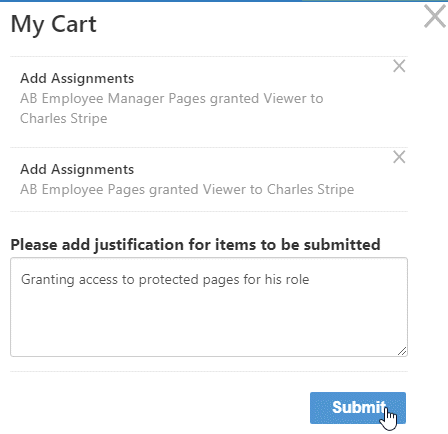 Image Added
 - Repeat these steps for the following Andy's Beans users:
- George Varghese is the Product Manager and needs access to the employees and productmanager pages.
- Barry Chandler is an employee and needs access to the employees pages.
- Fritz Dame is an employee and needs access to the employees pages.
- Tim Johnson is an employee and needs access to the employees pages.
- Maria Hansen is an employee and needs access to the employees pages.
Rhonda Black is an employee and needs access to the employees pages.
Tip For a full list of all Andy's Beans users and their roles, see About the Sample Web Application.
Now that you have created the WAM application for AndysBeans, the next step is to create an OAuth application for it.
| icon | false |
|---|---|
| title | Related Content |
| Column |
|---|
| Column |
|---|
| class | topicTOC |
|---|
| Div | ||||||||||||||||||||||||
|---|---|---|---|---|---|---|---|---|---|---|---|---|---|---|---|---|---|---|---|---|---|---|---|---|
| ||||||||||||||||||||||||
|