| Div | ||
|---|---|---|
| ||
/wiki/spaces/E2D/pages/29982926 / Installation and Configuration / Configuring EmpowerID / Connecting to Directory Systems / Current: Configuring Identity Forge for EmpowerID |
This topic describes how to configure Identity Forge IdentityForge for use with EmpowerID. Once you have followed the steps outlined in this topic, you can connect EmpowerID to your AS/400 directories.
To install
and configurethe Java environment
- Execute the Java JDK installer and click Next.
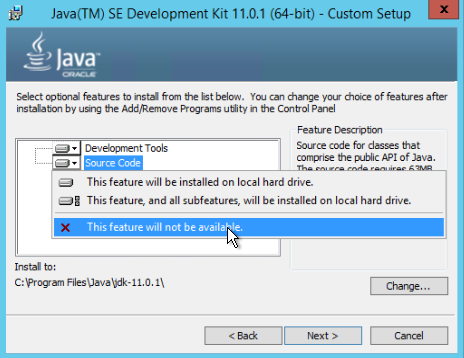
- On the optional features page, change Public JRE to This feature will not be available and changeSource Code to click the Source Code button and select This feature will not be available.
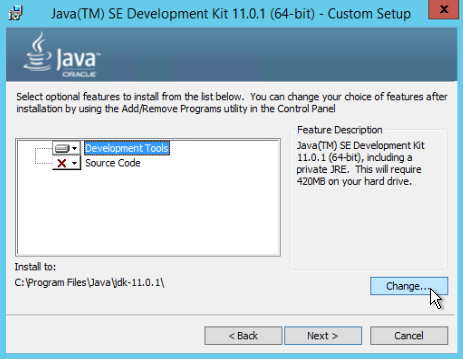
- Click Development Tools and then click the Change button.
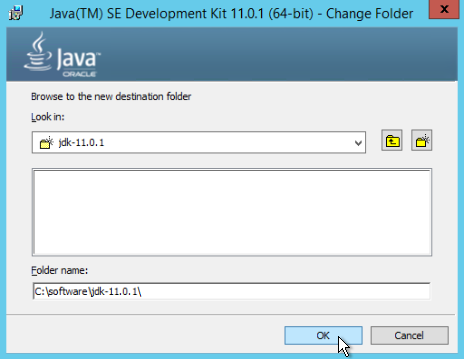
- Change C:\Program Files (x86)\Java\jdk1jdk-11.7.0_250.1\ to a shorter path without spaces in it, such as C:\software\jdk1jdk-11.70.0_25\.1\, and click OK.
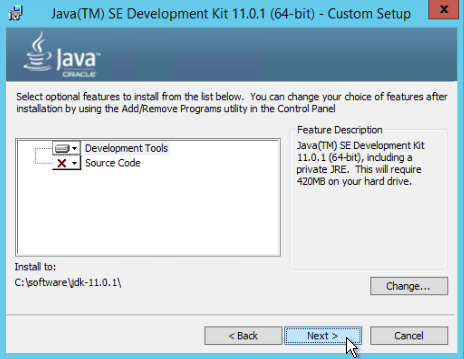
- Click Next to begin the installation .
- Click Close when finished.
- Open Control Panel by clicking Start, typing Control and pressing ENTER.
- From Control Panel, navigate to System > Advanced system settings and then click Environment Variables.and click Close when it finishes.
To configure the Java environment
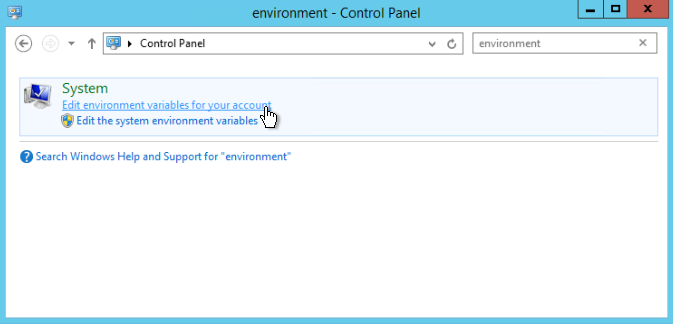
- From the Start menu, type "Control" and press ENTER to open Control Panel.
- In Control Panel, search for "Environment" and under System, click the link for Edit environment variables for your account.
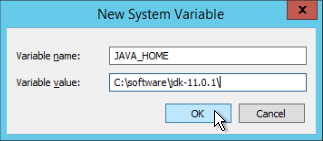
- In the System variables pane of the Environment Variables window that appears, click New.

- In the New System Variable dialog that appears, do type the following :
- Type JAVA_HOME in the Variable name field Type the installation values and click OK.
- Variable name: JAVA_HOME
- Variable value: installation path of the Java JDK, such as e.g. C:\software\jdk1jdk-11.7._25, in the Variable value field
- Click OK to close the dialog.
- 0.1\
- Close the Environment Variables window and then close Control Panel.
- Extract From the downloads mentioned as prerequisites above, extract i5_advanced_adapter_5.0.0.4_enterprise.zip to the root of the partition (C:\ in our example) and then navigate to .
- Navigate to the C:\i5_Advanced_Adapter_5.0.0.4_Enterprise\etc\LDAP Gateway folder.
- Extract ldapgateway.zip to the root of the partition (C:\ in our example).
- Extract From the downloads, extract jtopen_79_106.zip to a folder named jtopen_79_106 in the root of the partition (C:\ in our example).
- Navigate
- to the C:\jtopen_
- 9_
- 6\lib
- folder.
- Copy jt400.jar and util400.jar
- and paste them in the C:\ldapgateway\lib folder.
- Navigate to C:\ldapgateway\bin and open run.bat in the text editor of your choice.
Adjust the following line to the installation path of the Java JDK:
Code Block language java
Emacs set JAVA_HOME=\software\jdk1.
7.0_
01In our example, we change this line
to the following:
Code Block language java
theme Emacs set JAVA_HOME=C:\software\
jdk-11.0.1- Save and close the file.
To configure the IdentityForge as400.properties file
- Navigate to the C:\ldapgateway\conf folder and open the as400.properties file in the text editor of your choice.
From In the text editor, change the following parameter to true:
Code Block language java theme Emacs _isSSL_
Adjust the following parameters with the IP address of your target iSeries:
Code Block language java theme Emacs _host_ _agentHost_
Adjust the following parameters with the UID of the administrative AS/400 account:
Code Block language java theme Emacs _adminId_ _agentAdminId_
Place a '#' in front of the following parameters to comment them out:
Code Block language java theme Emacsjava _adminPwd_ _agentAdminPwd_
Remove the '#' from the following parameters to uncomment them:
CopyCode Block language java theme Emacs _adminPwdEncrypt_ _agentAdminPwdEncrypt_
- Save the file and leave it open for the encrypted hex values.
To encrypt hex values for the passwords
- Navigate to the C:\i5_Advanced_Adapter_5.0.0.4_Enterprise\scripts\propertyEncrypt.bat to folder and copy the propertyEncrypt.bat file.
- Paste the file in the C:\ldapgateway\dist and then open C:\ldapgateway\dist\propertyEncrypt.bat in folder, and then open the file in the text editor of your choice.
Adjust the following line to the installation path of the Java JDK:
Code Block language java theme Emacs set JAVA_HOME=C:\software\jdk1.5.0_15
In our example, this line is changed to the following:
Code Block language java theme Emacs set JAVA_HOME=C:\software\jdk1jdk-11.70.0_251
Scroll through the propertyEncrypt.bat file until you see the following line:
Code Block language java themeEmacs SET CLASSPATH=C:\software\identityforge\ldapgateway\dist\idfserver.jar
This Change this path needs to point to the IdentityForge installation directory. In our example, this line would be changed to the followingis:
Code Block language java themeEmacs SET CLASSPATH=C:\ldapgateway\dist\idfserver.jar
Scroll to the end of the propertyEncrypt.bat file until you see the following lines:
Code Block language java themeEmacs rem Start Property Encrypt Utility %JAVACMD% %JVM_OPTS% -cp %CLASSPATH% com.identityforge.idfserver.util.AESCipherUtil idfRacfPwd- Change the bolded text idfRacfPwd to the password of the AS/400 administrative account, then save the propertyEncrypt.bat fileclose and save the file.
Double-click propertyEncrypt.bat. You should to see something output similar to the following output:
Code Block language java theme Emacs New encrypted string as HEX: 10902AA71C4DF819C965E8B5B7DF0208
- Copy this the hex value (in our example, 10902AA71C4DF819C965E8B5B7DF0208) to the clipboard.
- Navigate to to the C:\ldapgateway\conf and open folder and open the as400.properties in file in the text editor of your choice.
Paste the hex value into the following parameters:
Code Block language java theme Emacs _adminPwdEncrypt_ _agentAdminPwdEncrypt_
To unpack the IdentityForge environment
- Navigate to C:\ldapgateway\dist and rename idfserver.jar to idfserver.zip.
- Extract the contents of idfserver.zip to C:\ldapgateway\dist\idfserver.
To configure the Front-End LDAP Administrative Account
The next step is to set the Front-End LDAP administrative account and password. This is the account used by EmpowerID to bind to the IdentityForge LDAP server.
Open C:\ldapgateway\dist\idfserver\beans.xml in the text editor of you choice and scroll to the below as400 section. We will be changing change the value for theFrontthe Front-End LDAP administrative account listed in bold:account adminUserDN and altAdminUserDN.
Code Block language xml theme Emacs <bean name="as400" singleton="true" class="com.identityforge.idfserver.backend.as400.As400Module">
Code Block language xml themeEmacs <property name="suffix" value="dc=as400,dc=com"/> <property name="workingDirectory" value="../as400"/> <property name="adminUserDN" value="cn=idfAs400Admin, dc=as400,dc=com"/> <property name="adminUserPassword" value="idfAs400Pwd"/> <property name="altAdminUserDN" value="cn=oimAs400Admin, dc=as400,dc=com"/> <property name="altAdminUserPassword" value="oimAs400Pwd"/> <property name="allowAnonymous" value="false"/> <property name="entryCacheSize" value="1000"/> <property name="defaultUacc" value="read"/> <property name="searchUsersType" value="user"/>
IdentityForge provides the ability to have allows two Front-End LDAP administrative accounts, but for our purposes we only need one.Change the adminUserDN and altAdminUserDN property values to the DN of the Front-End account you wish to use to bind to LDAP. For example:
Code Block language xml themeEmacs <bean name="as400" singleton="true" class="com.identityforge.idfserver.backend.as400.As400Module">
Code Block language xml themeEmacs <property name="suffix" value="dc=as400,dc=com"/> <property name="workingDirectory" value="../as400"/> <property name="adminUserDN" value="cn=EIDIDF, dc=as400,dc=com"/> <property name="adminUserPassword" value="idfAs400Pwd"/> <property name="altAdminUserDN" value="cn=EIDIDF, dc=as400,dc=com"/> <property name="altAdminUserPassword" value="oimAs400Pwd"/> <property name="allowAnonymous" value="false"/> <property name="entryCacheSize" value="1000"/> <property name="defaultUacc" value="read"/> <property name="searchUsersType" value="user"/>
- Open C:\ldapgateway\dist\propertyEncrypt.bat in the text editor of yur your choice.
Scroll to the end of the propertyEncrypt.bat file until you see the following lines:
Code Block language bash theme Emacs rem Start Property Encrypt Utility %JAVACMD% %JVM_OPTS% -cp %CLASSPATH% com.identityforge.idfserver.util.AESCipherUtil idfRacfPwd
- Change the bolded text idfRacfPwd to the password of the Front-End LDAP administrative account and then save the propertyEncrypt.bat file.
Double-click propertyEncrypt.bat. You should to see something output similar to the following output:
Code Block language bash theme Emacs New encrypted string as HEX: 10902AA71C4DF819C965E8B5B7DF0208
- Copy the value (in our example, 10902AA71C4DF819C965E8B5B7DF0208) to the clipboard.
Change the adminUserPassword and altAdminUserPassword property values to the encrypted password string in the clipboard. For example:
Code Block language xml theme Emacs <bean name="as400" singleton="true" class="com.identityforge.idfserver.backend.as400.As400Module">
Code Block language xml theme Emacs <property name="suffix" value="dc=as400,dc=com"/> <property name="workingDirectory" value="../as400"/> <property name="adminUserDN" value="cn=EIDIDF, dc=as400,dc=com"/> <property name="adminUserPassword" value="10902AA71C4DF819C965E8B5B7DF0208â/> <property name="altAdminUserDN" value="cn=EIDIDF, dc=as400,dc=com"/> <property name="altAdminUserPassword" value="10902AA71C4DF819C965E8B5B7DF0208"/> <property name="allowAnonymous" value="false"/> <property name="entryCacheSize" value="1000"/> <property name="defaultUacc" value="read"/> <property name="searchUsersType" value="user"/>
To configure the Back-End LDAP Administrative Account
The next step is to set the Back-End LDAP administrative password. This is the account used by EmpowerID to bind to the IdentityForge LDAP server and sync inventory to the Back-End.
- Open C:\ldapgateway\dist\idfserver\beans.xml in the text editor of your choice.
Scroll to the section shown below. We will be changing change the Back-End LDAP administrative account password listed in boldfor adminUserPassword and altAdminUserPassword:
Code Block language xml theme Emacs <bean name="hpbe2" singleton="true" class="com.identityforge.idfserver.backend.hpbe.HPBEModule"> <property name="suffix" value="dc=system,dc=backend"/> <property name="workingDirectory" value="../system"/> <property name="schema" ref="schemas"/> <property name="adminUserDN" value="cn=Directory Manager, dc=system,dc=backend"/> <property name="adminUserPassword" value="testpass"/> <property name="altAdminUserDN" value="cn=Directory Manager, dc=system,dc=backend"/> <property name="altAdminUserPassword" value="testpass"/> <property name="entryCacheSize" value="1000"/>
- Open C:\ldapgateway\dist\propertyEncrypt.bat in the text editor of your choice.
Scroll to the end of the propertyEncrypt.bat file until you see the following lines:
Code Block language bash theme Emacs rem Start Property Encrypt Utility %JAVACMD% %JVM_OPTS% -cp %CLASSPATH% com.identityforge.idfserver.util.AESCipherUtil idfRacfPwd
- Change the bolded text Change idfRacfPwd to the password of the Back-End LDAP administrative account and then save the propertyEncrypt.bat file.
Double-click propertyEncrypt.bat. You should to see something output similar to the following output:
Code Block language bash theme Emacs New encrypted string as HEX: 10902AA71C4DF819C965E8B5B7DF0208
- Copy the value (in our example, 10902AA71C4DF819C965E8B5B7DF0208) to the clipboard.
Change the adminUserPassword and altAdminUserPassword property values to the encrypted password string in the clipboard. For example:
Code Block language xml theme Emacs <bean name="hpbe2" singleton="true" class="com.identityforge.idfserver.backend.hpbe.HPBEModule"> <property name="suffix" value="dc=system,dc=backend"/> <property name="workingDirectory" value="../system"/> <property name="schema" ref="schemas"/> <property name="adminUserDN" value="cn=Directory Manager, dc=system,dc=backend"/> <property name="adminUserPassword" value="10902AA71C4DF819C965E8B5B7DF0208"/> <property name="altAdminUserDN" value="cn=Directory Manager, dc=system,dc=backend"/> <property name="altAdminUserPassword" value="10902AA71C4DF819C965E8B5B7DF0208"/> <property name="entryCacheSize" value="1000"/>
To configure SSL for the IdentityForge LDAP server
To configure secure communications between EmpowerID and the IdentityForge LDAP server we
willneed a PFX copy of the certificate being used by EmpowerID and an installed copy of OpenSSL to convert the PFX to a format usable by Java keystores.
- Install the Microsoft Visual C++ 2008 Redistributable Package (x86) by running vcredist_x86.exe.
- Next, install Win32 OpenSSL v1.0.1e Light by running Win32OpenSSL_Light-1_0_1e.exe. In our example, we are choosing an installation path of C:\software\OpenSSL-Win32.
- Click Next. When prompted where to copy the OpenSSL DLLs, choose The OpenSSL binaries (/bin) directory.
- Click Next and finish the installation.
- Copy the PFX certificate (named EIDcert.pfx in our example) to the root of the partition (C:\ in our example).
- Open a Command Prompt window and navigate to C:\software\OpenSSL-Win32\bin.
Execute the following command to convert the PFX file to a PEM file.
Code Block language bash theme Emacs openssl pkcs12 -in C:\EIDcert.pfx -out C:\EIDcert.pemThe OpenSSL toolkit will ask you to enter the import password; this is the pass phrase currently set on the PFX certificate. If you exported the certificate from the MMC snap-in, this will be the password you set on the certificate during the export.
- Enter the password for the certificate and press ENTER.
- Next OpenSSL will prompt for the PEM pass phrase. We are setting a new pass phrase here--be sure to remember this value! You can use the same password as the import password if you want. Enter the pass phrase and press ENTER, then enter the pass phrase again to confirm and press ENTER once more. We now have a PEM file available at C:\EIDcert.pem.
- Using a text editor of your choice, open the PEM file (C:\EIDcert.pem in our example). We need to extract the private key and place it in a separate file.
Find the following lines below:
Code Block language xml theme Emacs -----BEGIN ENCRYPTED PRIVATE KEY----- DATA HERE -----END ENCRYPTED PRIVATE KEY------ Copy everything from the beginning of the-----BEGIN ENCRYPTED PRIVATE KEY----- line to the end of the-----END ENCRYPTED PRIVATE KEY----- line and paste them into a new text file namedC:\encrypted.pem. Make sure there are no extra line breaks or spaces at the beginning or end of the file.
Next, we need to pull out the public key and put it into a separate file. Find the following lines below:
Code Block language xml theme Emacs -----BEGIN CERTIFICATE----- DATA HERE -----END CERTIFICATE------ Copy everything from the beginning of the -----BEGIN CERTIFICATE----- line to the end of the -----END CERTIFICATE----- line and paste them into a new text file named C:\cert.pem. Make sure there are no extra line breaks or spaces at the beginning or end of the file.
- Next, we need to decrypt the RSA private key.
- Open a Command Prompt window and navigate to C:\software\OpenSSL-Win32\bin.
Execute the following command:
Code Block language bash theme Emacs openssl rsa -in C:\encrypted.pem -out C:\key.pem
- When OpenSSL prompts you for the pass phrase, enter the PEM password you created earlier.
- Next, we need to convert the PEM files to DER files.
- Open a Command Prompt window and navigate to C:\software\OpenSSL-Win32\bin.
Execute the following two commands:
Code Block language bash theme DJango openssl pkcs8 -topk8 -nocrypt -in C:\key.pem -inform PEM -out C:\key.der -outform DER openssl x509 -in C:\cert.pem -inform PEM -out C:\cert.der -outform DER
Once these commands are completed, you will have two DER files. At this time it is recommended to delete the PFX and PEM files.
- Next, copy ImportKey.class to the Java JDK bin folder (C:\software\jdk1.7.0_25\bin in our example).
Open a Command Prompt, navigate to C:\software\jdk1.7.0_25\bin and execute the following command to merge the two DER certificate files into a single Java keystore.
Code Block language bash theme Emacs java ImportKey C:\key.der C:\cert.der
Note the following line: Using keystore-file : C:\Users\USERNAME\keystore.ImportKey.- Navigate to the above directory, rename the keystore.ImportKey file to as400.jks and then copy it to the IdentityForge \conf directory (C:\ldapgateway\conf in our example).
Finally, we need to configure IdentityForge to point to this Java keystore. Open C:\ldapgateway\dist\idfserver\beans.xml in the text editor of your choice and scroll to the following section. We will be changing the Java keystore filename listed in bold:
Code Block language xml theme Emacs <bean id="sslChannelFactory" class="com.identityforge.idfserver.nio.ssl.SSLChannelFactory"> <constructor-arg><value>false</value></constructor-arg> <constructor-arg><value>../conf/testnew.jks</value></constructor-arg> <constructor-arg><value>abc123</value></constructor-arg> <constructor-arg><value>false</value></constructor-arg> </bean>
Change the second constructor-arg value to the name of the Java keystore we created earlier. For example:
Code Block language xml theme Emacs <bean id="sslChannelFactory" class="com.identityforge.idfserver.nio.ssl.SSLChannelFactory"> <constructor-arg><value>false</value></constructor-arg> <constructor-arg><value>../conf/as400.jks</value></constructor-arg> <constructor-arg><value>abc123</value></constructor-arg> <constructor-arg><value>false</value></constructor-arg> </bean>
The final step is to set the Java keystore password. We will be changing the Java keystore password listed inbold:
Code Block language xml theme Emacs <bean id="sslChannelFactory" class="com.identityforge.idfserver.nio.ssl.SSLChannelFactory"> <constructor-arg><value>false</value></constructor-arg> <constructor-arg><value>../conf/as400.jks</value></constructor-arg> <constructor-arg><value>abc123</value></constructor-arg> <constructor-arg><value>false</value></constructor-arg> </bean>
- Open C:\ldapgateway\dist\propertyEncrypt.bat in the text editor of your choice.
Scroll to the end of the propertyEncrypt.bat file until you see the following lines of code:
Code Block language bash theme Emacs rem Start Property Encrypt Utility %JAVACMD% %JVM_OPTS% -cp %CLASSPATH% com.identityforge.idfserver.util.AESCipherUtil idfRacfPwd
- Change the bolded text to the password of the Java keystore. The default password is importkey. If you changed the keystore password earlier, please enter that value here instead. When finished, save the propertyEncrypt.bat file.
Double-click propertyEncrypt.bat. You should see something similar to the following output:
Code Block language bash theme Emacs New encrypted string as HEX: 10902AA71C4DF819C965E8B5B7DF0208
Copy this value (in our example, 10902AA71C4DF819C965E8B5B7DF0208) to the clipboard. Change the Java keystore password listed in bold to the encrypted password string in the clipboard. For example:
Code Block language xml theme Emacs <bean id="sslChannelFactory" class="com.identityforge.idfserver.nio.ssl.SSLChannelFactory"> <constructor-arg><value>false</value></constructor-arg> <constructor-arg><value>../conf/as400.jks</value></constructor-arg> <constructor-arg><value>10902AA71C4DF819C965E8B5B7DF0208</value></constructor-arg> <constructor-arg><value>false</value></constructor-arg> </bean>
Finally, since we are using an encrypted password for the Java keystore, we need to change the last constructor-arg value to true. For example:
Code Block language xml theme Emacs <bean id="sslChannelFactory" class="com.identityforge.idfserver.nio.ssl.SSLChannelFactory"> <constructor-arg><value>false</value></constructor-arg> <constructor-arg><value>../conf/as400.jks</value></constructor-arg> <constructor-arg><value>10902AA71C4DF819C965E8B5B7DF0208</value></constructor-arg> <constructor-arg><value>true</value></constructor-arg> </bean>
To configure SSL for the AS/400
To configure secure communications between the IdentityForge server and the AS/400 we will need to retrieve the SSL certificate from the OS/400 Certificate Manager.
- From a web browser, navigate to the Digital Certificate Manager on http://OS400domain:2001, where OS400domain is the OS/400 target system. Use the same user account and password that you use to access the OS/400.
- In the left panel, select Create Certificate Authority. If the Create Certificate Authority setting is not an option, select Install Local CA Certificate on Your PC.
- Select Install Certificate and copy the certificate to a text file. In our example we are copying the cert to the root of the partition, to C:\cert.cer.
Open a Command Prompt and navigate to the Java JDK bin folder. In our example, this is C:\software\jdk1.7.0_25\bin. Execute the following command:
Code Block language bash theme Emacs keytool -importcert -file C:\cert.cer -alias arbitraryaliashere -keystore C:\software\jdk1.7.0_25\jre\lib\security\cacerts
- The alias is just a text string used to reference the certificate--you can enter any value. Enter the default JDK keystore password (changeit) to confirm the addition.
To verify the presence of the certificate in the certificate store, run the following command:
Code Block language bash theme Emacs keytool -list -keystore C:\software\jdk1.7.0_25\jre\lib\security\cacerts
Enter the defaukt JDK keystore password (changeit) to view the contents of the Java keystore.
Info To allow IdentityForge and AS/400 to communicate through a firewall, the following ports may need to be opened between the IdentityForge server and the AS/400:
- Port 446 (TCP) DDM
- Port 448 (TCP) Secure DDM
- Port 449 (TCP) Server mapper
- Port 8470 (TCP) Central server
- Port 8475 (TCP) Remote command and program call server
- Port 8476 (TCP) Signon server
- Port 9470 (TCP) Secure central server
- Port 9475 (TCP) Secure remote command/ Program call server
- Port 9476 (TCP) Secure signon server
For more information, please see the following JTOpen and IBM iSeries documentation pages:
To package the IdentityForge environment
- Navigate to C:\ldapgateway\dist\idfserver, press CTRL+A to select all of files and folders in this location, then right click and choose Send to > Compressed (zipped) folder. This will create a .zip file in the C:\ldapgateway\dist\idfserver directory.
- Rename the .zip file to idfserver.jar. Copy idfserver.jar to C:\ldapgateway\dist.
- Overwrite the existing file.
To configure the IdentityForge windows service wrapper
- Execute C:\ldapgateway\bin\run.bat to start the IdentityForge server.
- To host the IdentityForge java executable as a windows service, navigate to C:\ldapgateway\win_service and open IDF-Win-Server.bat in the text editor of your choice.
Scroll to the section shown below. We will be changing the JAVA_HOME and JVM path variables listed in bold:
Code Block language bash theme Emacs set JAVA_HOME=C:\Program Files\Java\jre7 set JVM=C:\Program Files\Java\jre7\bin\client\jvm.dll
This path needs to point to the installation path of the Java JDK. In our example, this line would be changed to the following:
Code Block language java theme Emacs set JAVA_HOME=C:\software\jdk1.7.0_25 set JVM=C:\software\jdk1.7.0_25\jre\bin\client\jvm.dll
Scroll through the IDF-Win-Service.bat file until you see the HOME and APPLICATION_SERVICE_HOME variables listed in bold:
Code Block language bash theme Emacs set HOME=C:\ldfService\ldapgateway set APPLICATION_SERVICE_HOME=C:\ldfService\ldapgateway\win_service
This path needs to point to the IdentityForge installation directory. In our example, this line would be changed to the following:
Code Block language bash theme Emacs set HOME=C:\ldapgateway set APPLICATION_SERVICE_HOME=C:\ldapgateway\win_service
Scroll through the IDF-Win-Service.bat file until you see the SERVICE_NAME value listed in bold:
Code Block language bash theme Emacs set SERVICE_NAME=IdentityForgeService
This variable can be changed to a name of your choosing. This will be the name of the Windows service as shown in Service Manager.
Scroll through the IDF-Win-Service.bat file until you see the CG_STDOUTPUT variable listed below:
Code Block language bash theme Emacs set CG_STDOUTPUT=%CG_LOGPATH%\IDFServiceOut.log
In order to disable verbose logging, this line should be changed to the following:
Code Block language bash theme Emacs REM -- set CG_STDOUTPUT=%CG_LOGPATH%\IDFServiceOut.log
Scroll through the IDF-Win-Service.bat file until you see the CG_DESCRIPTION and CG_DISPLAY_NAME values listed in bold:
Code Block language bash theme Emacs Set CG_DESCRIPTION="Identity Forge Service for LDAP Gateway" set CG_DISPLAY_NAME=IdentityForgeService
These variables can be changed as you see fit. The text will become the description and the display name of the Windows service as shown in Service Manager, respectively.
- Open a Command Prompt window and navigate to C:\ldapgateway\win_service.
Execute the following command:
Code Block language bash theme Emacs IDF-Win-Service.bat install
If you wish to remove the service at a later date, execute the following command:
Code Block language bash theme Emacs IDF-Win-Service.bat remove
| Div | ||||||||||||||||||||||
|---|---|---|---|---|---|---|---|---|---|---|---|---|---|---|---|---|---|---|---|---|---|---|
| ||||||||||||||||||||||
|