Once you connect EmpowerID to ServiceNow, your ServiceNow developers can configure ServiceNow to create EmpowerID objects via service catalog requests. This topic demonstrates how to configure ServiceNow to add an EmpowerID group service catalog request.
| Info | ||||||||||||||||||
|---|---|---|---|---|---|---|---|---|---|---|---|---|---|---|---|---|---|---|
| ||||||||||||||||||
To configure ServiceNow to create EmpowerID groups, you need the following values from EmpowerID.
These values authenticate EmpowerID to ServiceNow. You also need an admin account in EmpowerID to supply ServiceNow with the credentials to create groups in EmpowerID. |
In ServiceNow, you need to create the following, all of which are covered in this topic.
- An OAuth provider that contains the information needed to connect with EmpowerID so that REST messages can be passed.
- Two new properties in the Request [sc_request] table to use in the Resume HTTP method of the REST message.
- workflowinstanceid
- workflowcorrelationid
- A REST message that calls the EmpowerID REST API with three POST HTTP methods.
- Default POST: for starting the workflow on the ServiceNow side
- Access Token: to get an access token for web API calls
- Resume Workflow POST: for starting the workflow on the EmpowerID side
- A Business Rule on the Approval table that tracks EmpowerID group requests in the Approval table, and passes values to the REST message.
- A ServiceNow workflow to handle user requests from the service catalog.
- A service catalog request so users can request EmpowerID groups through ServiceNow.
To create an OAuth provider
The OAuth provider contains the information needed to connect with EmpowerID so that REST messages can be passed.
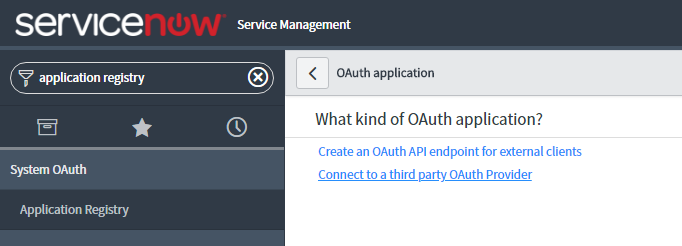
- Log in to your ServiceNow instance, and in the navigation pane, search for Application Registry and select it.
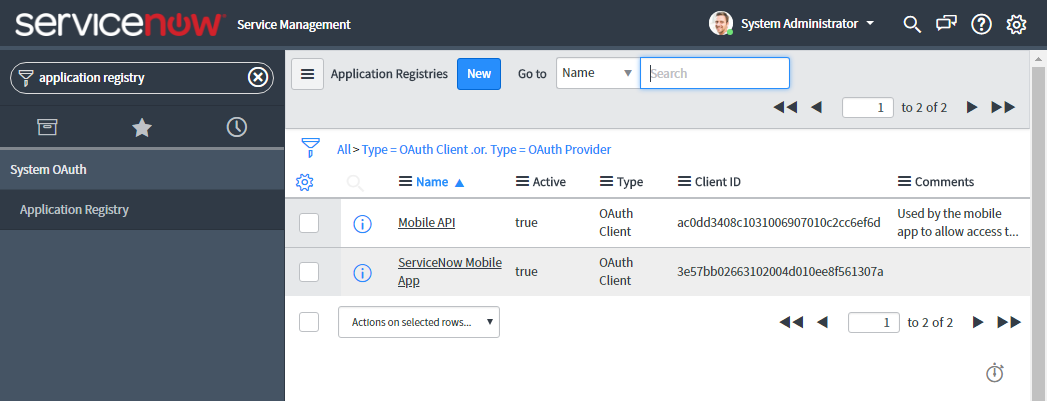
- Above the list of Application Registries, click the New button, and select Connect to a third party OAuth Provider.
- Configure the new Application Registry with the following settings. (Skipped settings retain their default values.)
- Name - EID
Client ID - The GUID from your EmpowerID OAuth application Client ID (Key)
Tip To find your EmpowerID OAuth settings in the web UI, expand Admin, then SSO Connections, and click OAuth. You can find all of the client settings in the DefaultEmpowerIDOauthApplication.
- Client Secret - The GUID from your EmpowerID OAuth application Client Secret
- OAuth API Script - Click the search icon and select OAuthUtil.
- Authorization URL - https://FQDN/oauth/v2/ui/authorize
Replace "FQDN" with the fully qualified domain name of your EmpowerID server (e.g. sso.empoweriam.com). - Token URL - https://FQDN/oauth/v2/token
- Redirect URL - https://FQDN/WebIdPForms/oauth/v2
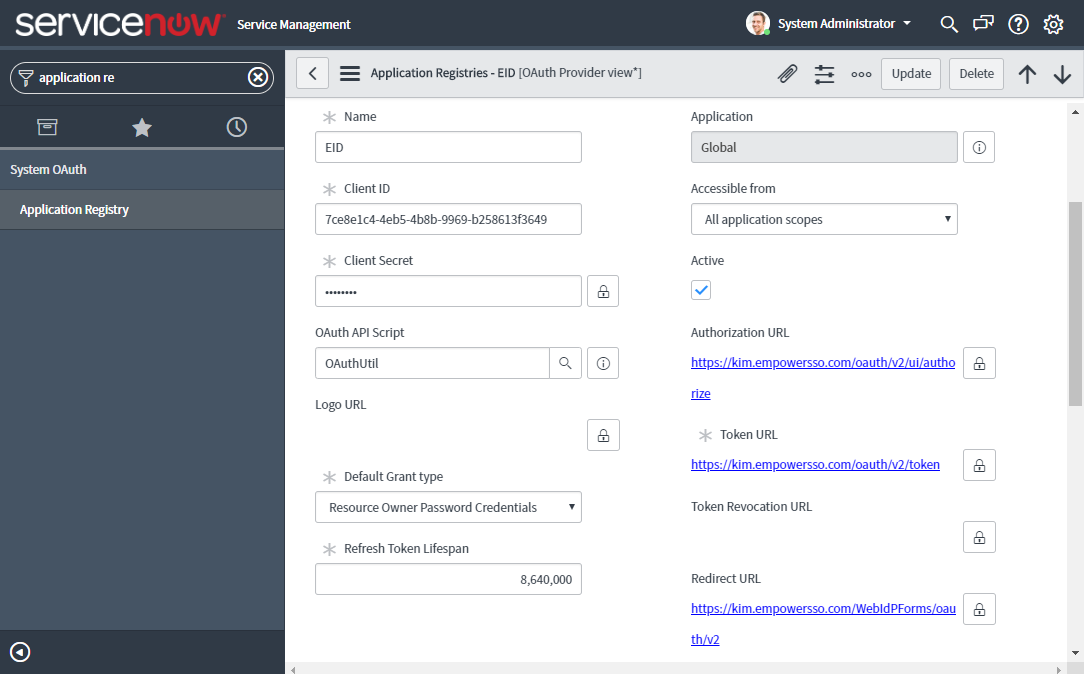
- Scroll to the bottom, and on the OAuth Entity Profiles tab, double-click the text Insert a new row and enter these values.
- Name - EID default_profile
- Is default - true
- Grant type - Resource Owner Password Credentials
- Click Submit to save the OAuth provider.
To add new columns to the Request table
Add two columns to the ServiceNow Request table to use in the Resume HTTP method parameters. The Resume method collects these values, along with the IsApproved value, via the HTTP query parameter script to pass to EmpowerID.
- Log in to your ServiceNow instance, and in the navigation pane, search for Tables and select the one under System Definition.
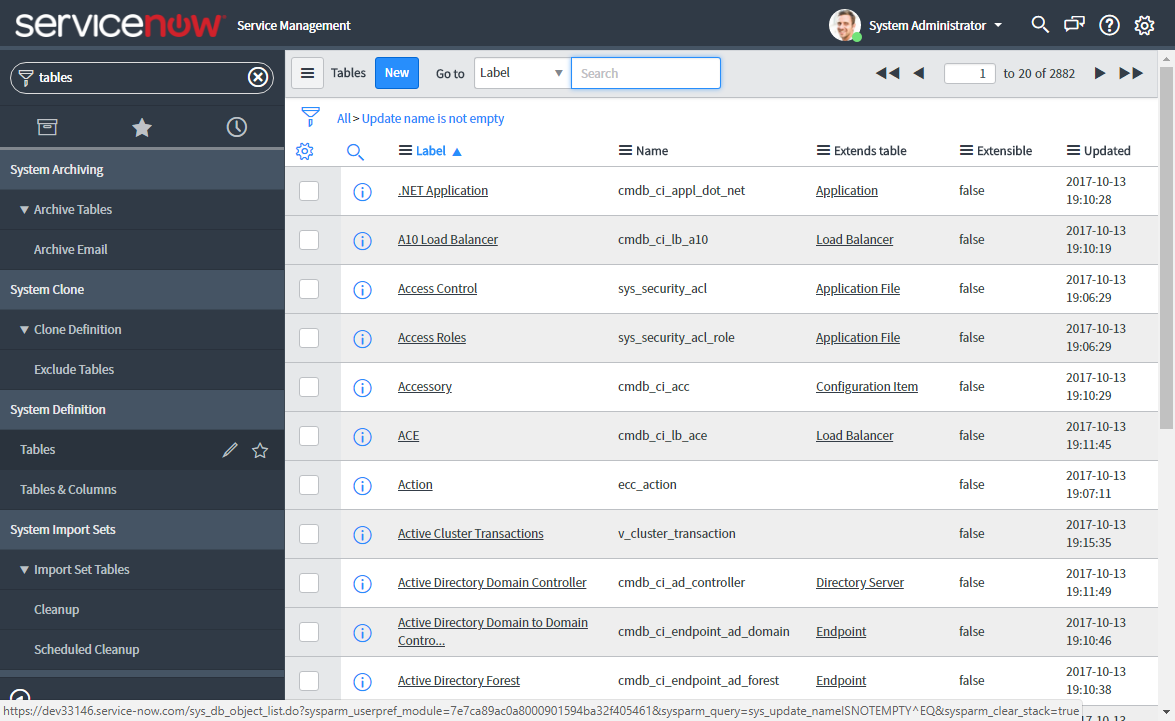
- Above the list of Tables, change the Go to drop-down from Name to Label, and search for Request.

- Click the Request [sc_request] table.
- On the Columns tab, click the New button to add a new Correlation ID column with the following settings. (Skipped settings can retain their default values.)
- Type - String
- Column label - Correlation ID
- Column name - (autofills after a pause) u_correlation_id
- Max length - 255
- Active - selected
- Display - selected
- Click Submit to save the new column.
- Back on the Columns tab, click the New button to add a new Workflow Instance ID column with the following settings. (Skipped settings can retain their default values.)
- Type - String
- Column label - Workflow Instance ID
- Column name - (autofills after a pause) u_workflow_instance_id
- Max length - 255
- Active - selected
- Click Submit to save the new column.
- Back on the Request table, click Update to save the new columns to the Request table.
To create a REST message
The REST message is what passes information between ServiceNow and the EmpowerID REST API. It uses three methods to communicate via EmpowerID's anonymous endpoints. One method passes access tokens, another responds to group requests created in EmpowerID with approval or rejection, and the third notifies EmpowerID to create a group from a request in the ServiceNow services catalog.
- In the navigation pane, search for REST Message and select it.
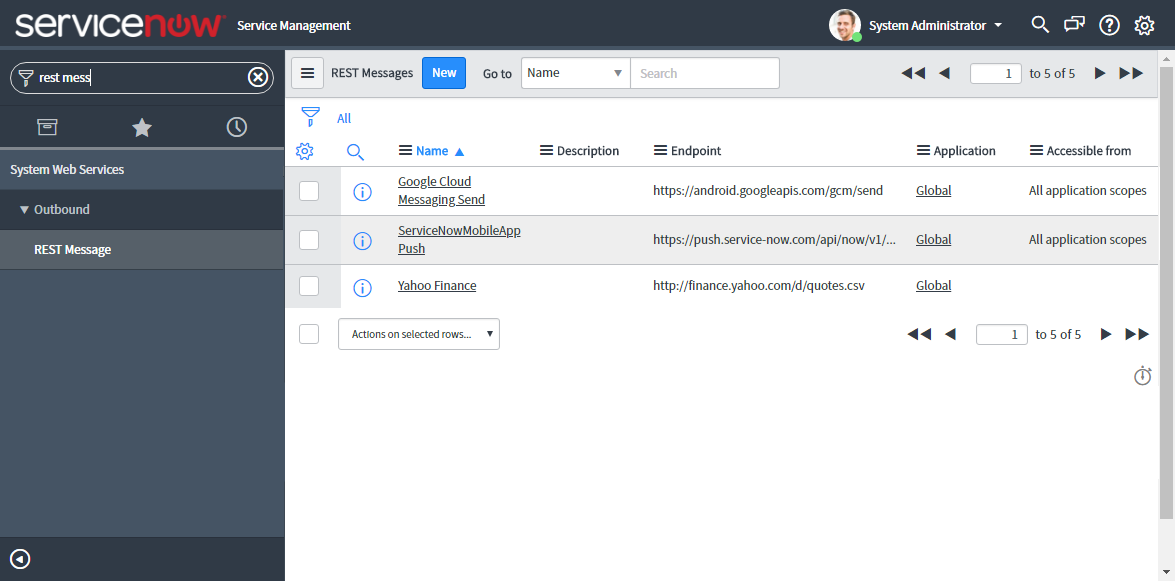
- Above the list of REST Messages, click the New button.
- Configure the new REST message with the following settings.
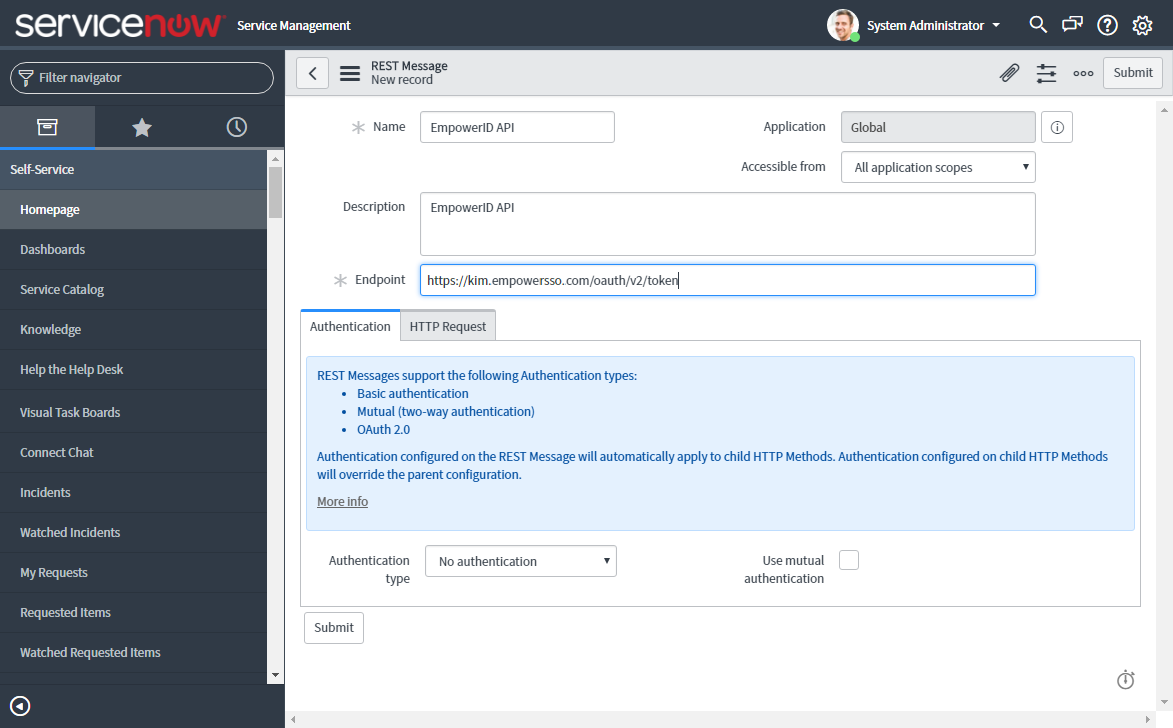
- Name: EmpowerID API
Take note of the name you use, as it is used in the Creating an Approval Business Rule script below. - Accessible from - All application scopes
- Endpoint - https://FQDN/oauth/v2/token
Replace "FQDN" with the fully qualified domain name of your EmpowerID server (e.g. sso.empoweriam.com).
- Name: EmpowerID API
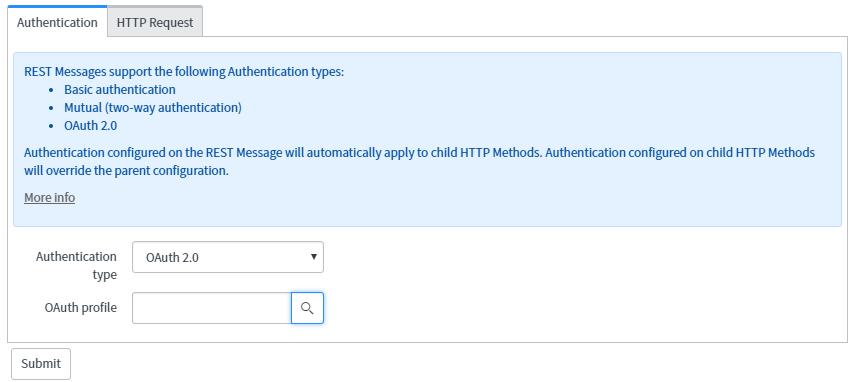
- On the Authentication tab:
- Change the Authentication type to OAuth 2.0.
- For the OAuth profile, click the search icon and select the EID default_profile that you created earlier.
- On the HTTP Request tab, add two HTTP Headers.
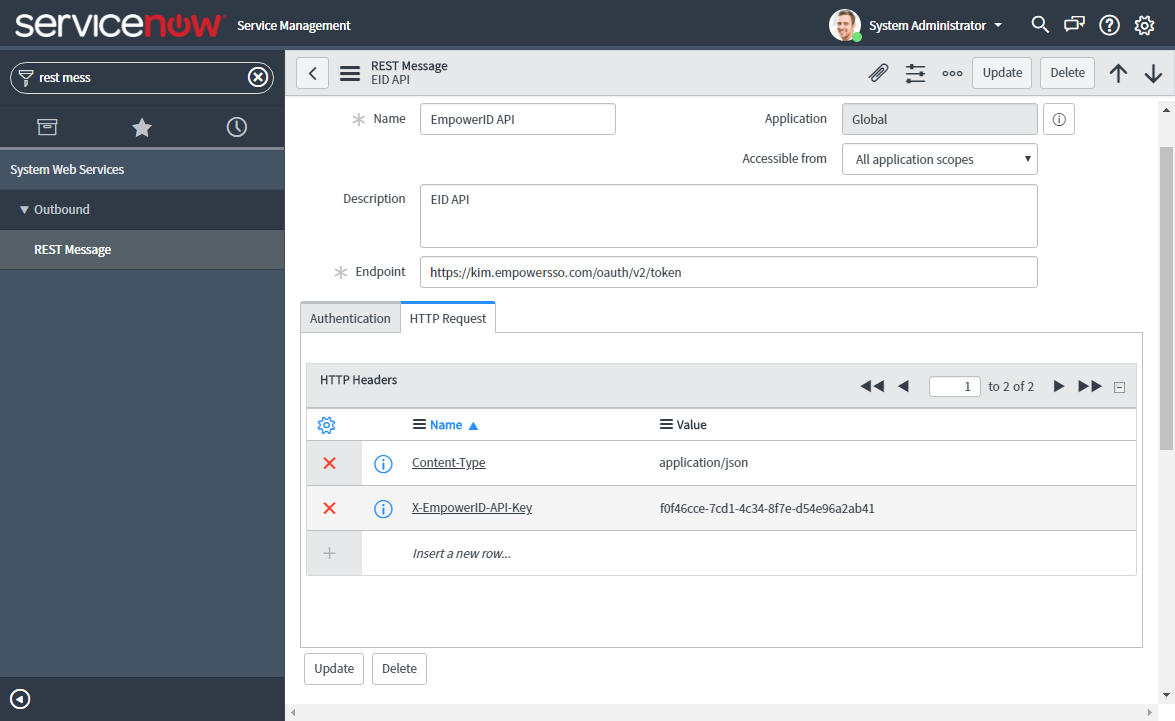
- In the list of HTTP Headers, double-click the text Insert a new row and enter these values.
- Name - Content-Type
- Value - application/json
- Insert another new row and enter these values.
- Name - X-EmpowerID-API-Key
Value - your EmpowerID OAuth application API key
Info You can find your OAuth application API key in EmpowerID by expanding Admin, then SSO Connections,and selecting OAuth. Click to open the DefaultSystemOAuthApplication (not the same as the one with the OAuth client keys), then click the Display Name to open it for editing. There you can copy the API Key for use in ServiceNow.
- In the list of HTTP Headers, double-click the text Insert a new row and enter these values.
- Click Submit to save the REST message. Back on the REST Messages list, click your newly created EmpowerID API REST message. A message at the top directs you to click the Get OAuth Token link to request a token.
Click the link, supply your EmpowerID admin username and password, and click Get OAuth Token.
Info If you are testing this in a lab setting, be sure to make your machine URL public so that ServiceNow can find it, and be sure that the same FQDN is in EmpowerID configurator for the web server and CDN server.
- Back on the EmpowerID API message, scroll to the bottom to see the HTTP Methods list.
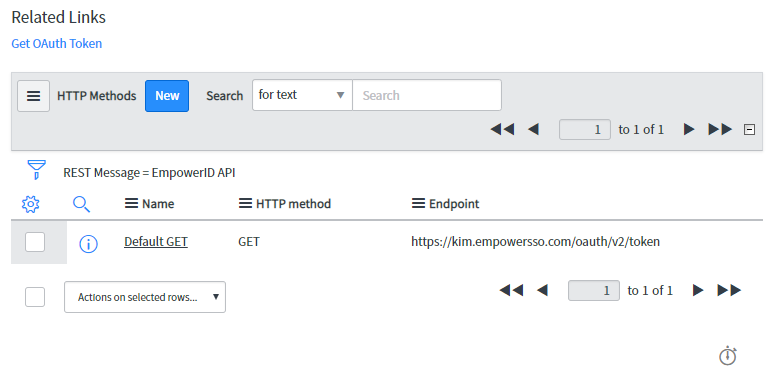
Next to HTTP Methods, click the New button to create a new POST method. Create three in total, with the following settings. (Click Submit after each to return to the main REST Message page where you can add the next.)
- Click the Submit (or Update) button to save the REST message.
To create an Approval business rule
The Approval table, where ServiceNow tracks EmpowerID group approval requests and their results, needs a business rule to pass values to the REST message.
- Log in to your ServiceNow instance, and in the navigation pane, scroll down and expand System Definition, then find and select Business Rules. (You can also search for Business Rules, and select the one nested under System Definition.)
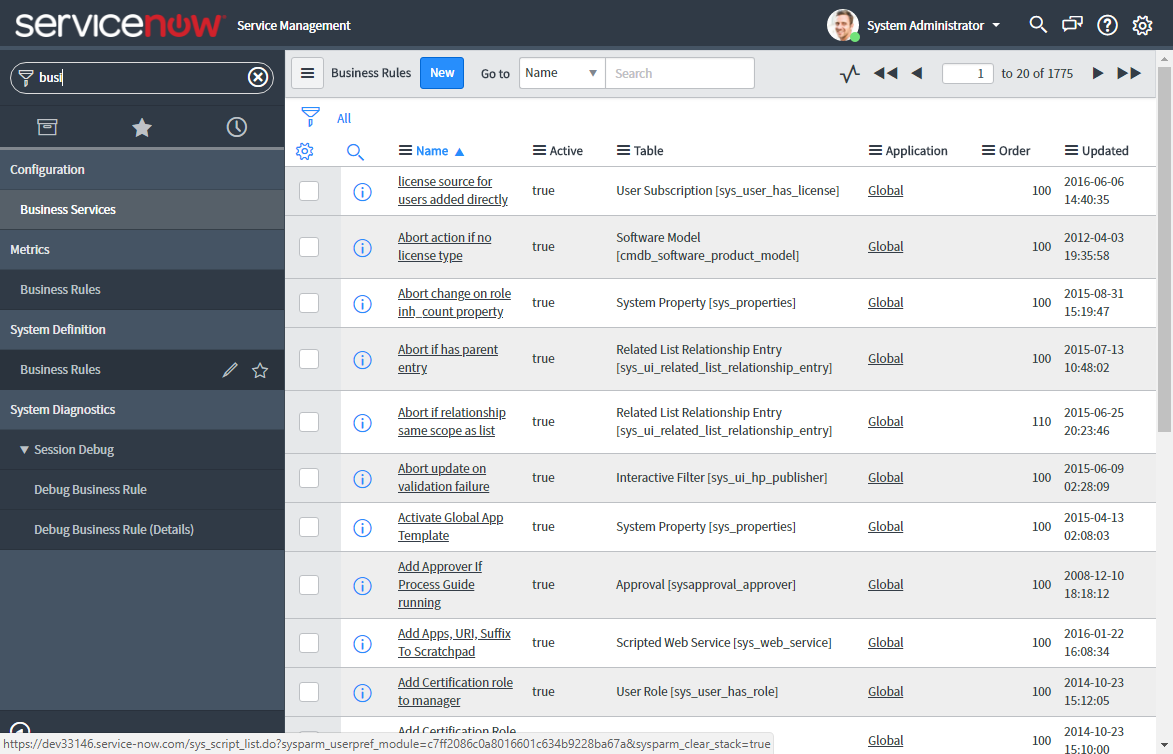
- Above the list of Business Rules, click the New button, and add a new one named EmpowerID BR.
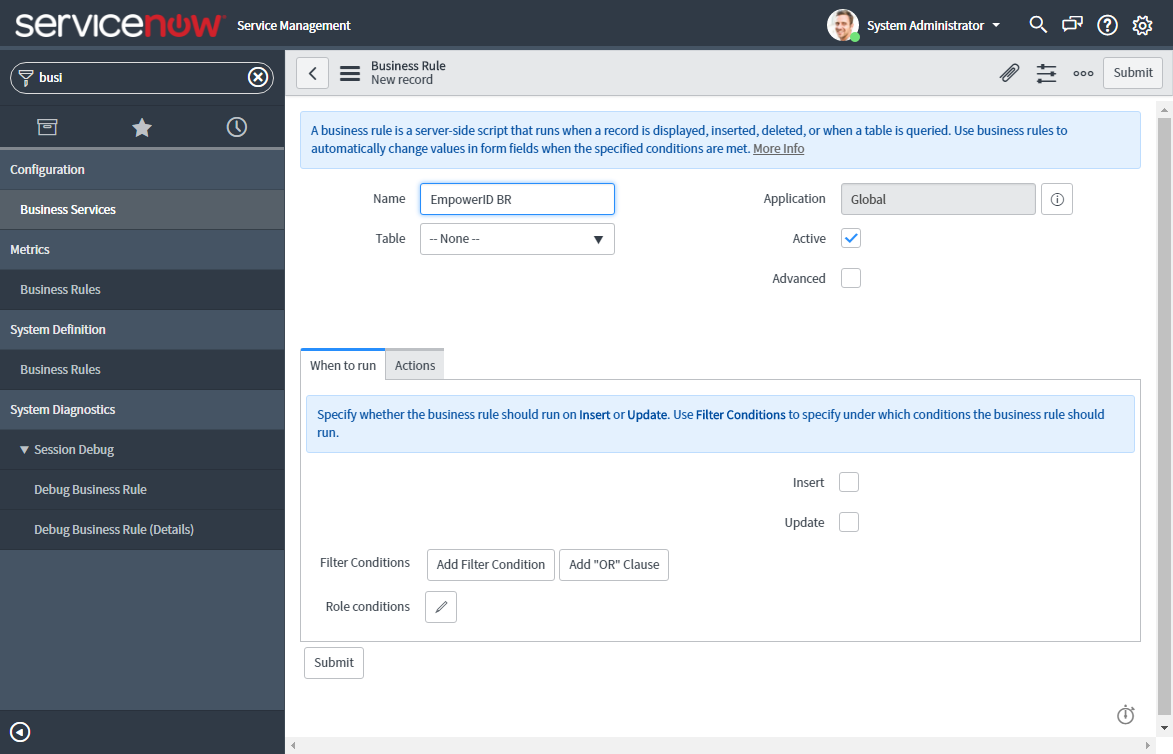
- Configure the new business rule with the following settings.
- Name - EmpowerID BR
- Application - Global (default)
- Table - Approval [sysapproval_approver]
- Active - selected (default)
- Advanced - selected (shows an advanced tab below, and adds fields)
- On the When to run tab, set When to "after," and select the Update checkbox.
On the Advanced tab, paste this script to replace the default stub.
Code Block language c# theme DJango (function executeRule(current, previous /*null when async*/) { // Code to create response for EmpowerID and update the Approval table try { var r = new sn_ws.RESTMessageV2("EmpowerID API", "Access Token"); var response = r.execute(); var responseBody = response.getBody(); var parser = new JSONParser(); var parsed = parser.parse(responseBody); var t = parsed.access_token; var regRecord = current.document_id.getRefRecord(); if(regRecord.getValue('u_workflow_instance_id') != null) { var r1 = new sn_ws.RESTMessageV2("EmpowerID API", "Resume"); r1.setStringParameterNoEscape("Token", t); r1.setStringParameterNoEscape("WorkflowInstanceID", regRecord.getValue('u_workflow_instance_id')); r1.setStringParameterNoEscape("CorrelationId", regRecord.getValue('u_correlation_id')); r1.setStringParameterNoEscape("IsApproved", current.state); var response1 = r1.execute(); var responseBody1 = response1.getBody(); var httpStatus1 = response1.getStatusCode(); } else { var req_item = new GlideRecord('sc_req_item'); req_item.addQuery('request', regRecord.sys_id); req_item.query(); if(req_item.next()) { var r2 = new sn_ws.RESTMessageV2("EmpowerID API", "Default POST"); r2.setStringParameterNoEscape("Token", t); r2.setStringParameterNoEscape("Name", req_item.variables["group_name"].toString()); r2.setStringParameterNoEscape("Description", req_item.variables["group_description"].toString()); r2.setStringParameterNoEscape("Decision", current.state); var response2= r2.execute(); var responseBody2= response2.getBody(); var httpStatus2 = response2.getStatusCode(); } } } catch(ex) { var message = ex.getMessage(); } })(current, previous);- Click Submit to save the business rule.

To create a Workflow
This is where you set up the workflow to run when a user requests an EmpowerID group from the service catalog.
- Log in to your ServiceNow instance, and in the navigation pane, search for Workflow Versions and select it.
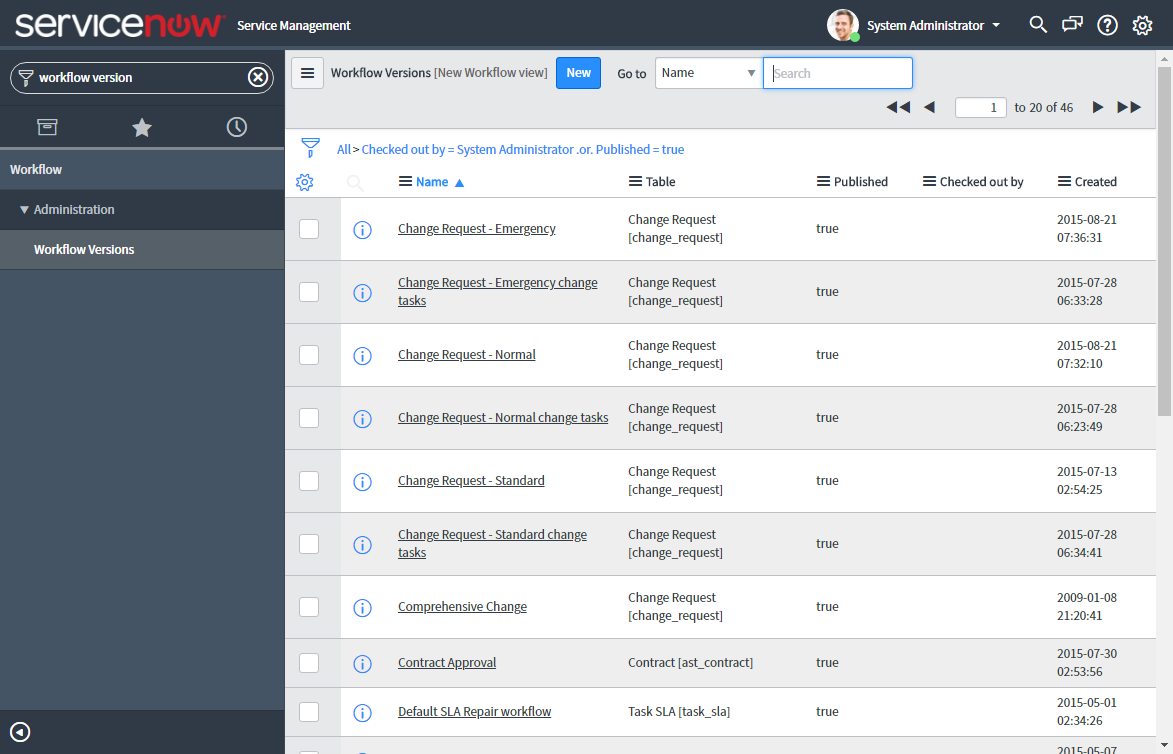
- Above the list of Workflow Versions, click the New button, and add a new workflow named EmpowerID WF.
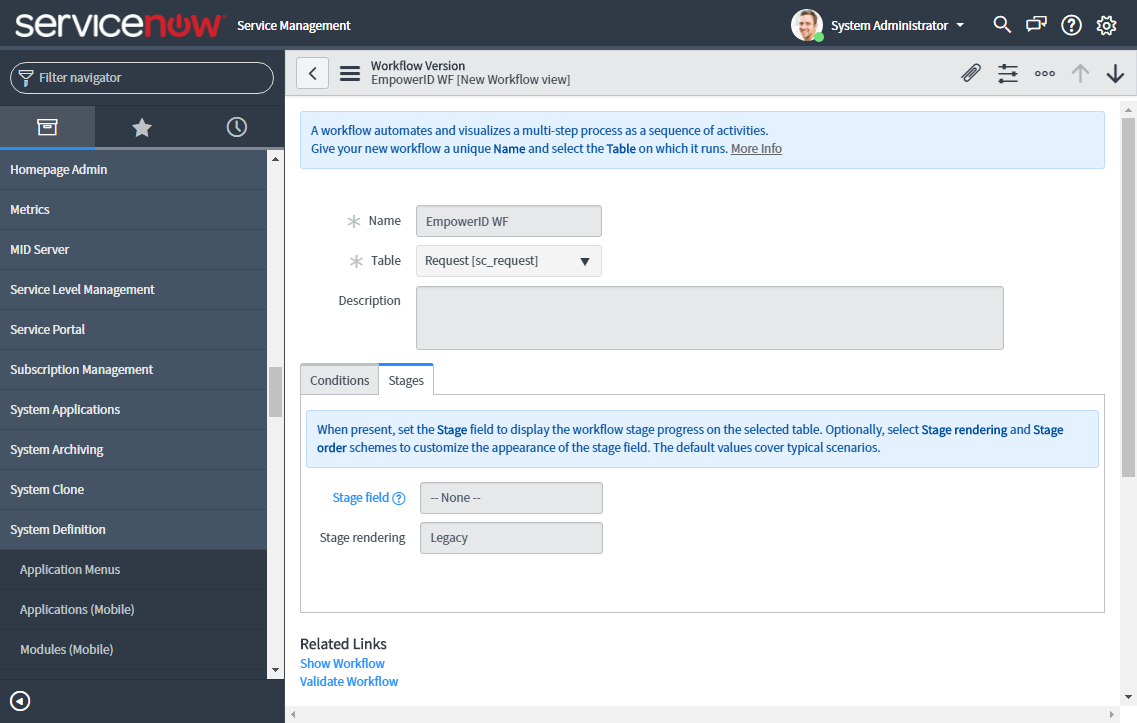
- Configure the new workflow version with the following settings.
- Name - EmpowerID WF
- Table - Request [sc_request]
- On the Conditions tab, leave the default value of Run the workflow (or Run the workflow always) with no conditions.
- On the Stages tab, leave the default value of Stage field (None) and change the Stage rendering value to Legacy.
- Click Submit to save the workflow version. A new tab opens with the visual workflow designer.
- From the Core tab on the right, drag workflow activities onto the designer to create a workflow like the one in this image using the settings below.
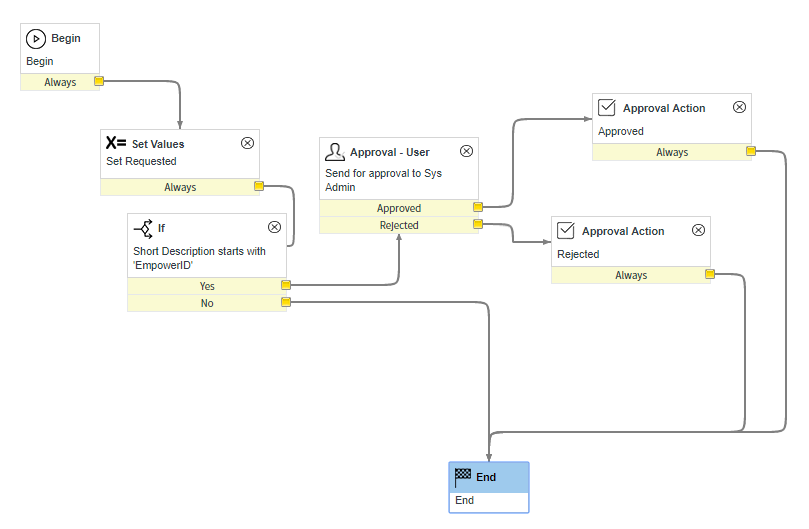
In the window that pops up when you drag each activity from a folder under Core Activities onto the workflow, use the settings in the boxes below the image.
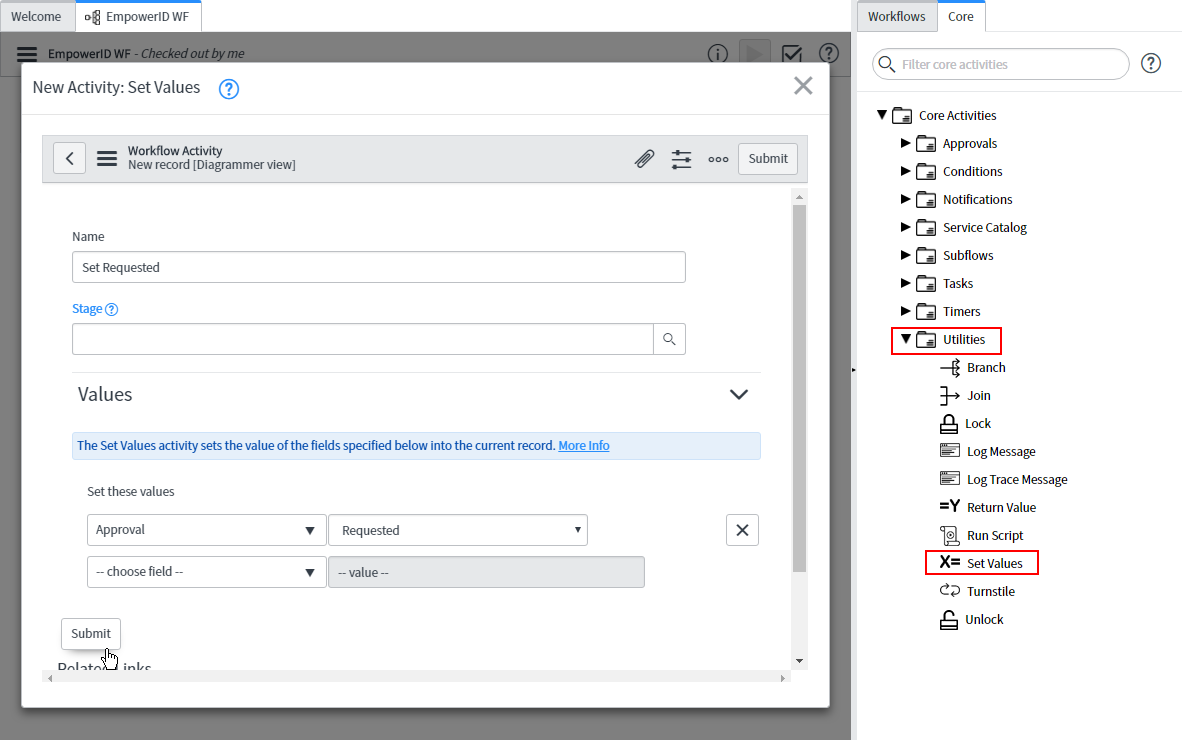
Info icon false title Set Requested From the Utilities folder, drag the Set Values activity onto the form and set it up with these values.
- Name - Set Requested
- Values --field-- - Approval
- Values --value-- - Requested
- Click Submit.
- Click the dark yellow dot on the default Begin activity and drag it to your new activity to create a flow arrow.
Info icon false title Short Description starts with 'EmpowerID' From the Conditions folder, drag the If activity onto the form and set it up with these values.
- Name - Short Description starts with 'EmpowerID'
- Condition --choose field - Short description
- Condition --choose operator - starts with
- Condition --(string) - EmpowerID
- Click Submit.
- Click the dark yellow dot on the Set Requested activity and drag it to your new activity to create a flow arrow.
Info icon false title Send for approval to Sys Admin From the Approvals folder, drag the Approval - User activity onto the form and set it up with these values.
- Name - Send for approval to Sys Admin
- Approvers --Users - System Administrator
- Condition for approval - use default values
- Schedule --Due date based on - A relative duration
- Schedule --Relative duration - 2 business days by 4pm
- Schedule --Schedule based on - A user specified schedule
- Schedule --Schedule - 8-5 weekdays
- Click Submit.
- Click the dark yellow dot on the Short Description starts with 'EmpowerID' activity's Yes option and drag it to your new activity to create a flow arrow.
- Click the dark yellow dot on the Short Description starts with 'EmpowerID' activity's No option and drag it to the End activity to create a flow arrow.
Info icon false title Approved From the Approvals folder, drag the Approval Action activity onto the form and set it up with these values.
- Name - Approved
- Action - Mark task approved
- Click Submit.
- Click the dark yellow dot on the Send for approval to Sys Admin activity's Approved option and drag it to your new activity to create a flow arrow.
- Click the dark yellow dot on the Approved activity and drag it to the End activity to create a flow arrow.
Info icon false title Rejected From the Approvals folder, drag the Approval Action activity onto the form and set it up with these values.
- Name - Rejected
- Action - Mark task rejected
- Click Submit.
- Click the dark yellow dot on the Send for approval to Sys Admin activity's Rejected option and drag it to your new activity to create a flow arrow.
- Click the dark yellow dot on the Rejected activity and drag it to the End activity to create a flow arrow.
- Click the Validate button (checkbox) above the workflow to ensure that it works.
- Click the hamburger menu at the top left and select Publish to make your workflow available to all users.
- If you need to edit the workflow, click the Show Workflow link at the bottom of the EmpowerID WF workflow version.
To create a service catalog request
The service catalog request provides a page in the ServiceNow service catalog where users can request a new EmpowerID group.
- Log in to your ServiceNow instance, and in the navigation pane, search for Maintain Items and select it. (Or navigate to Service Catalog, then Catalog Definitions, and select it from there.)
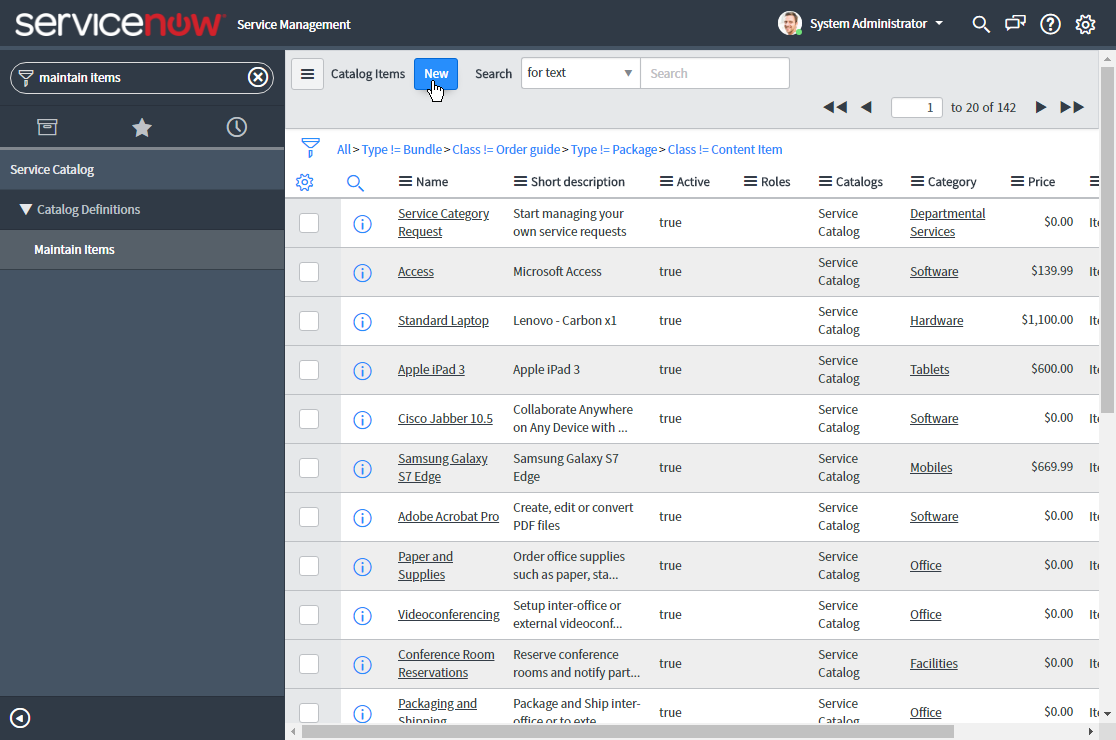
- Above the list of Catalog Items, click the New button, and add a new catalog item.
- Configure the new catalog item with the following settings.
- Name - EmpowerID Service Catalog Request
- Catalogs - Service Catalog
- Category - Services
- Short Description - Request EmpowerID Group
- Description - Create a group request. Once approved the group will be created in EmpowerID.
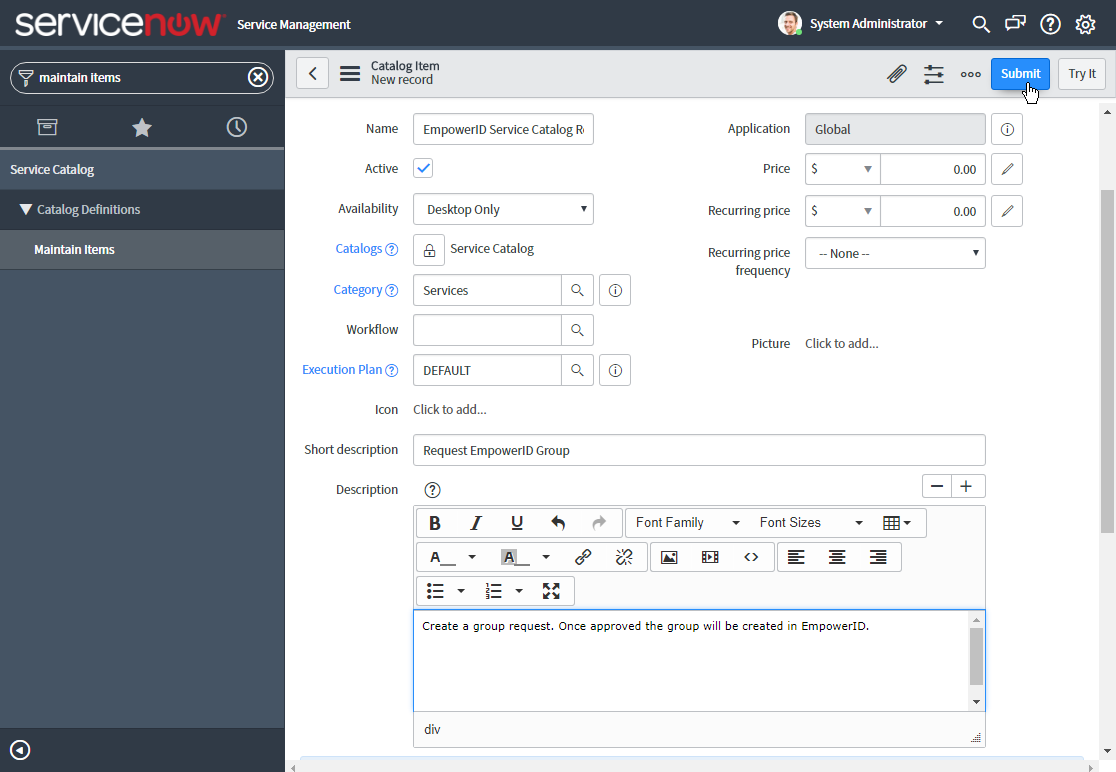
- Click Submit, then open the EmpowerID Service Catalog Request from the list of catalog items. (Change the Go to value to Name to search for it.)
- On the Variables tab at the bottom of the page, click New to add a variable with the following settings.
- Question - Group Description
- Name - group_description
- Tooltip - Enter a description for the group.
- Click Submit to save the variable.
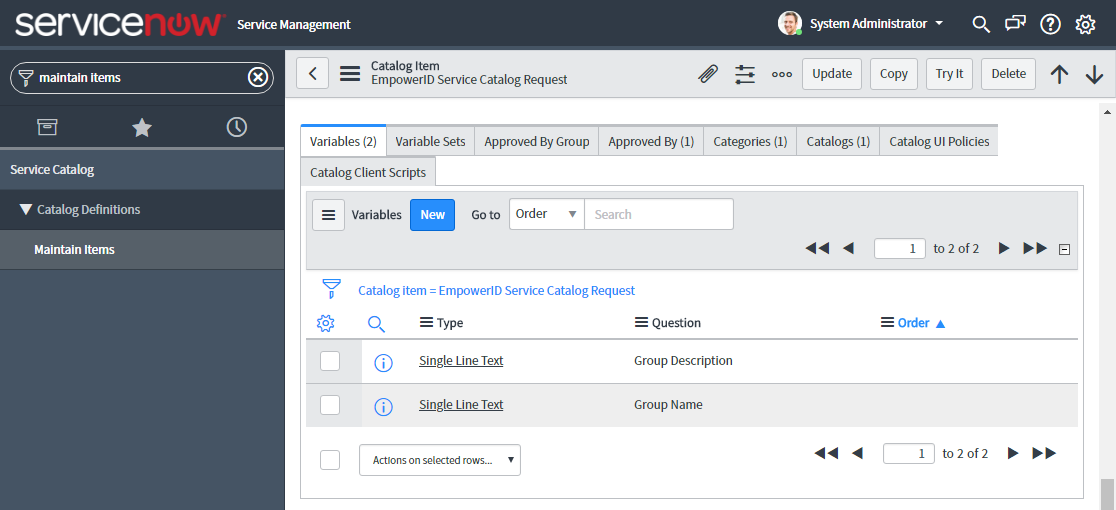
- Back on the Variables tab, click New to add a second variable with the following settings.
- Question - Group Name
- Name - group_name
- Tooltip - Enter the name of the group.
- Click Submit to save the second variable.
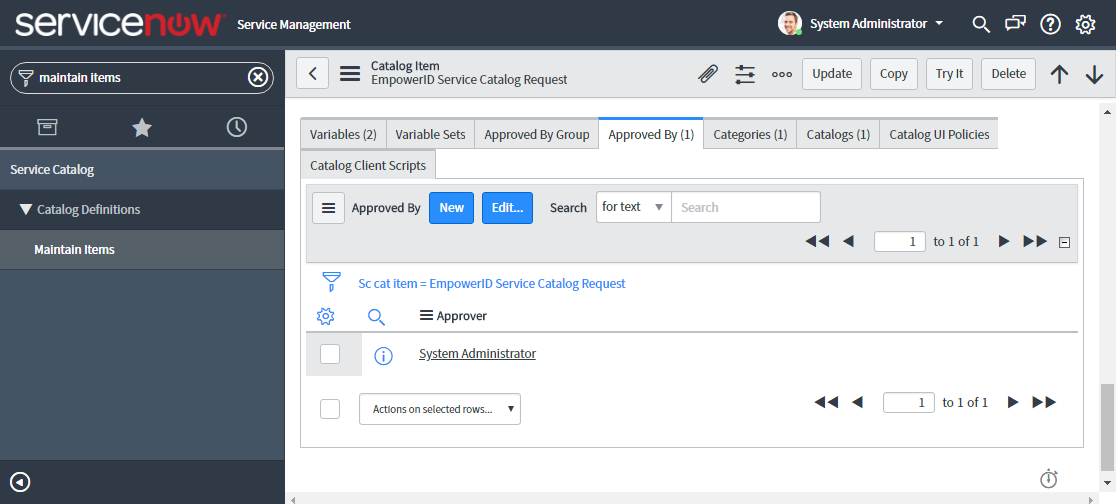
On the Approved By tab at the bottom of the page, click Edit to add an approver for EmpowerID group requests.
Note In the London version of ServiceNow, System Administrator is set by default, so you can skip this step.

- In the Collection search box, find and select System Administrator, and click the Add arrow to add it to the Approved By List.
- Click Save to save the approver.
| Tip |
|---|
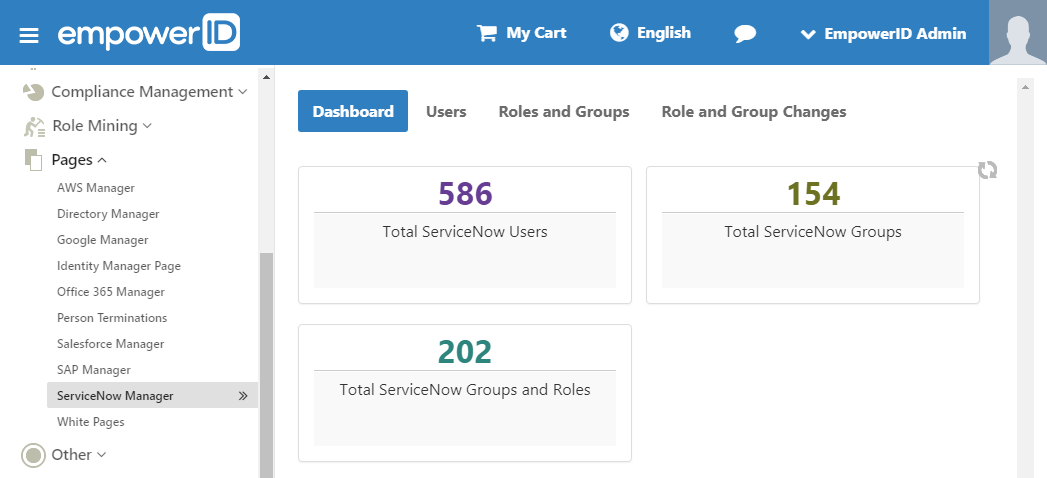
Once you have connected EmpowerID to ServiceNow, you can view and manage the users and groups associated with it from the ServiceNow Manager page in EmpowerID, located at "https://YourEmpowerIDServer/UI/#Common/Find/ServiceNowManager."
|
| Info | ||||
|---|---|---|---|---|
| ||||
| Div | ||||||||||||||||||||||||
|---|---|---|---|---|---|---|---|---|---|---|---|---|---|---|---|---|---|---|---|---|---|---|---|---|
| ||||||||||||||||||||||||
|