If your environment has Microsoft Exchange, you can configure EmpowerID to inventory and enforce permissions for your Exchange organization. If you are using Exchange, EmpowerID automatically discovers the organization during the initial Active Directory forest scan, categorizes it as a Resource System, and creates a record within the ExchangeMailbox table of the EmpowerID Identity Warehouse for each mailbox within the organization.
To work with Exchange after the initial inventory, you must:
- Enable the Exchange Management Host WCF Web Service on an EmpowerID Web server, enabled by default on All-In-One and Web Front-End server roles.
- Configure the Exchange Resource System to talk to the host on the specified EmpowerID Web server
EmpowerID directs all traffic for Exchange through the EmpowerID Exchange Services Web site and application pool in IIS.
To configure Exchange management
- Log into the EmpowerID web application as an administrator.
- In the navigation pane, expand Admin, then Applications and Directories, and select Account Stores and Systems.
- On the Resource Systems tab, the Exchange Organization appears as a Microsoft Exchange system type in the grid.

- Click the Display Name link of the Exchange Organization. In the Resource System Details page that appears, you can run inventory or other jobs. To edit the settings, click the Edit icon on the name of the organization.

- In the edit view of the page, you can edit values in any of the enabled fields on several tabs as detailed in the tables below. Do not enable inventory until the end.
When you have finished editing, click Save.
Info Clicking the Save button on any of the tabs saves any changed settings on all of the tabs, so there is no need to save it after each tab.
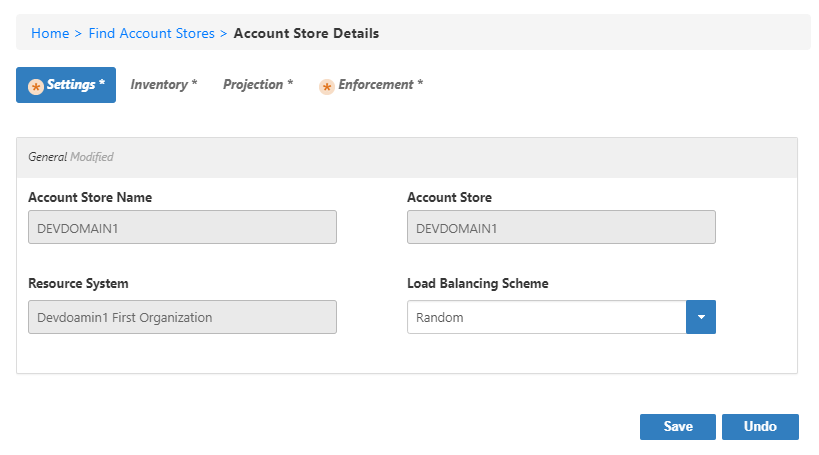
Settings Tab
| Setting | Description |
|---|---|
| Load Balancing Scheme | Click the drop-down arrow to select how EmpowerID decides which server to add new mailboxes to when there are multiple Exchange servers.
|
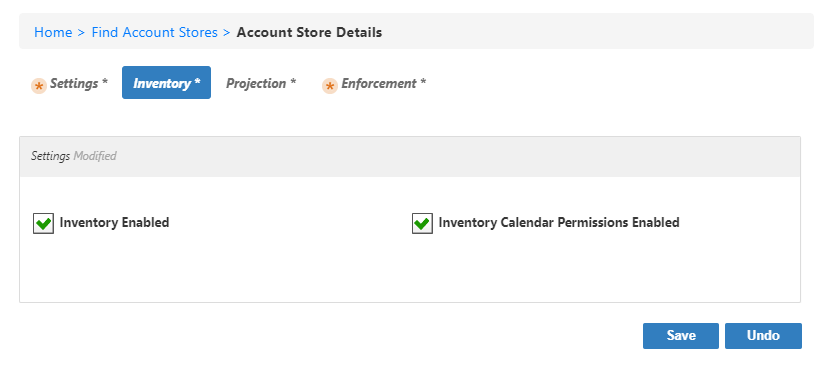
Inventory Tab
| Setting | Description |
|---|---|
| Inventory Enabled | Select to allow EmpowerID to inventory the Exchange organization. |
| Inventory Calendar Permissions Enabled | Select to allow EmpowerID to inventory calendar permissions for the Exchange organization. |
Projection Tab
| Setting | Description |
|---|---|
| Resource Role Group Membership Projection Enabled | Select to allow EmpowerID to dynamically manage the membership of the organization's groups, adding and removing users to and from groups based on policy-based assignment rules. |
| Projection Interval: Start | Set the date on which to begin projection. By default, this is set to the creation date of the account store. |
| Projection Interval: End | Set the date on which to stop projection. By default, this is set to ten years after the creation date of the account store, but since Run Indefinitely is selected by default, this value is ignored unless you clear that checkbox. |
| Projection Interval: (units) | Select the units for the interval at which to run projection. By default, this is set to 10 minutes.
|
| Run Indefinitely | Select to allow projection to run indefinitely, ignoring the End date. |
| Interval: (number) | Set the number of units for the interval at which to run projection. By default, this is set to 10 minutes. |

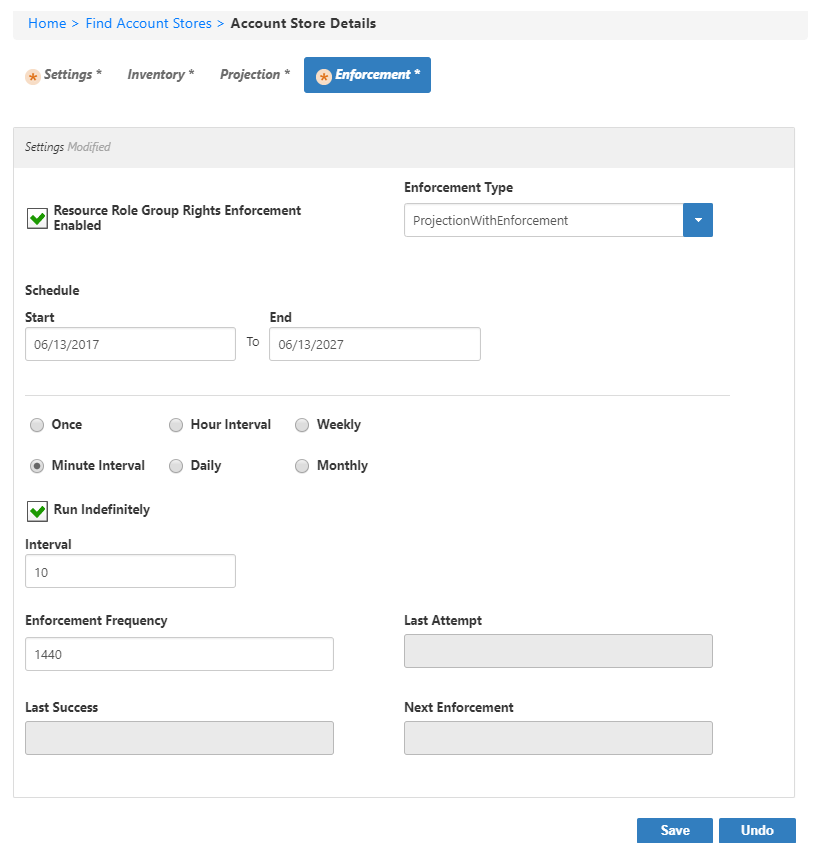
Enforcement Tab
| Setting | Description |
|---|---|
| Resource Role Group Rights Enforcement Enabled | Select to allow EmpowerID to determine who should have access to what in Exchange based on their assignments to Access Levels in EmpowerID and to enforce it using domain local groups (Resource Role Groups). |
| Enforcement Type | Select to specify how EmpowerID is to enforce rights in native systems.
|
| Schedule: Start | Set the date on which to begin enforcement. By default, this is set to the creation date of the account store. |
| Schedule: End | Set the date on which to stop enforcement. By default, this is set to ten years after the creation date of the account store, but since Run Indefinitely is selected by default, this value is ignored unless you clear that checkbox. |
| Interval: (units) | Select the units for the interval at which to run enforcement. By default, this is set to 10 minutes.
|
| Run Indefinitely | Select to allow enforcement to run indefinitely, ignoring the End date. |
| Interval: (number) | Set the number of units for the interval at which to run enforcement. By default, this is set to 10 minutes. |
| Enforcement Frequency | Set the re-enforcement frequency in minutes. |
| Info | ||||
|---|---|---|---|---|
| ||||
| Div | ||||||||||||||||||||||
|---|---|---|---|---|---|---|---|---|---|---|---|---|---|---|---|---|---|---|---|---|---|---|
| ||||||||||||||||||||||
|