The EmpowerID Domain Controller (DC) Filter is an optional plugin that you can install on all of your Active Directory domain controllers to synchronize passwords for users for their accounts in different account stores. It installs a PwdFilter and DC Filter Service on each domain controller.
When a password change occurs, PwdFilter calls the DC Filter Service, which in turn forwards the password sync request to the DCFilterService web service hosted on the EmpowerID Server, which triggers the Password Sync DC Filter workflow. The workflow takes these notifications and syncs the new password to any other user accounts owned by an EmpowerID Person as well as their Person object.
Or you can change the value specified for the RequestWorkflowID in the EmpowerID Identity Warehouse. If the value for the RequestWorkflowID is null (no workflow is specified), the password sync occurs through code; otherwise, the workflow handles the entire task. To sync to an unsupported system or provide additional logging, you can add custom logic to the workflow in Workflow Studio.
| Info |
|---|
The EmpowerID DC Filter Service is configured by default to use a service identity that is mapped to an EmpowerID Person to reset user account passwords in Active Directory. However, we recommend certificate-based authentication as problems can sometimes arise when using a service identity. This topic demonstrates installing and configuring the EmpowerID DC Filter Service using certificates for authentication. In this scenario, you need two certificates:
EmpowerID needs the public key of the client certificate. The domain controller needs the public key of the EmpowerID Server certificate and the root for that certificate. You need to add these certificates to the certificate stores on each machine (the domain controller and the EmpowerID server). |
The workflow looks like this. (A description follows the diagram.)
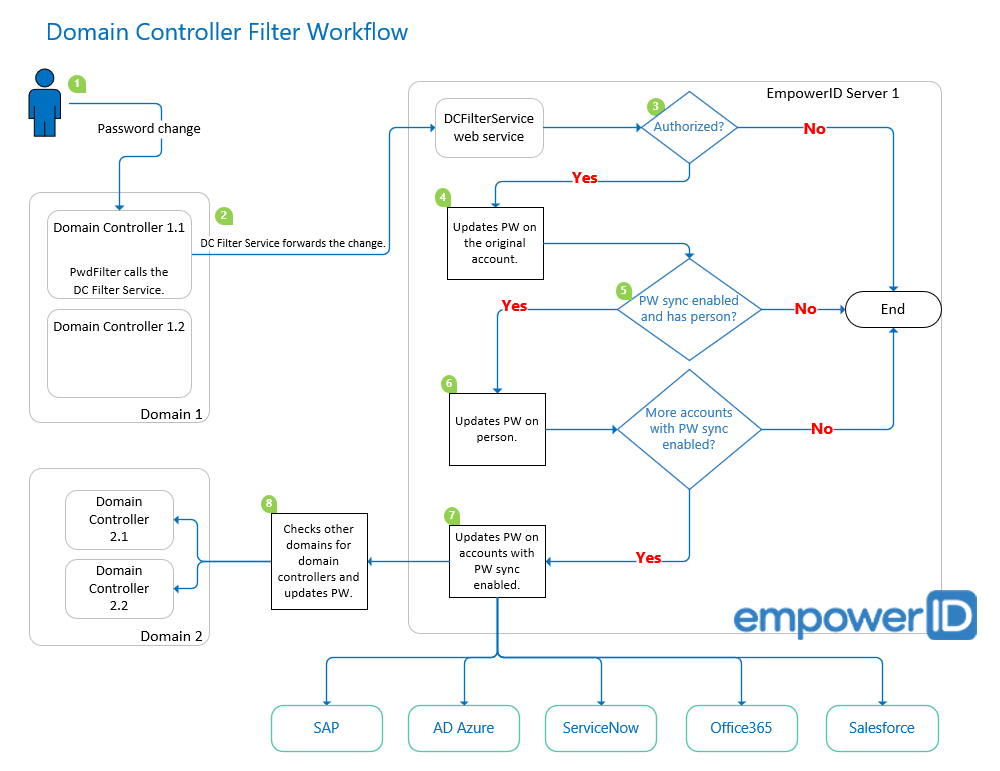
In the diagram, we have two domains, each with two domain controllers, one EmpowerID server, and a number of native systems.
When a user account password change occurs, the PwdFilter calls the DC Filter Service.
The DC Filter Service forwards the password sync request to the DCFilterService web service hosted on the EmpowerID server.
Insert excerpt IL:Password Encryption Note IL:Password Encryption Note nopanel true The Password Sync DC Filter workflow verifies whether the request is authorized.
If so, it updates the password on the user account.
The workflow then checks whether Allow Password Sync is enabled on the related account store, and whether the user account is linked to a person.
If so, it updates the password on the person and checks to see whether the person has more accounts with Allow Password Sync enabled.
If so, it updates the password on any user accounts linked to the person that have Allow Password Sync enabled.
Then it checks other domains to see whether they have domain controllers, and updates the password as appropriate.
| Warning |
|---|
The DC Filter Client certificate can be SHA-2 in EmpowerID 2016 and above, but must be SHA-1 in previous versions. |
This topic demonstrates how to install the EmpowerID DC Filter and is divided into the following activities:
Installing the Message Queuing feature on the domain controller
Installing the EmpowerID DC Filter Service on the domain controller
Exporting the public key and root certificates of the EmpowerID server certificate to the domain controller
Importing the public key and root certificates of the EmpowerID server certificate to the appropriate certificate stores on the domain controller
Exporting the public key of the client certificate to the Empower server
Adding the client certificate to the EmpowerID certificate store
Creating a certificate-based service configuration file in Workflow Studio
Editing the EmpowerID DC Password Filter Config file for certificate-based authentication
Creating an EmpowerID Person for the DC Password Filter Service
Delegating the DC Filter Password Sync Access Level to the EmpowerID Person
Mapping the Client Certificate to the EmpowerID Person
Testing the EmpowerID DC Filter
To install Message Queuing
Follow this installation on each Active Directory domain controller server.
Log into the server and in Server Manager, from the Manage menu, select Add Roles and Features.
In the Add Roles and Features Wizard that appears, click Next until you reach the Features tab.
Expand Message Queuing, then Message Queuing Services, and select Message Queuing Server. This provides the queuing system that the Windows EmpowerID DC Filter Service uses to store password requests until they are processed.
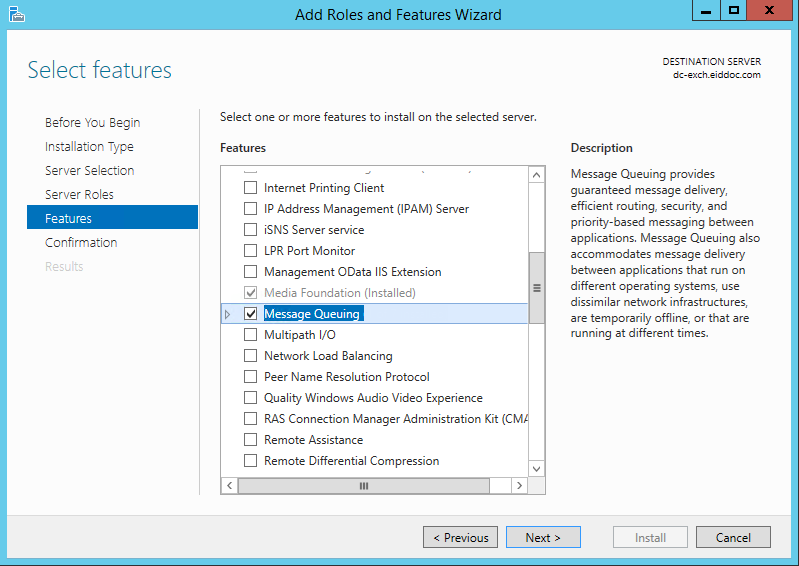
On the same tab, select .NET Framework 4.5 Features and .NET Framework 3.5 Features, click Next and then click Install.
To install the domain controller filter
| Warning |
|---|
The service account for the DC Filter must have logon as a service rights on all Domain Controllers. Otherwise the EmpowerID DC Filter service will not start. You can add the user in Administrative Tools, Local Security Policy, Local Policies, User Rights Assignment, then Log on as a service. |
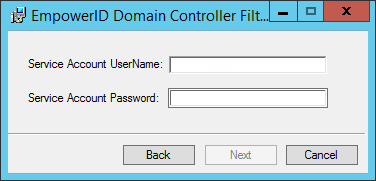
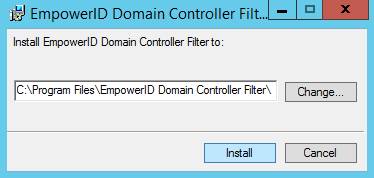
On each domain controller, double-click the EmpowerID.DCFilter.msi to launch the EmpowerID Domain Controller Filter Setup.
Enter the credentials for the Windows service account (local admin) that is to run the DC Filter Service and click Next. This accounts reads the EmpowerID DC Filter queue and sends any password change notifications to EmpowerID. (Note that you must specify the user name in the format domain\username.)
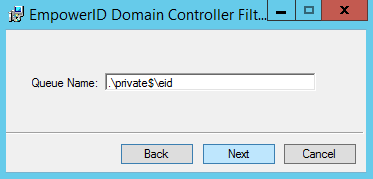
Insert excerpt IL:DC Service Account Note IL:DC Service Account Note nopanel true In the Queue Name field, type the path to the Private Queues section and the name of the queue where all password reset requests are to be processed, then press Tab and click Next to continue. The format for this is .\private$\queueName.
In the example below, we are creating a queue named eid in the Private Queues section.
Select the folder location in which to place the installed files and then click Install to continue.
In the User Account Control dialog, click Yes to allow the program to make changes.
Wait for the wizard to complete the installation and then click Finish.
Reboot the domain controller.
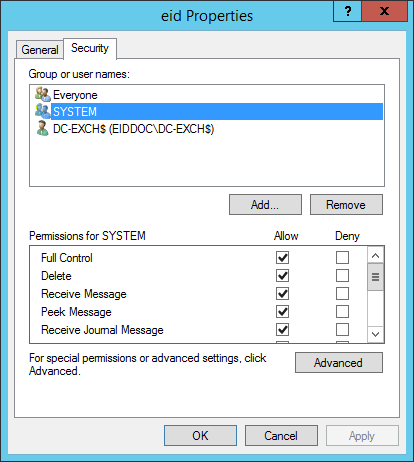
Open the Computer Management console and expand Services and Applications, then Message Queuing, and select Private Queues to see the private queue you created for the DC Filter.

Double-click the queue to open the Properties dialog for it.
Click the Security tab and then click the service account you specified for the DC Filter to verify that the account has full permissions on the queue.
To export the server certificates to the Domain Controller
On the EmpowerID server that is to receive messages from the domain controller, open MMC.exe.
From the File menu, select Add/Remove Snap-in, then select Certificates and click Add.
In the dialog that appears, select the option to manage certificates for Computer account and click OK.
Under the Console Root, expand Certificates (Local Computer), then Personal and select Certificates.
From the Personal Certificates store, right-click the EmpowerID Server certificate (the one beginning with an asterisk) and select All Tasks, then Manage Private Keys.
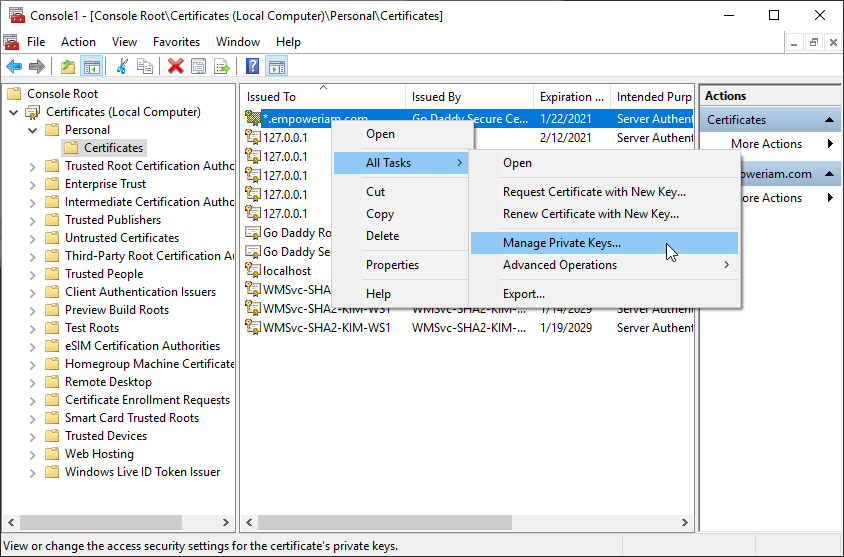
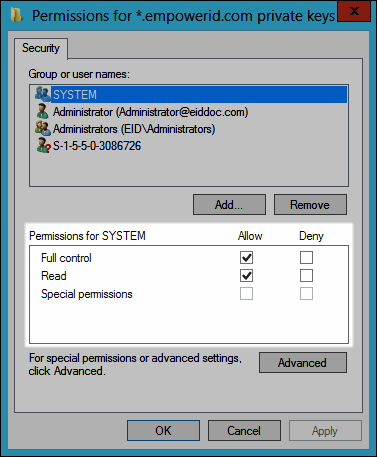
Ensure that the DC Filter service account you specified has permissions for the keys.
From the Personal Certificates store, right-click the EmpowerID server certificate and select All Tasks, then Export.
In the Certificate Export Wizard that appears, click Next.
Select No, do not export the private key and click Next.
Select DER encoded binary X.509 (.CER) and click Next.
Click Browse, navigate to an appropriate place on the domain controller in which to save the certificate, type a name for the certificate in the File name field and then click Save.
Back in the Certificate Export Wizard, click Next and then click Finish.
Click OK to close the certificate export success message.
Back in MMC, expand Trusted Root Certification Authorities and click Certificates.
From the Trusted Root Certification Authorities store, right-click the root certificate for the EmpowerID server certificate and select Export from the context menu.
In the Certificate Export Wizard that appears, click Next.
Select DER encoded binary X.509 (.CER) and click Next.
Click Browse, navigate to an appropriate place on the domain controller in which to save the certificate, then type a name in the File name field and click Save.
Back in the Certificate Export Wizard, click Next and then click Finish.
Click OK to close the certificate export message.
To import the server certificates to the DC Certificate Stores
On the domain controller, open MMC.exe and add the Certificates snap-in for the local computer.
From the File menu, select Add/Remove Snap-in, then select Certificates and click Add.
In the dialog that appears, select the option to manage certificates for Computer account and click OK.
Expand Certificates (Local Computer), then Personal, right-click Certificates and select All Tasks, then Import from the context menu.
In the Certificate Import Wizard that appears, click Next.
Click Browse, select the EmpowerID server public key certificate you just exported and then click Open.
Click Next.
Click Next again and then click Finish.
Click OK to close the import success message.
Back in the Certificates Snap-In of MMC, expand Trusted Root Certification Authorities, right-click Certificates and select All Tasks, then Import from the context menu.
In the Certificate Import Wizard that appears, click Next.
Click Browse, select the EmpowerID root certificate you exported earlier and click Open.
Click Next.
Click Next again and then click Finish.
Click OK to close the certificate import message.
To export the client certificate public key to the server
From the Certificates snap-in of your domain controller, navigate to the Personal Certificates store.
From the Personal Certificates store, right-click the client certificate and select All Tasks, then Export from the context menu.
In the Certificate Export Wizard that appears, click Next.
Select No, do not export the private key and click Next.
Select DER encoded binary X.509 (.CER) and click Next.
Click Browse, navigate to an appropriate place on the EmpowerID server in which to save the certificate, type a name for the certificate in the File name field and then click Save.
Back in the Certificate Export Wizard, click Next and then click Finish.
Click OK to close the certificate export message.
To add the client certificate to the server certificate store
In the EmpowerID Web interface navigation sidebar, expand Single Sign-On, then SSO Connections, and click SSO Components.
On the SSO Components page, click the Certificates tab and then click the Add button.
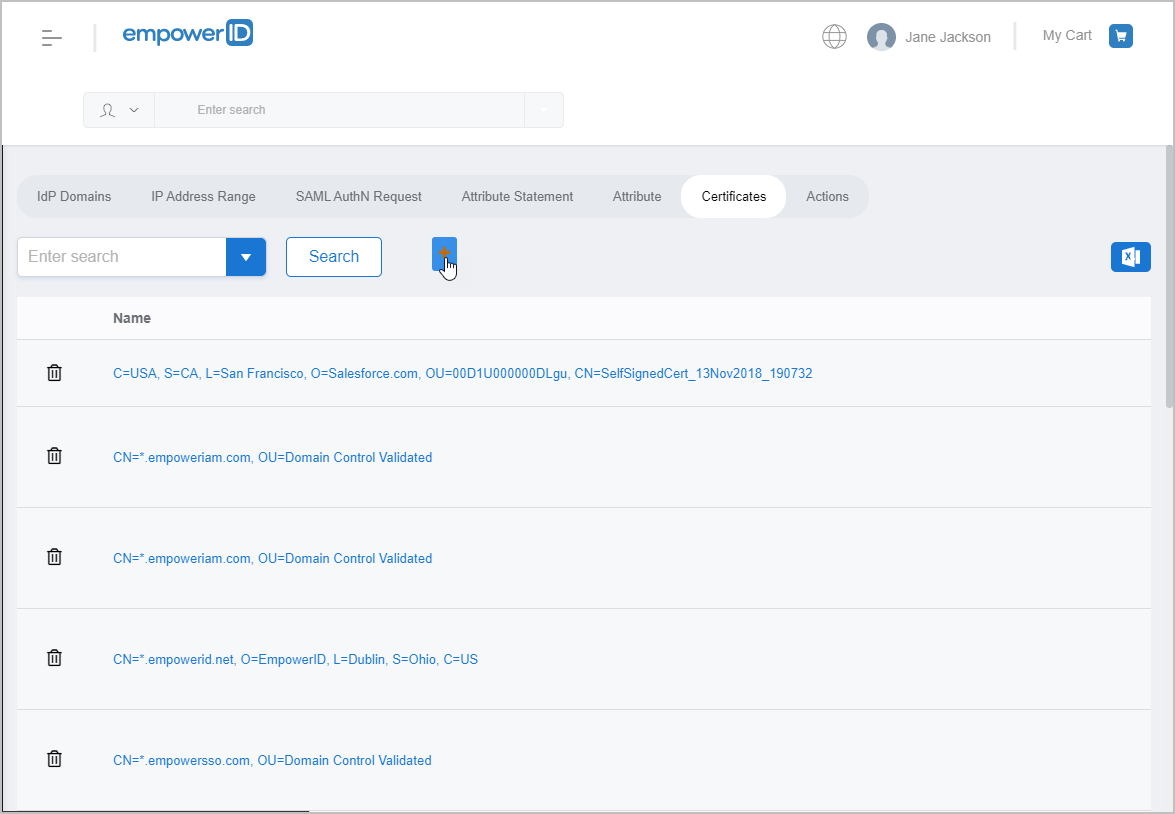
Browse for the client certificate you exported earlier and then click Open.
Leave Requires Password cleared.
Click Save.
To create a certificate-based service configuration file
On the EmpowerID server, log into Workflow Studio as an administrator.
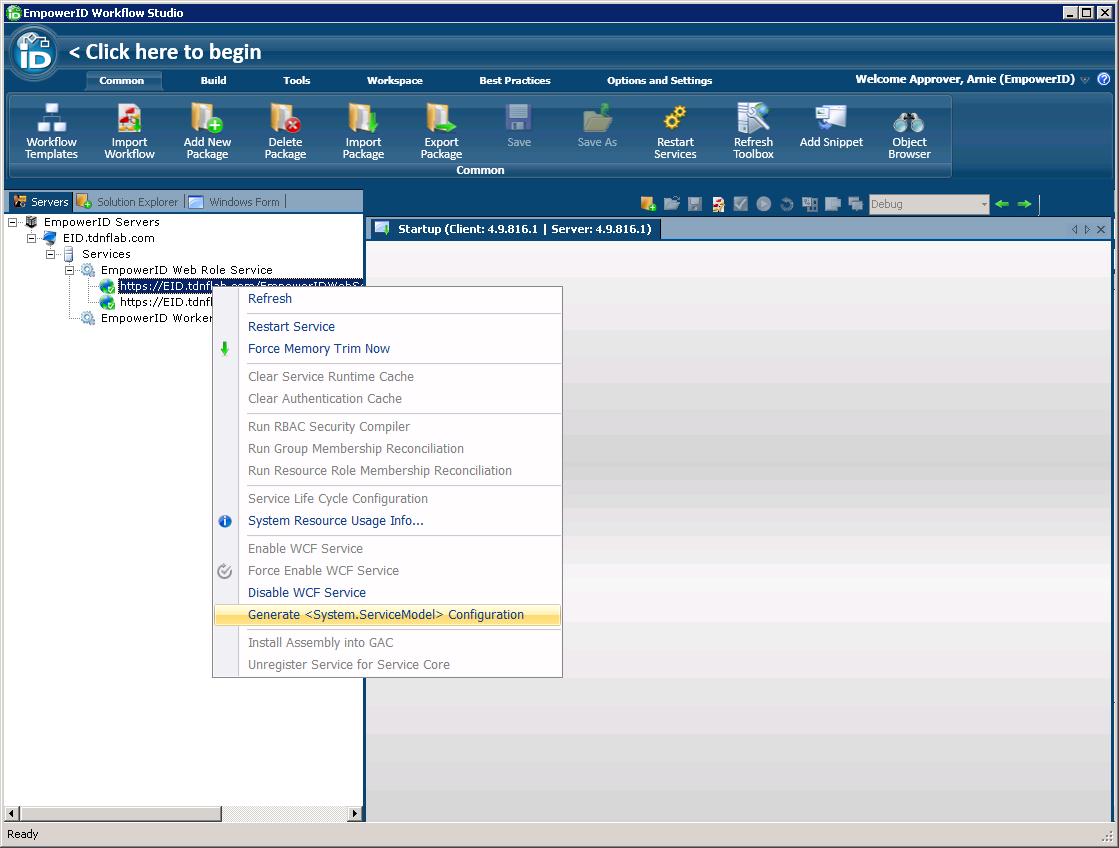
In Workflow Studio, click the Servers tab located to the left of Solution Explorer.
Expand the EmpowerID Servers > EmpowerID Server > Services > EmpowerID Web Role Service nodes in the servers tree and then right-click any one of the EmpowerID services and select Generate <System.ServiceModel> Configuration from the context menu.
In the Relying Party Config that is generated, click the Certificate tab and copy the XML.
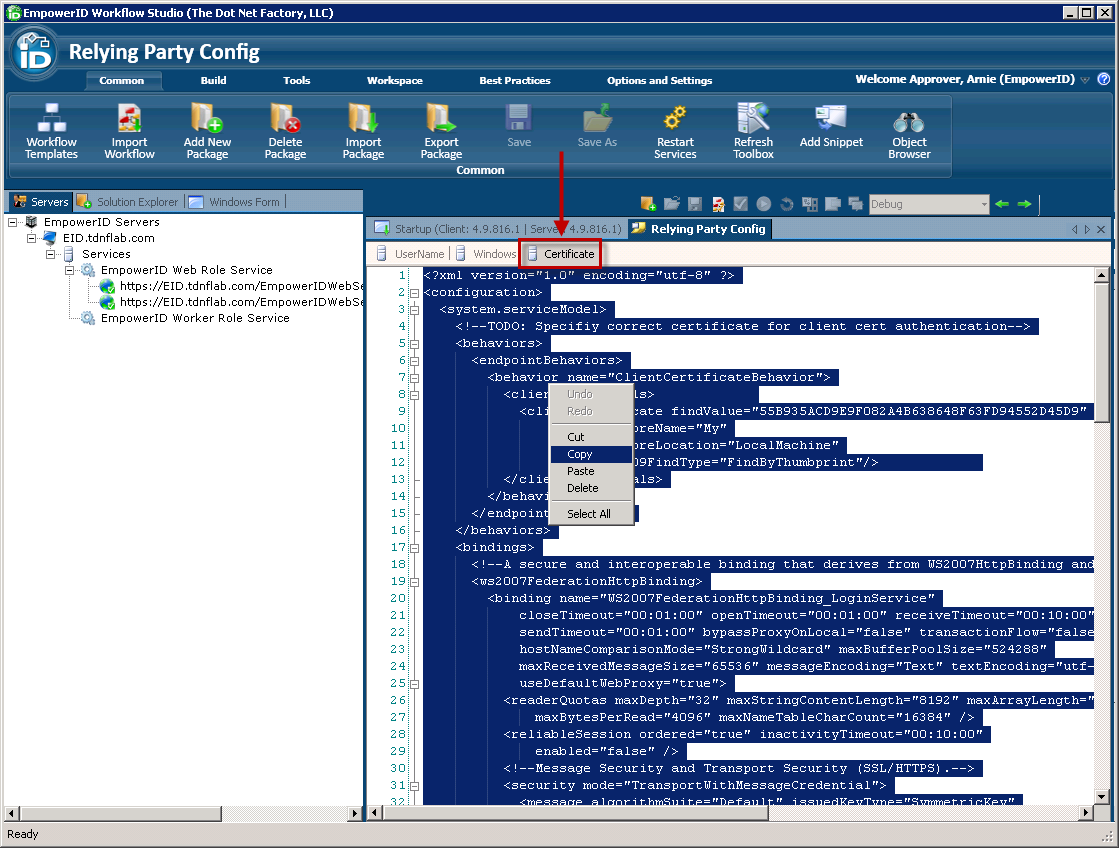
Open a text editor and paste the XML in to a blank document and then save the document as an XML file named EmpowerIDPwdFilterService.exe.config.
To edit the DC Password Filter Config file
On the domain controller, navigate to
C:\Program Files\EmpowerID Domain Controller Filter.Create a backup subfolder, and copy the existing EmpowerIDPwdFilterService.exe.config file into the new subfolder.
Locate the EmpowerIDPwdFilterService.exe.config file you created in Workflow Studio and paste it into the
C:\Program Files\EmpowerID Domain Controller Filterdirectory.When the Copy File dialog opens, select Copy and Replace.
Open the EmpowerIDPwdFilterService.exe.config file you just copied with a text editor.
To specify the correct certificate for client cert authentication, locate the clientCertificate attribute and replace the findValue value with the thumbprint of your client certificate.
Code Block language xml <clientCertificate findValue="9D49BEF8F5D9F419D61C5061869D1F7CFAAAA377" storeName="My" storeLocation="LocalMachine" x509FindType="FindByThumbprint"/>To specify the correct service contract, locate the endpoint attribute and change the address value to point to the DCFilterService.svc and the contract value to DCFilterService.DCFilterService.
Code Block language xml <endpoint address="https://EID.tdnflab.com/EmpowerIDWebServices/DCFilterService.svc binding="ws2007FederationHttpBinding" bindingConfiguration="WS2007FederationHttpBinding_LoginService" contract="DCFilterService.DCFilterService" name="WS2007FederationHttpBinding_LoginService" behaviorConfiguration="ClientCertificateBehavior">To specify the correct SSL certificate thumbprint, locate the certificateReference attribute and copy the findValue string.
Code Block language xml <certificateReference findValue="1F47DEA25442BCADB60BB8F5F1C6A14A9B82AC9B" isChainIncluded="false" storeName="My" storeLocation="LocalMachine" x509FindType="FindByThumbprint"/>From the Search menu of the text editor, select Replace.
In the Find what field, enter the copied findValue string.
In the Replace with field, enter the thumbprint of the SSL certificate used by the EmpowerID server and click Replace All.
Save your changes to EmpowerIDPwdFilterService.exe.config.
Restart the EmpowerID DC Filter service.
To install the system access certificate on the server
On the EmpowerID server, in File Explorer, navigate to
C:\Program Files\TheDotNetFactory\EmpowerID\Programs\System Certificates, right-click EmpowerIDSystemAccessCert.pfx and select Install PFX.Follow the steps in the wizard.
Repeat this process on each respective EmpowerID server.
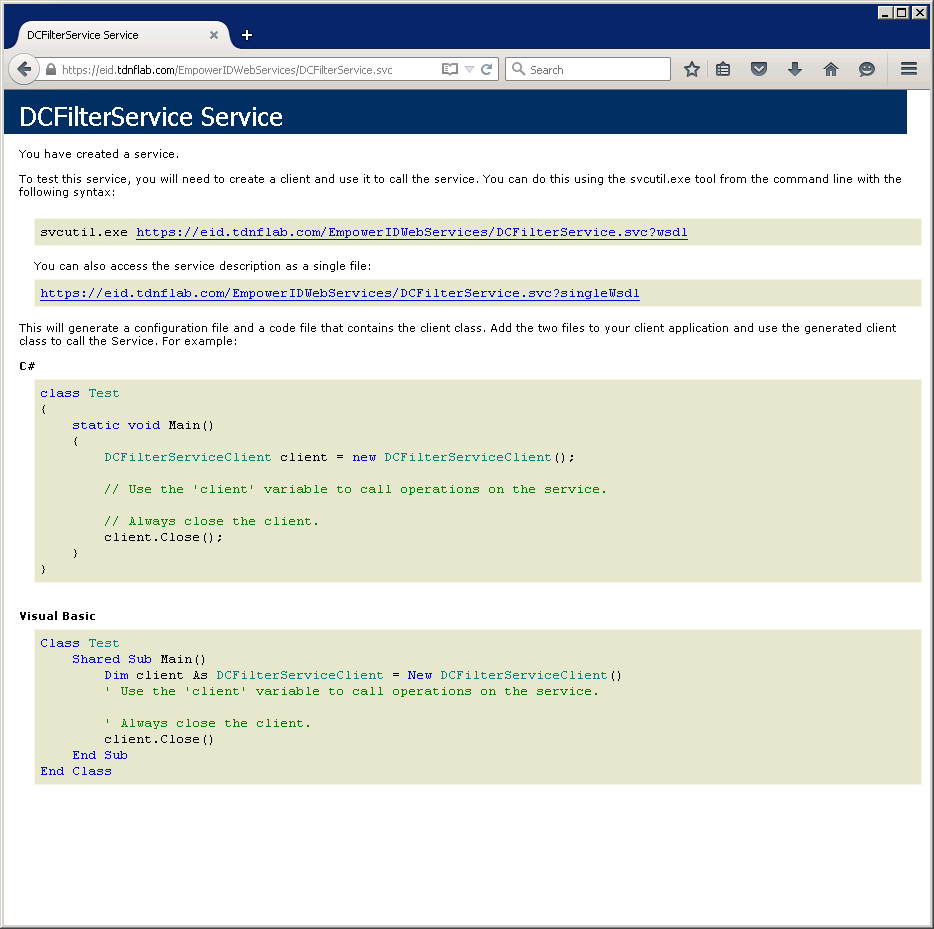
Next, ensure the URL for the endpoint address is correct by copying and pasting it in the address bar of a browser. You should see a page similar to the following:
To create a person for the DC Password Filter service
On the navbar of the Web application, expand Identity Administration and click People.
On the Person page, click the Create Person Simple Mode action link.
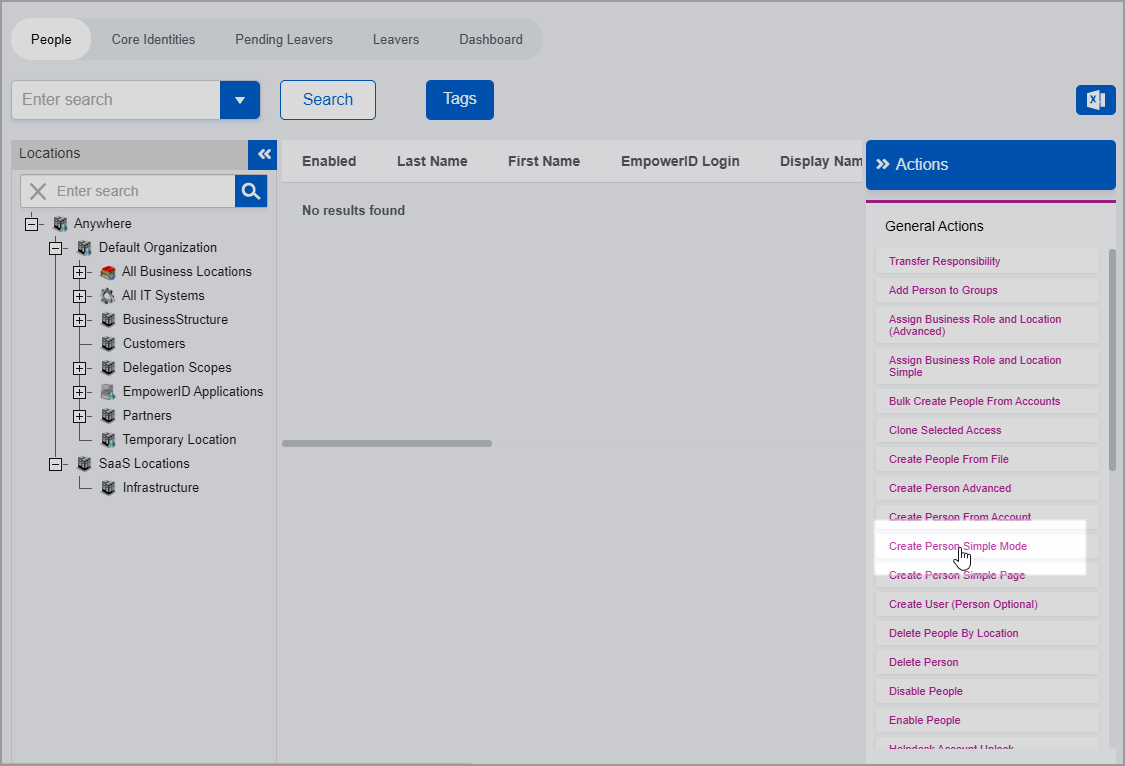
Enter a first name and a last name for the Person account in the First Name and Last Name fields, respectively. As this Person account serves as an identity for the DC Password Filter service, name it accordingly. In our example, we name the Person "dcsvcproxy."
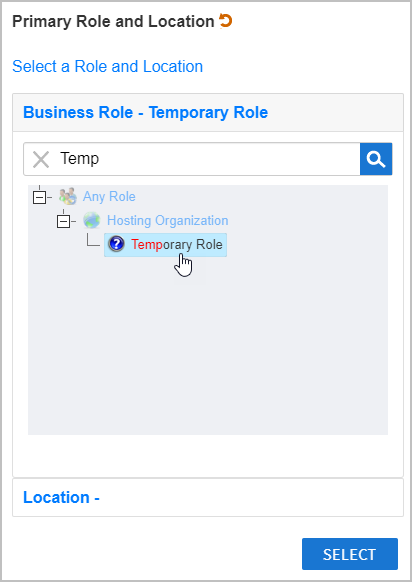
Under Primary Role and Location, click Select a Role and Location.
In the Business Role pane of the Business Role and Location selector that appears, type Temp, press ENTER and then click Temporary Role to select it.
Click the Location tab to open the Location pane and then type Temp, press ENTER and click Temporary Role to select it.
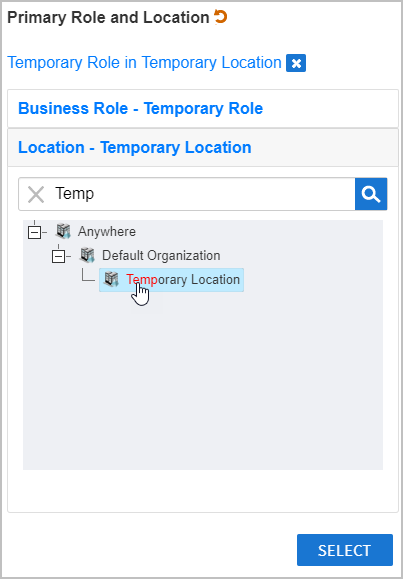
Click Select to select the Business Role and Location for the Person account and close the Business Role and Location.
Back in the main form, click Save to create the EmpowerID Person.
After EmpowerID creates the Person, you should be directed to the View page for the Person. From this page, delegate to the Person the DC Filter Password Sync Access Level as outlined below.
To delegate the DC Filter Password Sync access level
On the Person Details page for the Person, click the Access Assignments accordion to expand it.
From the Access Assignments accordion, select By Location from the Assign direct to resource or other method? drop-down.
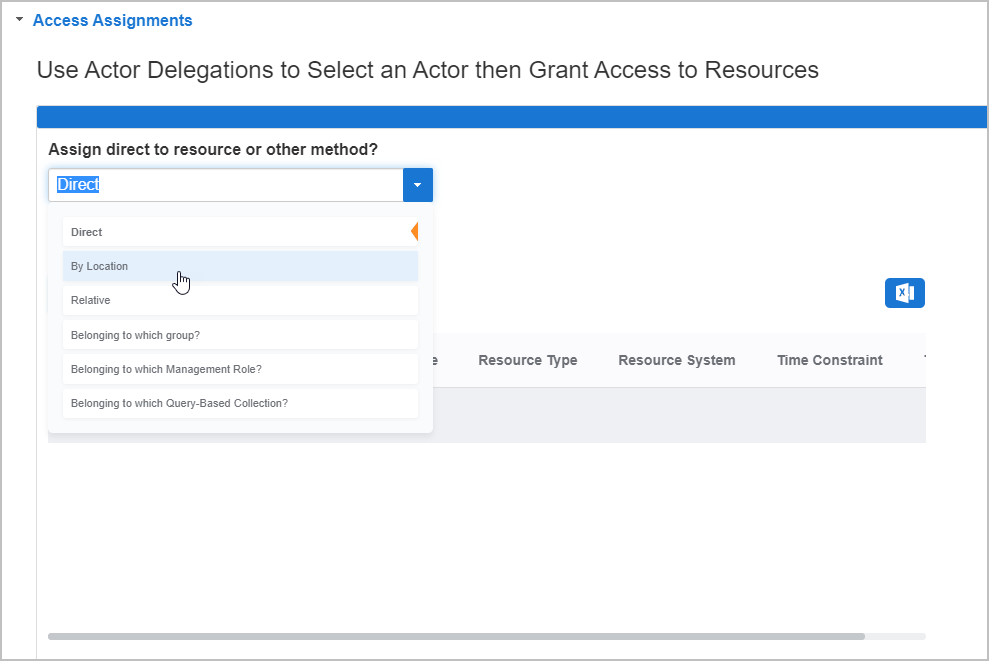
Click the Add New button located on the grid header.

In the Select the resource(s) to grant access to dialog that appears, do the following:
From the Resource Type drop-down, select Person, as the Password Reset Sync operation is executed against Person objects.
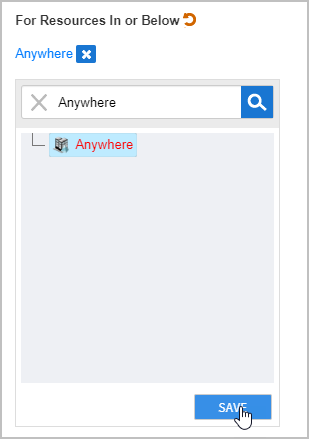
Under For Resources in or Below, click the Select a Location link.
In the Location Selector that appears, search for and select the appropriate location and then click Save to close the Location Selector. In our example, we grant the access assignment against all people in any location so we select Anywhere.
From the Access Level drop-down, select DC Password Sync. This Access Level has one operation allowed, the Password Sync DC Filter workflow.
Optionally, if you want to limit the access to a specified period of time, check Temporary Access (GMT/UTC Time) and select the appropriate dates and times from the calendar.
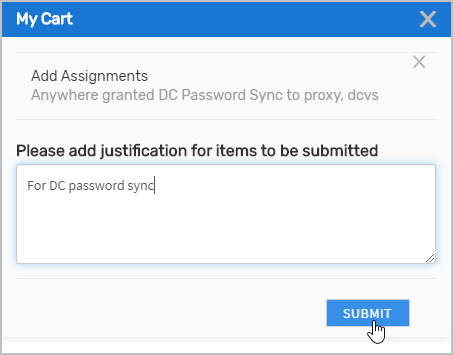
Click Save to add the assignment to the shopping cart.
Click the Shopping Cart at the top of the page and in the Cart dialog that appears, type a reason for the assignment and then click Submit.
Next, map the client certificate to the same person as shown below.
To map the client certificate to the person
On the View page for the person, expand the Roles, Accounts, and Login Security accordion and then click the Edit link in the Mapped Login Certificates pane.
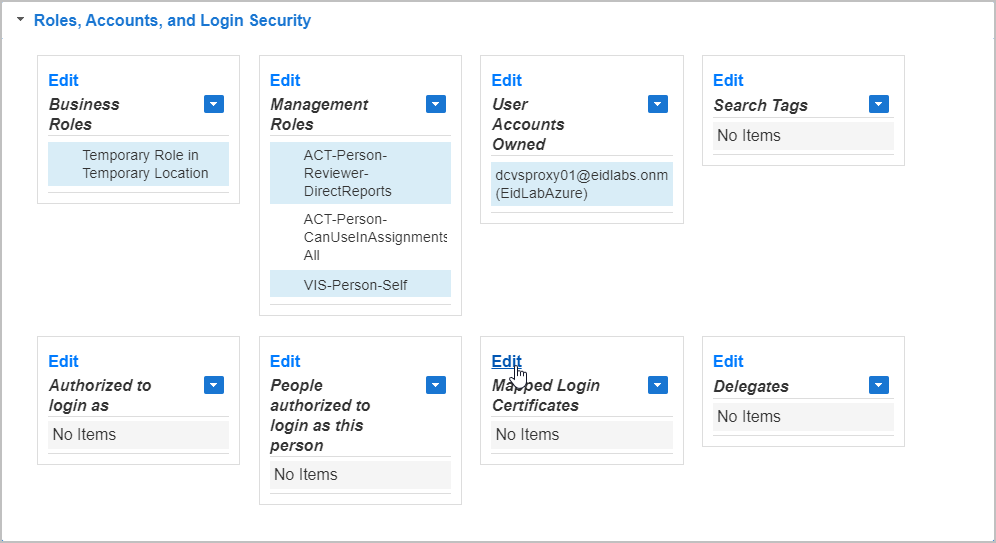
Search for and select the client certificate and then click Save.
To test the DC Filter Password service
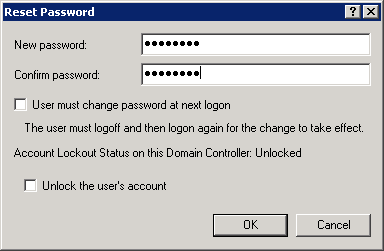
On any EmpowerID server open Active Directory Users and Computers and locate a user account that has an EmpowerID Person linked to it.
Right-click the user and select All Tasks, then Reset Password, and reset the user's password.
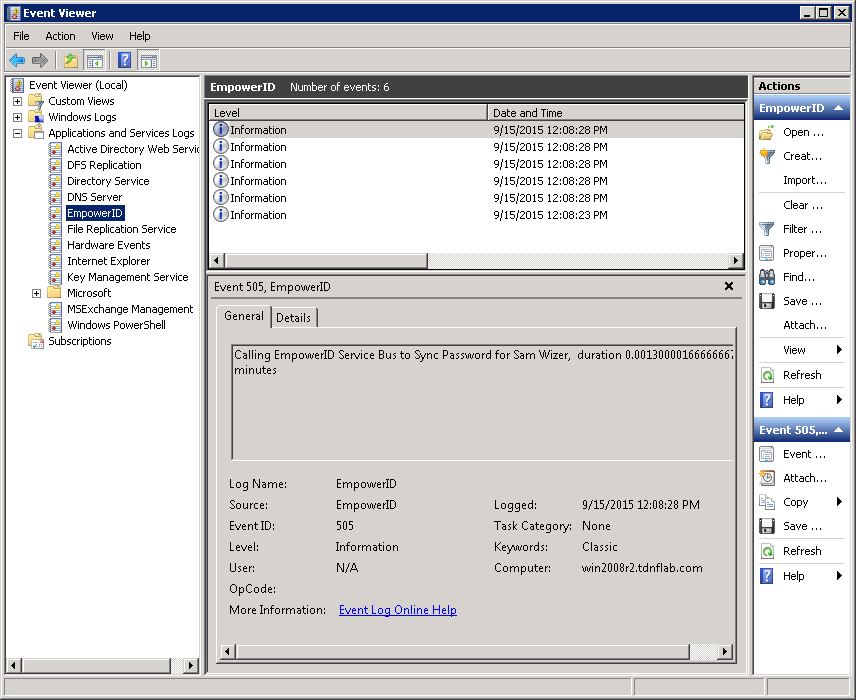
Open the Event Viewer on the domain controller.
Expand Applications and Services Logs and click EmpowerID.
You should see a message showing that the EmpowerID Service Bus was called to Sync Password for the select user account. There should be no errors in the log.
Insert excerpt IL:External Stylesheet IL:External Stylesheet nopanel true
Please run the below command to force registration if you don't see anything in event log.
”c:\Program Files\EmpowerID Domain Controller Filter\RegAsm.exe" c:\Windows\System32\CSPwdFilter.dll
| Info |
|---|
To ensure you have the thumbprint for the Access certificate, you can run the below queries against the EmpowerID Identity Warehouse. |
| Code Block | ||
|---|---|---|
| ||
--Verify the CertificateStoreID returned matches that of the EmpowerID Server certificate, which is imported in the Domain Controller running the DC Filter Select CertificateStoreID, SigningCertificateStoreID, EncryptionCertificateStoreID from CertificateAppliesTo Where AbsoluteUri = 'https://<Servername.domain.com>/empoweridwebservices/empoweridcertsts.svc' Select CertificateStoreID, SigningCertificateStoreID, EncryptionCertificateStoreID from CertificateAppliesTo Where AbsoluteUri = 'https://<Servername.domain.com>/EmpowerIDWebServices/DCFilterService.svc' --Check the certificateStoreID of the certificate used ad the EmpowerID Servicer certificate Select CertificateStoreID from CertificateStore where Thumbprint = '<Replace this with the thumbprint of the Certificate you are using>' |
| Div | ||||||||||||||||
|---|---|---|---|---|---|---|---|---|---|---|---|---|---|---|---|---|
| ||||||||||||||||
IN THIS ARTICLE
|