When user accounts no longer meet the criteria for belonging to a group, you can remove them from the group. When you do so, any entitlements and delegations they received from the group via a policy are handled in accordance with that policy.
For example, if you have a group with an Exchange Mailboxes Mailbox Provisioning Policies that specifies the mailbox be deprovisioned when a member is no longer a member, removed users will lose their mailboxes.
To remove an account from a group
- In the navigation sidebar, expand Identity Administration and click Groups.
Search for the group from which you want to remove user accounts and then click the record for that group. You should see a list of contextual actions appear that can be executed against that group appear in the Actions pane.


- Click the Remove Accounts from Groups action.


- In the Account Lookup that appears, search for the account you want to remove from the group .Tick and then the box beside the group account to select it.

- Repeat, steps 5 and 6, adding as many accounts as needed.
- When you have finished adding accounts, click Submit.

- Click OK to close the Operation Execution Summary.

To verify that EmpowerID removed the accounts from the group
- Search for the group from which you just removed the account(s). From the grid, click the Logon Name link for the group.
- From the View One page, expand the Group Members accordion and search for the accounts you removed from the group. You should see no records for those accounts.
- Next, navigate to the Audit Log by expanding System Logs in the Navigation Sidebar and clickingAudit Log.
- In the Audit Log, click the Group Membership Changes tab. From the navigation sidebar, expand System Logs and then click Audit Log.
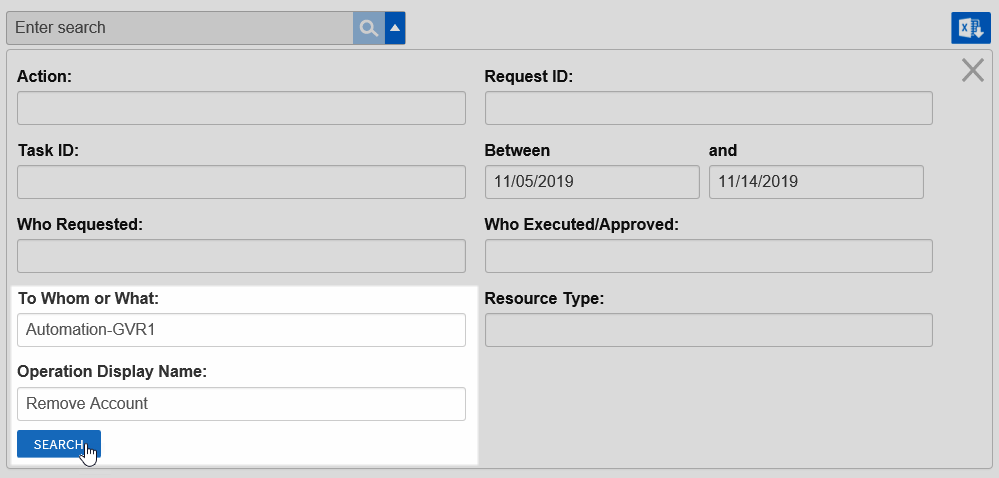
- Click the drop-down arrow beside the search field to open the Advanced Search dialog.

- In the Advanced Search dialog, do the following
- In the To Whom or What field, enter the name of the group from which you removed one or more accounts.
- In the Operation Display Name field, enter Remove Account.
- Click Submit.
- You should see a record for each account you removed from the group.

This directs you to the View One page for the group. View One pages allow you to view details about an object in EmpowerID and make changes to those objects as needed.

To verify the user account is removed from the group in Active Directory
- Open Active Directory Users and Computers and search for the group from which you removed the user account(s).
- Open the Properties dialog for the group and click the Members tab. You should see that the accounts are not listed as members.
...

| Style | ||
|---|---|---|
| ||
...