Versions Compared
| Version | Old Version 3 | New Version Current |
|---|---|---|
| Changes made by | ||
| Saved on |
Key
- This line was added.
- This line was removed.
- Formatting was changed.
To call the API so that it performs the operations or returns the data requested by your application, you need to make a POST request to the appropriate endpoint. When creating new resources like an EmpowerID Person, you need to POST a request to the endpoint that starts the EmpowerID Workflow service, passing to the API the necessary header and request data. For creating an EmpowerID Person, this data is as follows.
Endpoint
| Code Block | ||
|---|---|---|
| ||
https://{FQDN_OF_Your_EmpowerID_Web_Server}/api/services/v1/workflow/start |
Headers
| Key | Value |
|---|---|
| X-EmpowerID-API-Key | The API key for the OAuth application you created above. |
| Authorization | The OAuth token you received from EmpowerID. |
| Content-Type | application/json |
Request Data
Request data is sent to the API in JSON format. The data in the below request represents the minimum key/value pairs required for creating an EmpowerID Person. The API Reference includes all possible key/value pairs that can be submitted when creating people.
| Info |
|---|
OutputParameters are optional, but are useful for viewing the results of the operation. |
| Code Block |
|---|
{
  "Name": "CreatePerson",
  "InputParameters":
  {
    "TargetPerson" :
    {
      "LastName": "Adams",
      "FirstName": "Samuel",
      "PrimaryOrgRoleOrgZoneID": "2"
    }
  },
  "OutputParameters": [{"TargetPerson": ["PersonID", "FirstName", "LastName"]}]
} |
| Element | Description | Type | Required |
|---|---|---|---|
| Name | Name of the workflow | String | Required |
| InputParameters | Workflow input | Data Object | Required |
| TargetPerson | Attributes of the person | Data Object | Required |
| FirstName | First name of the person | String | Required |
| LastName | Last name of the person | String | Required |
| PrimaryOrgRoleOrgZoneID | Primary Business Role and Location of the person | Integer | Required |
| OutputParameters | Workflow output | Data Object | Optional |
Code Examples
In the examples, we are passing in the minimum number of parameters and requesting an output showing the PersonID, LastName and FirstName attributes of the person that is created by the operation.
cURL
| Info |
|---|
Be sure to use double quotes unless you are making the request from a non-Windows OS. |
Request
| Code Block |
|---|
curl "https://{FQDN_Of_Your_EmpowerID_Web_Server}/api/services/workflow/start" \
-X POST \
-H "X-EmpowerID-API-Key: {Your_API_Key} \
-H "Authorization: Bearer {OAuth_token_you_received_from_EmpowerID}" \
-H "Content-Type: application/x-www-form-urlencoded" \
-d "{ \"Name\": \"CreatePerson\", \"InputParameters\": {\"TargetPerson\":{\"LastName\"" \"Adams\",
\"FirstName\": \"Samuel\", \"PrimaryOrgRoleOrgZoneID\" \"2\" }}, \"OutputParameters\": [{\"TargetPerson\":
[\"PersonID\", \"FirstName\", \"LastName\"]}]}" |
Ajax
| Code Block |
|---|
$.ajax({
  url: "https://sso.empowersso.com/api/services/v1/workflow/start",
  type: "POST",

 headers: {
    "X-EmpowerID-API-Key": "{Your_API_Key}",
    "Content-Type": "application/json",
    "Authorization": "Bearer {OAuth_token_you_received_from_EmpowerID
	}
  },

  data: JSON.stringify({
  	"Name": "CreatePerson",
		"InputParameters":
		{
			"TargetPerson": {
			"FirstName": "Adams",
			"LastName" : "Samuel",
			"PrimaryOrgRoleOrgZoneID": "4980"
		}
	},
	"OutputParameters": [{"TargetPerson": ["PersonID", "FirstName", "LastName"]}]

  })
}) |
Response
If the request is successful, you should receive a JSON response that looks similar to the following:
| Code Block |
|---|
{
  "Id": 0,
  "Name": "CreatePerson",
  "InstanceId": "db14de5f-b8e4-4e61-a6a5-d17030e4a44f",
  "CorrelationId": "00000000-0000-0000-0000-000000000000",
  "UIType": "None",
  "UIName": "",
  "UIData": null,
  "OutputParameters": {
    "TargetPerson": {
      "PersonID": 402,
      "FirstName": "Samuel",
      "LastName": "Adams"
    }
  },
  "OutputTaskParameters": null,
  "WorkflowState": "Completed",
  "DeferredUntil": "0001-01-01T00:00:00",
  "Error": null
}
|
Postman Example
- Open the Postman app on your machine.
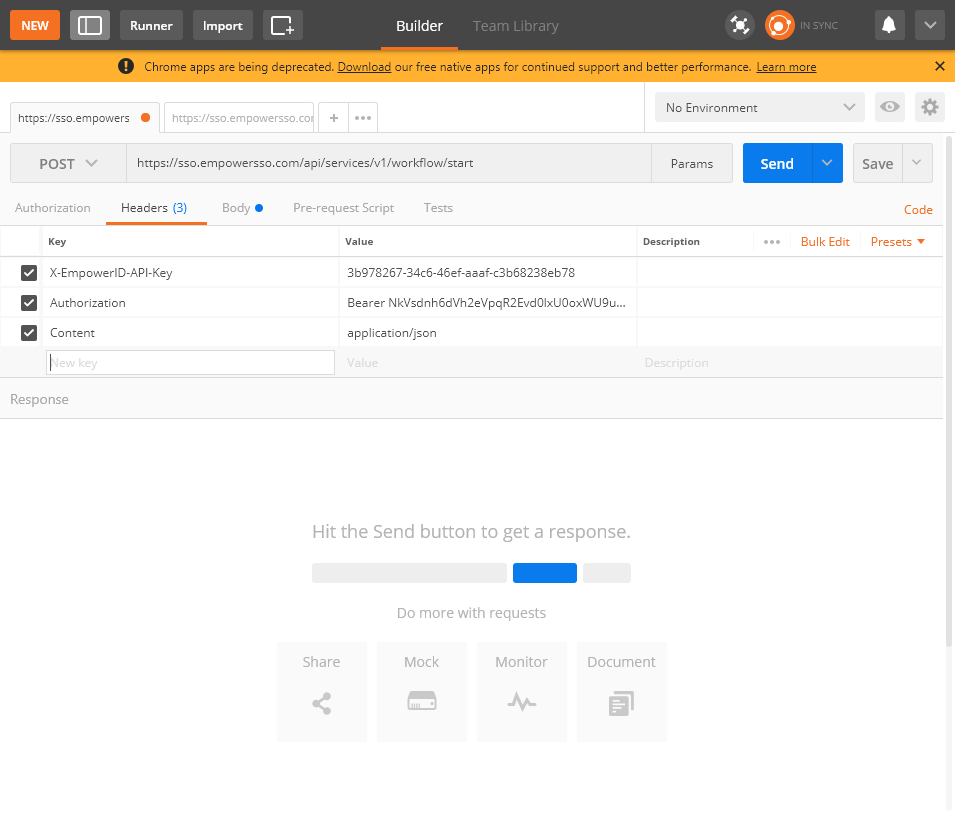
- In Postman, open a new tab, select POST as the HTTP method and enter https://{FQDN_Of_Your_EmpowerID_Web_Server}/api/services/workflow/start.
- Click the Headers tab and add the above mentioned key/value pairs.
 Image Modified
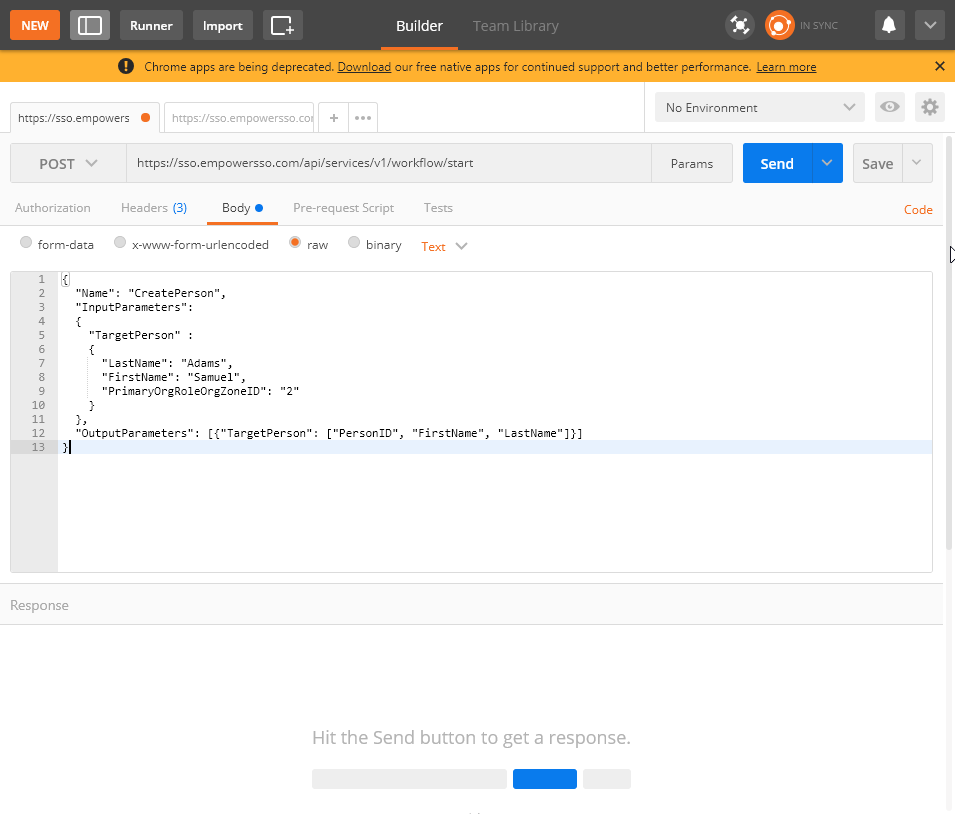
 Click the Body tab, select raw and then add the below JSON:
Code Block { "Name": "CreatePerson", "InputParameters": { "TargetPerson" : { "LastName": "Adams", "FirstName": "Samuel", "PrimaryOrgRoleOrgZoneID": "2" } }, "OutputParameters": [{"TargetPerson": ["PersonID", "FirstName", "LastName"]}] }
Click Send.
If the request is successful, you should receive a JSON response that looks similar to that shown below.Code Block { "Id": 0, "Name": "CreatePerson", "InstanceId": "db14de5f-b8e4-4e61-a6a5-d17030e4a44f", "CorrelationId": "00000000-0000-0000-0000-000000000000", "UIType": "None", "UIName": "", "UIData": null, "OutputParameters": { "TargetPerson": { "PersonID": 381, "FirstName": "Samuel", "LastName": "Adams" } }, "OutputTaskParameters": null, "WorkflowState": "Completed", "DeferredUntil": "0001-01-01T00:00:00", "Error": null }
| Div | ||||||||||||||||||||||||
|---|---|---|---|---|---|---|---|---|---|---|---|---|---|---|---|---|---|---|---|---|---|---|---|---|
| ||||||||||||||||||||||||
|