- Created by Phillip Hanegan , last modified on May 25, 2018
You are viewing an old version of this content. View the current version.
Compare with Current View Version History
« Previous Version 7 Next »
Activities represent the action or logic for a specific process within a workflow and are comprised of properties and methods that perform the action of a workflow, while maintaining the state of that workflow. This topic provides an overview of the most common activities used in EmpowerID workflows.
From Activities
When you publish a form in Workflow Studio, a special activity, known as a "Form activity," is generated and published to the EmpowerID Identity Warehouse. When the form is published, EmpowerID generates each form field as a "dependency property" that can be used for capturing and passing user input to other activities in the workflow. To use a Form activity in a workflow, you search for the Form activity in the Activities tree and drag it onto the workflow design surface. Once on the design surface, you can bind dependencies and set any relevant activity properties.
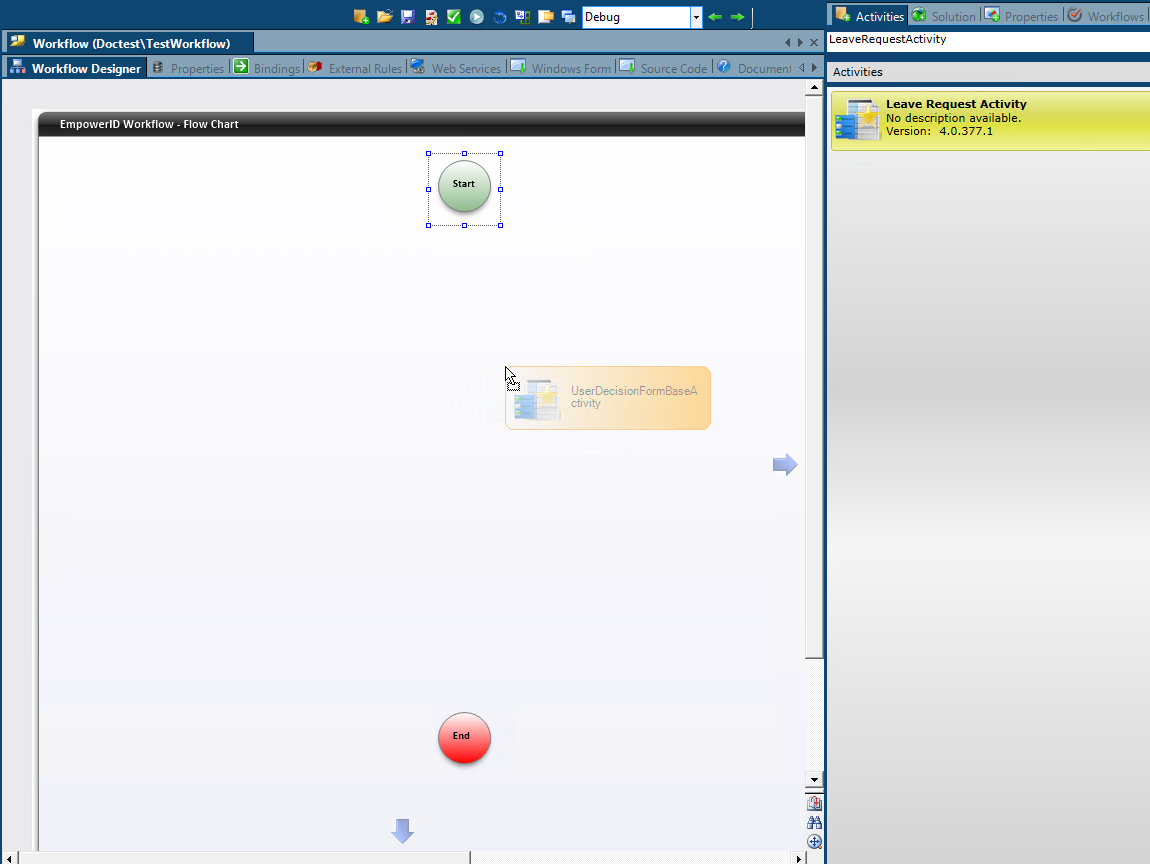
If you have a created a custom form and cannot find an activity for it in the Activities toolbox, most likely the form has yet to be published or the toolbox needs to be refreshed. To refresh the toolbox, select Refresh Toolbox from the Common menu.
When setting Form activity properties, the following properties have importance:
| Property | Type | Description |
|---|---|---|
| Input/Output | RBAC Object | This specifies the resource type, such as a user account, group or person, that is the object of the form. The value will be set according to the RBAC object, if any, that was bound to the form when it was first created. For example, if you created a form with fields for editing a person, the RBAC object you would associate with the form would be the Person RBAC object, with each of the form's field being bound to the particular person attributes you want to show on the form. In this way, when someone uses your workflow to edit a person, the fields on the form will reflect the attributes of the person being edited. In EmpowerID, this person is known as the TargetPerson. Thus, in this case, the value of Input/Output should be TargetPerson. If the form involves editing an account, the value of Input/Output would be TargetAccount and if the form involves editing a group, the value of Input/Output would be TargetGroup etc. This tells the workflow that the input to the Form activity is a person, an account, or a group, etc., and that the output of the Form activity is a person, an account or a group, etc. |
| ControlTitle | String | Specifies the title text that appears to users for a given form. The default value is derived from the originating form. If the value is changed, you must republish the workflow before those changes appear in the UI. |
| ControlDescription | String | Specifies a description for the form. The default value is derived from the originating form. Optional. |
| AgreementText | String | Specifies any agreement text to which a user needs to agree to before they can submit the form. Optional. |
| HideWaitForResultsChecked | Boolean | Specifies whether the Wait for Results check box appears on forms. Setting the value to True hides the check box, while setting it to False shows the check box. Set to False by default. |
| TabName_IsVisible | Boolean | Specifies whether a given form tab appears to users. The default value is derived from the originating form. Set to True by default. |
| TabName_Title | Boolean | Specifies the title of a given form tab. The default value is derived from the originating form, but can be changed on the workflow. If the Title is changed, the workflow must be republished before those changes will appear in the UI. |
| WaitToSeeResults | Boolean | Specifies whether the workflow should show the results of a form submittal to users. Set to True by default. For this property to have an effect, HideWaitForResultsChecked must be set to False. |
Operation Activities
Operation activities are activities based on the EmpowerID workflow authorization framework to determine if the current user in a workflow process can execute the code contained in that activity. They determine at runtime if the current user has any EmpowerID roles with the necessary operations against the target resource(s) to perform the action being attempted, and handle any approval process required if they do not. Approvals are routed using the EmpowerID Rights-Based Approval Routing (RBAR) technology to any individuals, groups, roles, or query-based SetGroups that have been granted the ability to perform the operation against the target resource. The operation activities protect the execution of the "action" code for that activity as designed in Workflow Studio.
Each operation activity is derived from the OperationWorkflowBase activity, which exposes a number of methods and other members implemented by the deriving activities. Workflow Studio provides templates that allow for the quick creation of several different types of operation activities, depending on the number of resources involved in the workflow process. These include:
- Single Multi-Operation Activity — Used for creating Operation activities with one resource involved that could execute multiple operations.
- Dual Multi-Operation Resource Activity — Used for creating Operation activities with two resources involved that could execute multiple operations.
- Triple Multi-Operation Resource Activity — Used for creating Operation activities with three resources involved that could execute multiple operations. An example of a triple operation is the change Person primary Business Role and Location operation. To perform this operation, security is checked on the Person, Business Role, and the Location.
To use an Operation activity in a workflow, you search for the activity in the Workspace tree, drag it onto the workflow design surface and set any relevant properties on the activity.
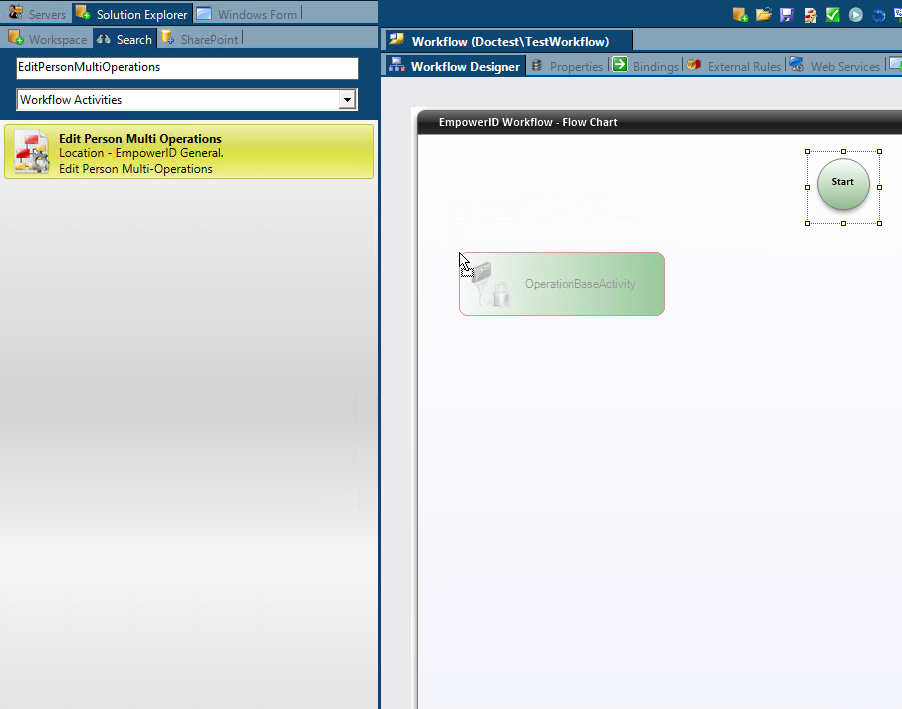
When setting Operation activity properties, the following have particular importance. These properties are listed by category.
In the below table, note the Form_ properties. These properties can be used in situations where a single resource object is being affected by the operation. Operation activities can affect both single resource objects, as well as a list of resource objects. For example, if you are using the CreatePersonOperation activity in a workflow that creates people, you can use Form_TargetPerson to get from the Operation approval form the person being created; or, you can use the TargetPeople property to get a list of the people being created (when multiple people are being created at the same time).
| Property | Category | Type | Description |
|---|---|---|---|
| Name | Activity | String | Specifies the name of the activity. |
| Description | Activity | String | Specifies the description for the activity. Optional. |
| Enabled | Activity | Boolean | Specifies whether the activity is enabled. Set to True by default. If set to False, the activity will not be executed. |
| DisableGoingForApproval | Approval Information | Boolean | Specifies whether the operation is allowed to go for approval when required. Set to True by default. If set to False, operations needing approval will not be executed. |
| EnableBulkApproval | Approval Information | Boolean | Used in multi-operation activities, this specifies whether the Global Approval drop-down appears in each potential approver's To Do tab of the Request Center. Set to True by default. If set to False, approvers must approve each operation one-by-one. |
| PromptToAskForApproval | Approval Information | Boolean | Specifies whether a message appears to users without the appropriate access needed to execute the operation if they would like to submit the request for approval. Set to False by default. EmpowerID does not recommend changing the default value. |
| SendEachOperationForApproval | Approval Information | Boolean | Specifies whether EmpowerID sends each operation requiring approval as a separate notification rather than grouping them together in a single notification. Set to Falseby default. |
| SkipSecurityCheck | Approval Information | Boolean | Specifies whether EmpowerID should skip checking to see if the person executing the operation has the access needed to perform the operation. Set to False by default. If set to True, EmpowerID executes the operation for all users who have access to the workflow, even for those users who do not have the access needed to perform the operation(s) associated with the activity. |
| DelayExecutionInMinutes | Delayed Execution | Integer | Specifies the length of time in minutes the workflow should delay executing the operation. The default value is 0. |
| EnableCreateTAskAfterDelayedExecution | Delayed Execution | Boolean | Specifies whether a task should be created that notifies the workflow user that operation was successfully executed after being resumed. |
| DisableApproverNotification | Boolean | Specifies whether EmpowerID sends an email to potential operation approvers, when approval is needed. Set to Falseby default. | |
| DisableInitiatorEmailNotification | Boolean | Specifies whether EmpowerID sends an email to workflow initiators when an operation requiring approval is either approved or rejected by a designated approver. Set to Falseby default. | |
| Form_TargetRBACObject | Boolean | Specifies whether EmpowerID sends an email to workflow initiators when an operation requiring approval is either approved or rejected by a designated approver. Set to Falseby default. | |
| DisableInitiatorEmailNotification | Boolean | Specifies whether EmpowerID sends an email to workflow initiators when an operation requiring approval is either approved or rejected by a designated approver. Set to Falseby default. | |
| DisableInitiatorEmailNotification | Boolean | Specifies whether EmpowerID sends an email to workflow initiators when an operation requiring approval is either approved or rejected by a designated approver. Set to Falseby default. | |
| Form_TargetRBACObject | Input | RBAC Object | Specifies the RBAC object being targeted by the operation, where RBACObject is the component type, such as an account (Form_TargetAccount), person (Form_TargetPerson) or group (Form_TargetGroup). |
| Form_ControlTitle | Input | String | Specifies the the title users see when viewing the approval form associated with the operation. |
| Form_TabName_IsVisible | Input | Boolean | Specifies whether a given form tab, where TabName is the name of the tab, appears to users. The tab name is derived from the originating form. |
| TargetRBACObjects | Input | List | Lists all RBAC Objects, such as accounts (TargetAccounts), people (TargetPersons), groups (TargetGroups), etc., when those objects are hard-coded to the operation. |
| ShowAttributeModificationSummaryOnApproval | Input | Boolean | Specifies whether users should see a list of all the attributes changed by the operation, including the old and new values for each attribute. |
| ShowOperationsGridOnApproval | Input | Boolean | Specifies whether a grid of operations needing approval appear to approver in the To Do tab of their Request Center views. Set to True by default. If set to False, approvers must approve each operation on the approval form. |
| Password | Input | String | Specifies the password when password vaulting is involved. |
| EnableRetryIfExecutionFailed | Retry Execution | Boolean | Specifies whether EmpowerID should attempt to retry executing the operation(s) associated with the activity, if the initial attempt fails. |
| RetryIntervalInMinutes | Retry Execution | Integer | Specifies the time in minutes that EmpowerID should wait before attempting to retry executing failed operation(s) associated with the activity. EnableRetryIfExecutionFailed must be enabled for this property to have effect. |
Bubble Activities
Bubble activities are activities that you can add to workflows to display a desired message to a user, such as whether the operation they attempted succeeded or failed. When encountered in a workflow, users simply click OK to close the message. Once a message is closed, the workflow resumes and either exits or performs some other function depending on the logic that follows the activity. This logic is defined by Line Rules. See the Line Rule section below for more information.
The following image shows an example of two Bubble activities within a single workflow, the CreateUserAndMailbox workflow. This workflow, among other things, allows users to create an AD user account and an Exchange mailbox for that account. Depending on what happens within the workflow, one or the other of the Bubble activities is executed. If an error occurs and the mailbox is not created, the workflow displays a message stating that it was unable to create the mailbox. If the user account and the mailbox are both successfully created, the workflow displays an Operation execution summary, stating the results of the workflow.
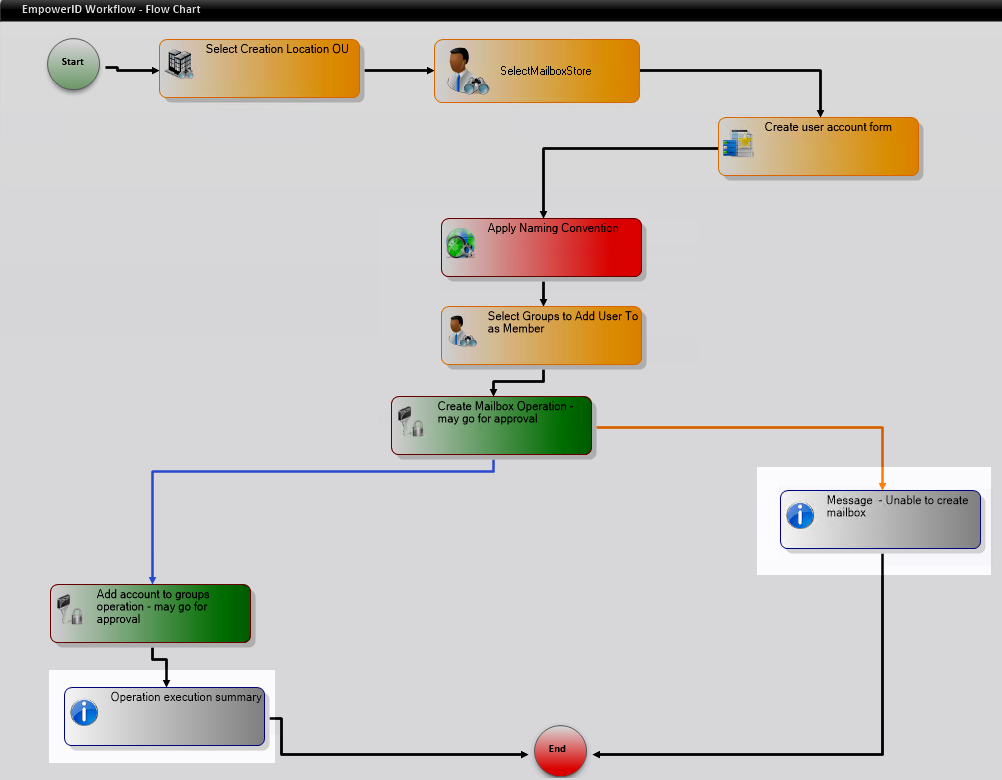
To use a Bubble activity in a workflow, you search for Bubble in the Activity toolbox, drag it onto the Workflow design surface and then set values for any appropriate properties. Bubble activities are UI activities, and as such have a lot of properties associated with them. However, of these properties, only a few have relevance for the Bubble activity. These are as follows:
| Property | Type | Description |
|---|---|---|
| Name | String | Specifies the name of the activity. |
| Description | String | Specifies a description for the activity. Optional. |
| Message | String | Specifies the message that appears to users when the activity executes. This value can be set from the Properties window or dynamically passed to the activity at runtime. |
| MessagesList | UnorderedListTree | Used when displaying a list to users, such as would occur when using the Bubble activity as an Operation Execution Summary. When setting this value, you specify the message that displays at the top of the list. This value can be set in the Properties window or dynamically passed to the activity at runtime. |
| WaitForResponse | Boolean | Specifies whether the workflow should wait for a user response before proceeding. When set to True, the Bubble contains an OK button that users must click for the workflow to resume. Set to True by default. |
You can filter the properties to show those relevant to the activity by sorting them alphabetically.
Confirm Activities
Similar to Bubble activities, Confirm activities are activities that you can add to workflows to display to users a confirmation message with "Yes" and "No" buttons. These activities are often used in situations where resources are being deleted. When a users clicks a button, the workflow logic branches to execute any code associated with the response. Generally this encompasses either deleting the resource, sending the request for approval, or exiting the workflow.
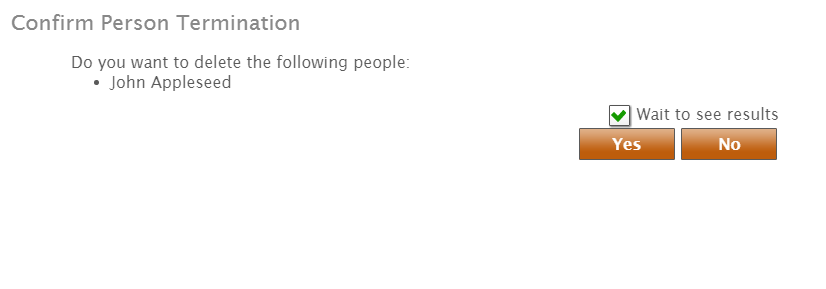
The following image shows an example of a Confirm activity within a workflow, the DeleteMultiplePeopleWF workflow. For this particular workflow, the activity is executed and the message is displayed when a workflow initiator selects one or more people to be deleted. When the activity executes, the workflow waits for the user's input before resuming, following one of two possible outcomes.
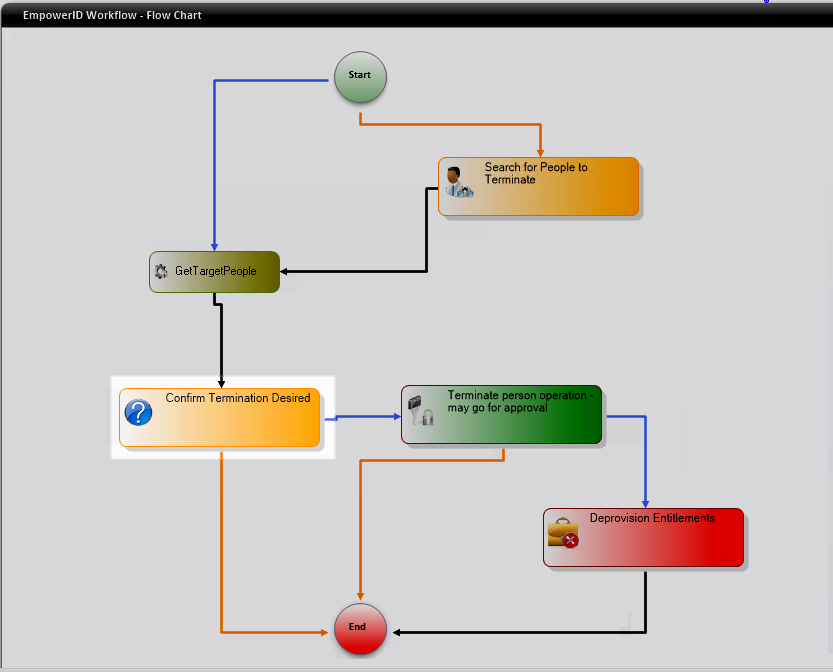
To use a Confirm activity in a workflow, you search for Confirm in the Activity toolbox, drag it onto the Workflow design surface and then set values for any appropriate properties. As with Bubble activities, Confirm activities are UI activities, and as such have a lot of properties associated with them. However, of these properties, only a few have relevance for the Confirm activity. These are as follows:
| Property | Type | Description |
|---|---|---|
| Name | String | Specifies the name of the activity. |
| Description | String | Specifies a description for the activity. Optional. |
| Message | String | String that specifies the message that appears to users when the activity executes. This value can be set from the Properties window or dynamically passed to the activity at runtime through Workflow property binding or from another activity, such as a System Code activity. When setting the value in a System Code activity, you add the System Code activity (discussed below) to the workflow above the Confirm activity and then add the code to the ExecuteCode Event Handler. Person p; this.ConfirmDelete.Message = "Are you sure you want to delete" + p.FriendlyName + "?" |
| MessagesList | UnorderedListTree | Used when displaying a list to users, such as a list in an Operation Execution Summary or when asking a user to confirm their decision to delete multiple objects. This value can be set in the Properties window or dynamically passed to the activity at runtime through Workflow property binding or from another activity, such as a System Code activity. When setting the value in a System Code activity, you add the System Code activity (discussed below) to the workflow above the Confirm activity and then add the code to the ExecuteCodeEvent Handler. // Check to see if MessagesList is null
if (ConfirmDelete.MessagesList == null)
ConfirmDelete.MessageList = new TheDotNetFactory.Framework.Common
.Shared.Common.UnorderedListTree("Do you want to delete the following people:");
|
| ConfirmDecision | Boolean | Specifies whether the user confirmed their decision. To allow the user to provide input, this value should be set to False. When set to False (and WaitForResponse is set to True), the workflow waits for the user's decision before proceeding. The process then flows accordingly, according to the logic associated with the rules applied to the lines that connect the Confirm activity to the other workflow activities. The logic applied to the lines (known as Line Rules or Business Rules) is a simple Boolean that directs the workflow in either one direction or the other. return CurrentWorkflow.ConfirmDelete.ConfirmDecision In the above code snippet, CurrentWorkflow refers to the workflow, ConfirmDelete refers to the name of the Confirm activity in the workflow and ConfirmDecision is a Boolean that corresponds to the user clicking the "Yes" button. If the user clicks "Yes" the workflow follows the line with the rule. |
| WaitForResponse | Boolean | Specifies whether the workflow should wait for a user response before proceeding. |
System Code Activities
System Code activities are activities that you can place in a workflow to execute custom code using the ExecuteCode event handler. To use a System Code activity in your workflows, you search for System in the Activity Toolbox, drag the activity onto the Workflow design surface, and then double-click it to generate the stub for the ExecuteCode handler. Once the stub is generated, you add the code you want the workflow to execute when the process reaches the activity.
Account ac;
this.Confirm.Message = "Are you sure you want to delete" + ac.FriendlyName + "?"
System Code activities have a number of relevant properties that you need to set when using them in a workflow. These properties are as follows:
| Property | Type | Description |
|---|---|---|
| Name | String | Specifies the name of the activity. |
| Description | String | Specifies a description for the activity. Optional. |
| Enabled | Boolean | Specifies whether the code in the activity is allowed to execute. Set to True by default. If set to False, the workflow will not execute the activity. |
System Parallel Activities
System Parallel activities are activities that you can add to Flow Chart workflows when you need the workflow to execute code in parallel. Often, these activities are used to execute the operations enabled within Operation activities in parallel, such as when adding and removing accounts to and from groups.
The below image shows a System Parallel activity with an Operation activity added to each branch. When the workflow process reaches the activity, it will execute the operations associated with each branch in parallel and then proceed to the next activity. To use a System Parallel activity in your own workflows, you search for SystemParallel in the Activity Toolbox, drag the activity onto the Workflow design surface and then either drag the desired Operation activities onto the branches of the System Parallel activity.
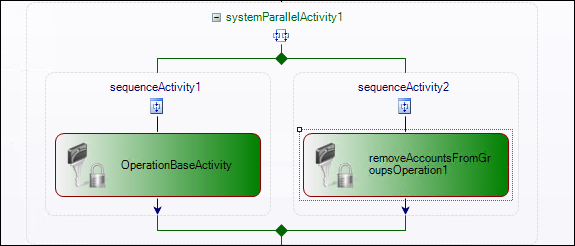
By default, System Parallel activities have two branches. If needed, you can add more branches by right-clicking on the activity and selecting Add Branch from the context menu.
System If Else Activities
System If Else activities--also known as Rule Decision activities--are advanced versions of System Parallel activities used in situation where conditions or rules need to be applied to parallel branches so that the logic associated with those branches only executes when the rule is met. An example of a workflow with this type of activity is the Update Person Group Membership workflow that ships with EmpowerID. This workflow provides users with the ability to both add and remove users to and from groups.
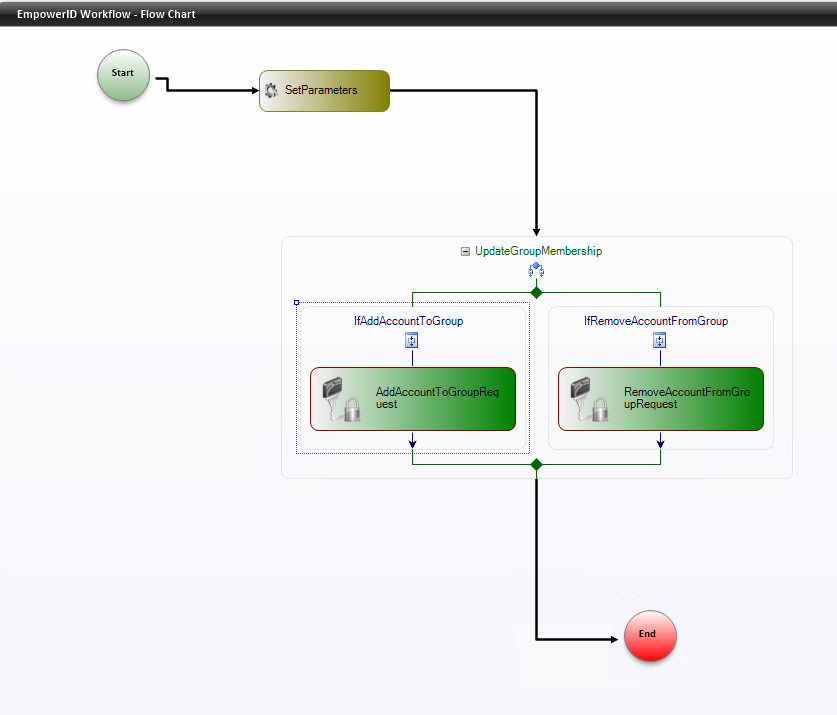
As shown by the above image, the System If Else activity (named UpdateGroupMembership in the workflow) has two branches, the IfAddAccountToGroupbranch and the IfRemoveAccountFromGroup branch, with each branch conditioned by what the user is trying to do. If the user is adding someone to a group, the logic in the IfAddAccountToGroup branch executes, while the logic in the IfRemoveAccountFromGroup branch executes if the user is removing someone from a group. If the user is both adding and removing someone to and from a group, the logic in both branches executes.
The determining factor for branch execution is the logic applied to the branch's Rule property. For this workflow, the logic is fairly simple, as shown by the below code examples. The first example shows the code for the AddAccountToGroup rule, while the second shows the code for the RemoveAccountFromGroup rule.
//Check to see if the user is adding the account to one or more groups
return CurrentWorkflow.AddAccountToGroupRequest.TargetGroups.Count > 0;
//Check to see if the user is removing the account from one or more groups
return CurrentWorkflow.RemoveAccountFromGroupRequest.TargetGroupAccounts.Count > 0 && CurrentWorkflow.RemoveAccountFromGroupRequest.TargetAccounts.Count > 0;
To use a System If Else activity in a workflow, you search for SystemIFElse in the Activity toolbox, drag the activity onto the Workflow design surface and then set values for any appropriate activity and branch properties. The properties you need to set are as follows:
On the activity itself:
| Property | Type | Description |
|---|---|---|
| Name | String | Specifies the name of the activity. |
| Description | String | Specifies a description for the activity. Optional. |
| Enabled | Boolean | Specifies whether the code in the activity is allowed to execute. Set to true by default. If set to False, the workflow will not execute any code associated with the activity. |
On the activity's branches:
| Property | Type | Description |
|---|---|---|
| Name | String | Specifies the name of the branch. |
| Description | String | Specifies a description for the branch. Optional. |
| Enabled | Boolean | Specifies whether the branch is enabled. Set to true by default. If set to false, the workflow will not execute any code associated with the branch. |
- No labels