Configuring EmpowerID Email Options
Provider options
By default, EmpowerID is configured to use SMTP as the provider for email delivery. However, SMTP is not the only provider option. You can elect to use Exchange Web Services (on-premise or Office 365) or both SMTP and Exchange Web Services (EWS). If you choose to use both providers, you order the precedence by setting the priority for each. The provider with the lowest priority has the higher precedence. By default, SMTP has precedence over EWS. You can change this at any time in the EmpowerID Web interface.
You can configure EmpowerID to process emails differently, depending on your scenario. These scenarios include the following:
- Configuring EmpowerID for simple SMTP relay — In this scenario, you specify the SMTP server that EmpowerID uses to send automated emails on behalf of the system and the default from address for all EmpoweID notifications. Examples of these types of emails include welcoming emails sent to new employees, emails sent to users when their passwords are reset by the help desk, and pending password expiration notifications, etc.
- Configuring EmpowerID for authenticated SMTP Delivery — In this scenario, you specify an account that EmpowerID should use to connect to the SMTP server. This account must have password that is vaulted in EmpowerID and becomes the default From address used for any automated emails sent on behalf of the system. When configuring for authenticated SMTP delivery, you have the option to specify whether to use SSL, TLS and the port used for TLS.
- Configuring EmpowerID for Exchange Web Services (EWS) — In this scenario, you specify the account that EmpowerID should use to connect to EWS, as well as the URL to the EWS server. As with configuring EmpowerID for authenticated SMTP delivery, you need to vault the password for the user account.
- Configuring EmpowerID for email approvals — In this scenario, you set EmpowerID up to give resource owners and other delegated approvers the ability to respond to Access Requests from their email clients, apart from interacting directly with the request in the EmpowerID Web interface. This allows users to respond to requests when away from their desks. To do so, they simply reply to the email with "Approved" or "Rejected." EmpowerID reads the response and submits the decision.
To configure EmpowerID for simple SMTP relay
- From the navigation sidebar, expand Admin, then EmpowerID Servers and Settings and then click EmpowerID System Settings.
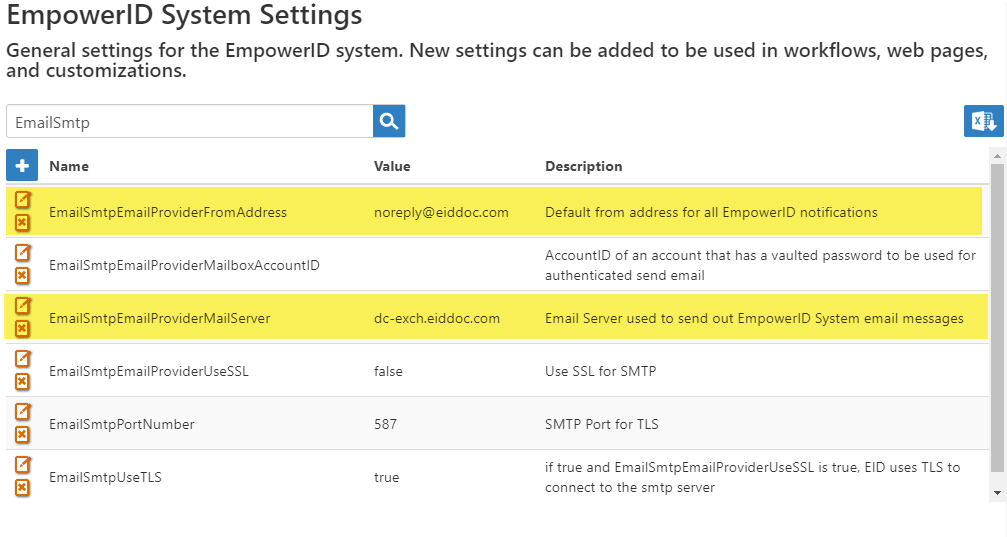
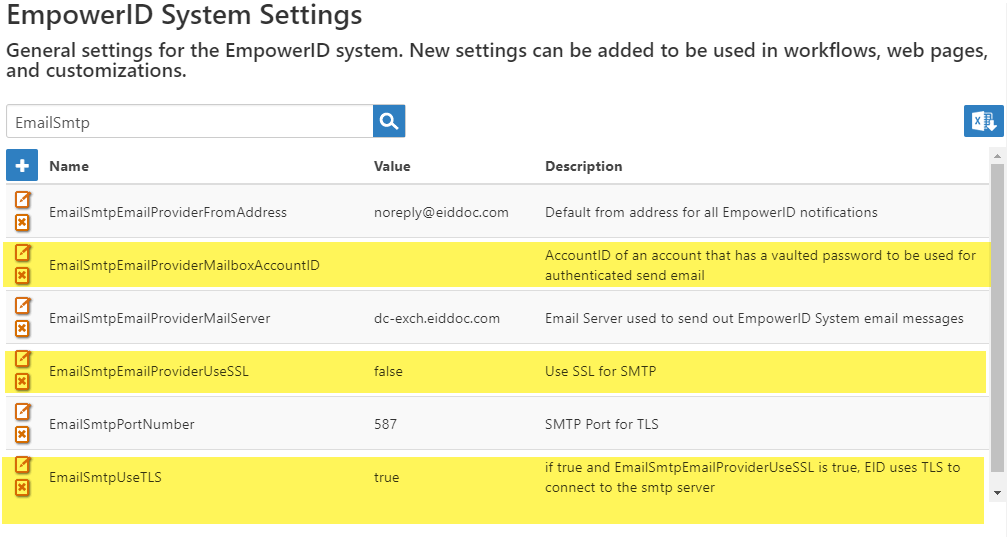
- On the EmpowerID System Settings page, enter EmailSmtp in the Search field and press ENTER.
You should see all SMTP email configuration settings in the grid. Of these settings, the following are relevant when using EmpowerID for SMTP relay only:- EmailSmtpEmailProivderFromAddress — This specifies the default From address the system should use when sending automated emails to your user.
- EmailSmtpEmailProviderMailServer — This specifies the DNS or IP address of the SMTP server in your environment.
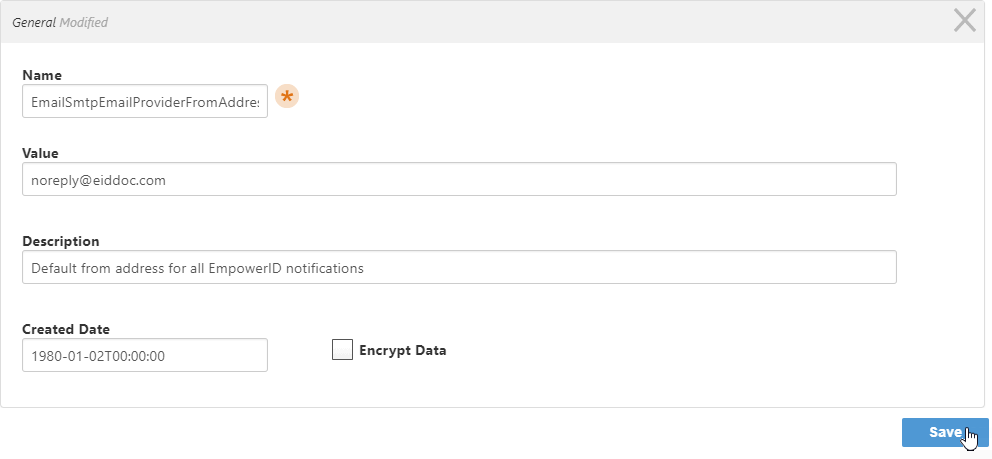
When EmpowerID is first installed, part of the configuration involves specifying the SMTP server and the default From address. You can edit these values from the EmpowerID System Settings page by doing the following:- Click the Edit button for the setting you want to change. In this example we are changing the value for the EmailSmtpEmailProviderFromAddress.

- Enter the new value in the Value field and then click Save.
You should see the new value in the grid.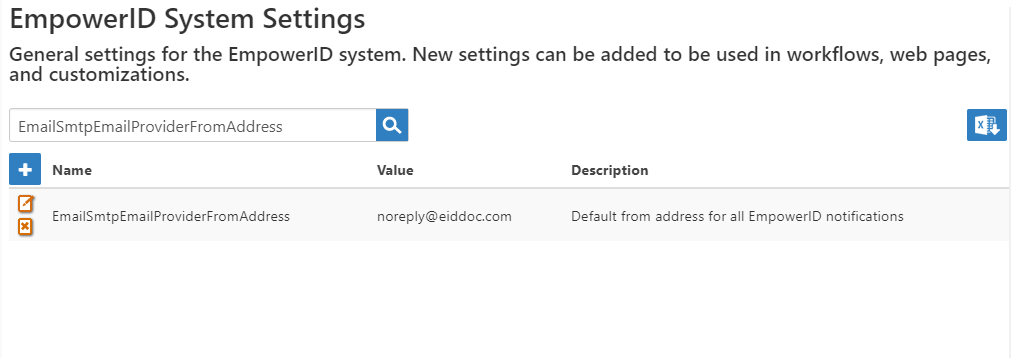
- Click the Edit button for the setting you want to change. In this example we are changing the value for the EmailSmtpEmailProviderFromAddress.
To configure EmpowerID for authenticated SMTP Delivery
- From the navigation sidebar, expand Admin, then EmpowerID Servers and Settings and then click EmpowerID System Settings.
On the EmpowerID System Settings page, enter EmailSmtp in the Search field and press ENTER.
You should see all SMTP email configuration settings in the grid. Beyond the EmailSmtpEmailProviderMailServersetting mentioned above, the following settings are relevant when configuring EmpowerID for authenticated SMTP delivery:When configuring EmpowerID for authenticated SMTP, the account used for reading and processing emails takes precedence over the EmailSmtpEmailProivderFromAddress setting.
• EmailSmtpEmailProivderMailboxAccountID — This specifies the user account EmpowerID uses to authenticate to the SMTP server, as well as to send automated responses on behalf of the system. This account needs to have its password vaulted in EmpowerID.If you are using a mail delivery system other than Exchange that supports SMTP, then you need to create a tracking-only account store and add an account with the appropriate credentials, as well as a user principal name, for that system to that account store. You then vault the password for that user account. For information on creating tracking-only account stores, see Creating Tracking-Only Account Stores.
• EmailSmtpEmailProviderUseSSL — This specifies whether to use SSL for SMTP.• EmailSmtpUseTLS — This specifies whether EmpowerID should use TLS to connect to the SMTP server. EmailSmtpEmailProviderUseSSL must be set to true for this setting to have effect. If set to false and EmailSmtpEmailProviderUseSSL is set to true, EmpowerID uses SSL to connect to the SMTP server.
- To configure authenticated email using SMTP, do the following:
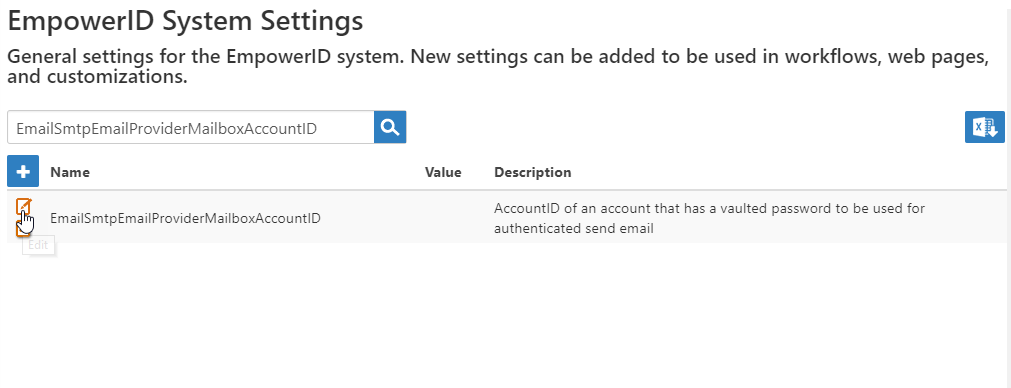
- Search for EmailSmtpEmailProivderMailboxAccountID and click the Edit button.
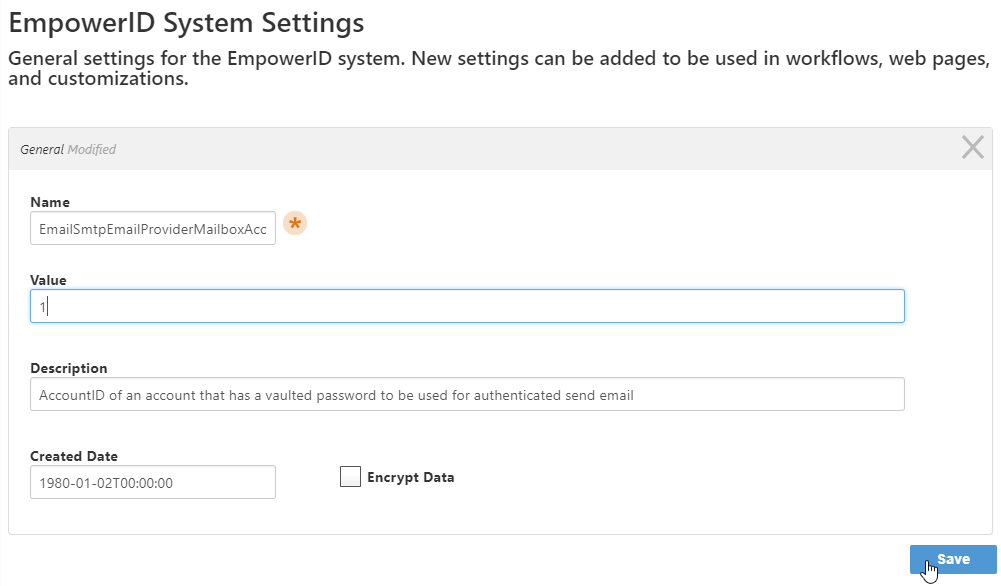
- In the Value field, enter the AccountID of the user account you will be using to authenticate to the server and process emails and then click Save.
- Next, vault the password for the user account by doing the following:
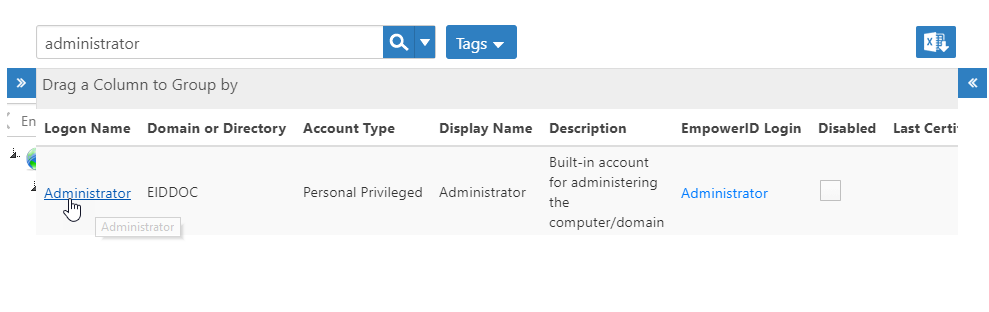
- From the navigation sidebar, expand Identities and click User Accounts.
- Search for the user account and then click the Logon Name link for it.
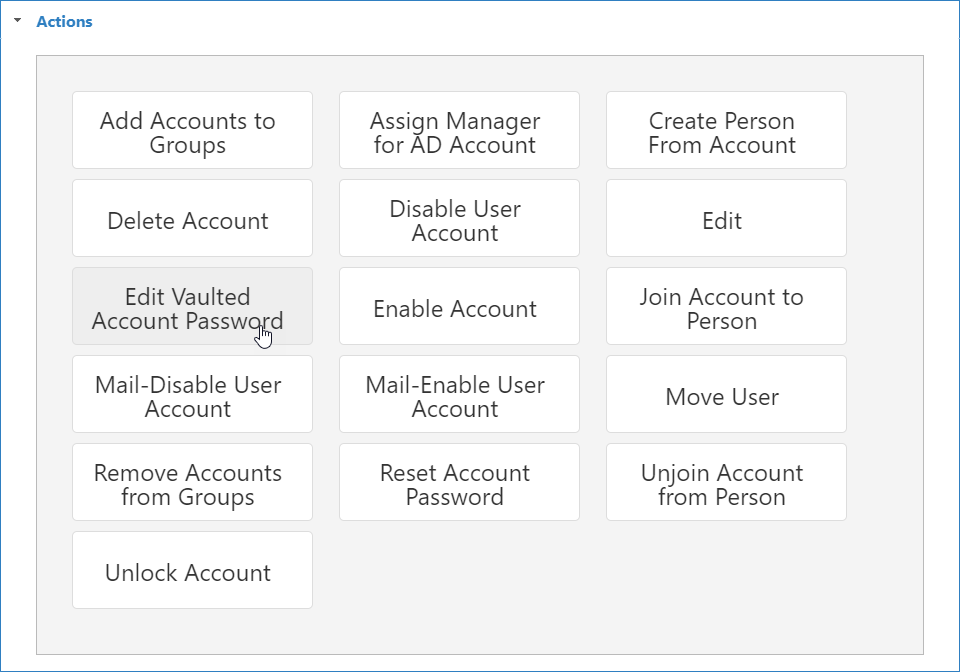
- From the View One page for the account, expand the Actions accordion and then click the Edit Vaulted Account Password button.
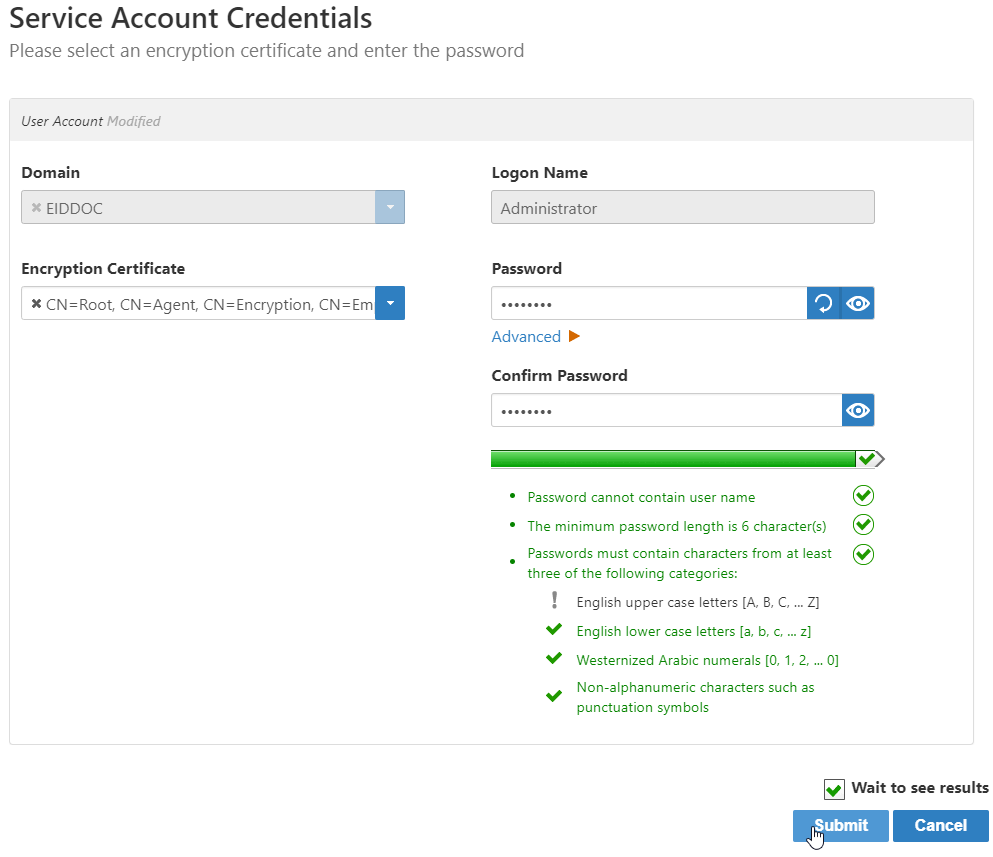
- On the Service Account Credentials page that appears, do the following:
- Click Encryption Certificate and select a certificate for encrypting the password.
- Enter the password in the Password and Confirm Password fields
- Click Submit.
- Click OK to close the Operation Execution Summary.
- Return to the EmpowerID System Settings page and edit any of the other SMTP settings as needed.
- Search for EmailSmtpEmailProivderMailboxAccountID and click the Edit button.
To configure EmpowerID for EWS
- From the navigation sidebar, expand Admin, then EmpowerID Servers and Settings, and click System Settings.
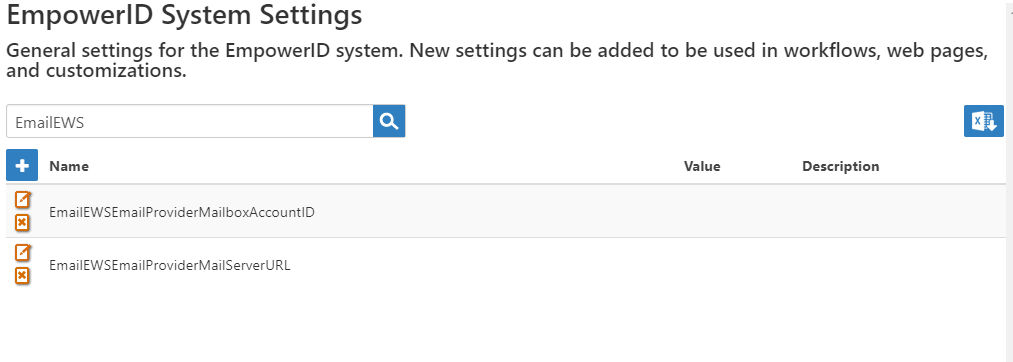
- On the EmpowerID System Settings page, enter EmailEWS in the Search field and press ENTER.
All Exchange Web Services email configuration settings appear in the grid.- EmailEWSEmailProivderMailboxAccountID — This specifies the user account EmpowerID uses to authenticate to the EWS server as well as to send automated emails on behalf of the system. This account needs to have its password vaulted in EmpowerID.
- EmailEWSEmailProviderMailServerURL — This specifies the URL to the EWS server. If you are using Office 365, the value of the URL should be https://outlook.office365.com/EWS/Exchange.asmx.
- To configure authenticated email using EWS, do the following:
- Click the Edit button for the EmailEWSEmailProivderMailboxAccountID setting.
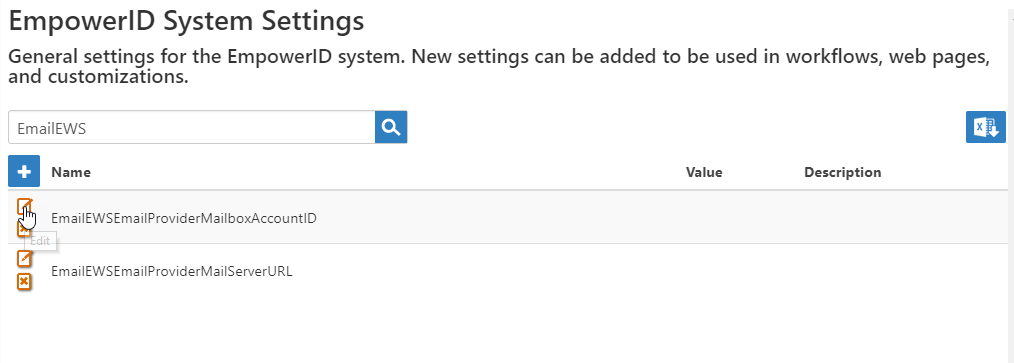
- In the Value field, enter the AccountID of the user account you will be using to authenticate to the server and process emails and then click Save.
- Click the Edit button for the EmailEWSEmailProivderMailboxAccountID setting.
- Next, vault the password for the user account by doing the following:
- From the navigation sidebar, expand Identities and click User Accounts.
- Search for the user account and then click the Logon Name link for it.
.png?version=1&modificationDate=1532015645832&cacheVersion=1&api=v2)
- From the View One page for the account, expand the Actions accordion and then click the Edit Vaulted Account Password button.
.png?version=1&modificationDate=1532015692759&cacheVersion=1&api=v2)
- On the Service Account Credentials page that appears, do the following:
- Click Encryption Certificate and select a certificate for encrypting the password.
- Enter the password in the Password and Confirm Password fields
- Click Submit.
.png?version=1&modificationDate=1532015761082&cacheVersion=1&api=v2)
- Click OK to close the Operation Execution Summary.
- Return to the EmpowerID System Settings page and edit the value for the EmailsEWSEmailProviderMailServerURL setting.
- Next, change the priority for the SMTP and EWS providers so that EWS has the higher precedence by doing the following:
- From the navigation sidebar, expand Admin, then Miscellaneous and click Email Provider.
- On the Provider page, click the Edit button for SMTP And IMAPI Email Provider.
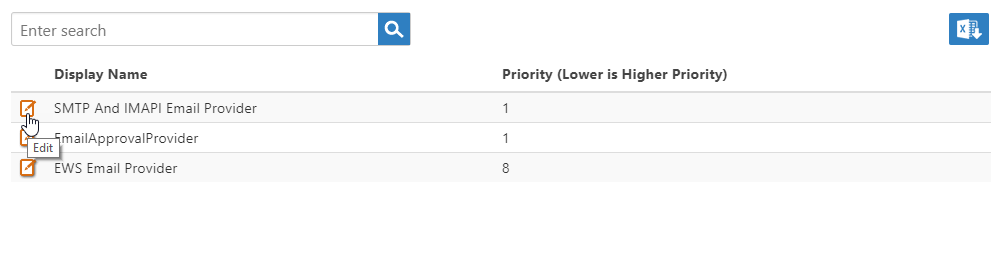
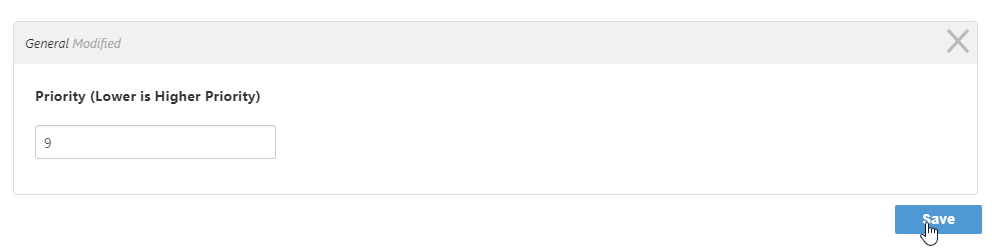
- Change the Priority from 1 to 9 and click Save. This gives the EWS Email Provider a higher priority as it has a lower value (8).
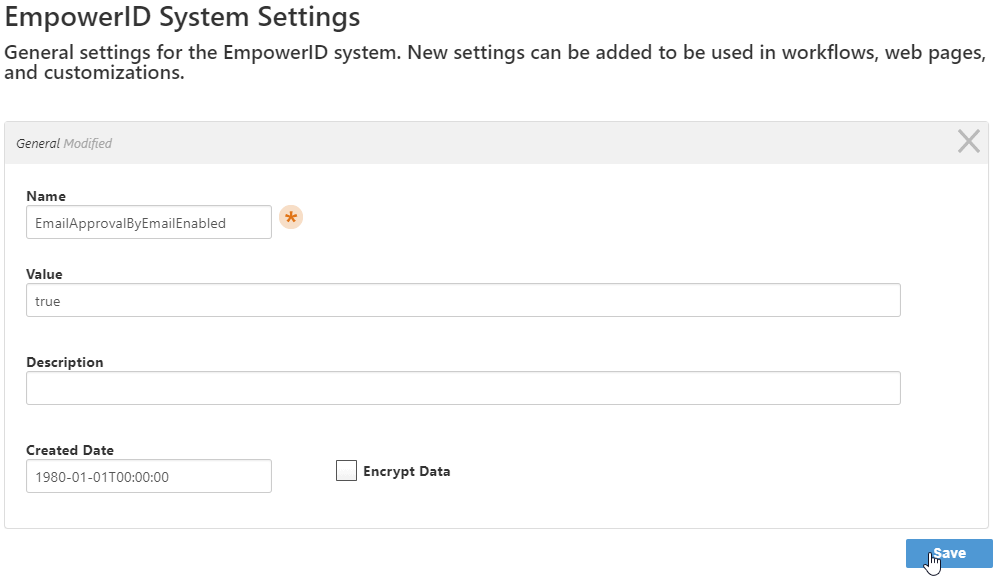
To configure EmpowerID for email approvals
For EmpowerID to process email approvals, the task or operation being approved or rejected must have the EnableBulkApproval set to true. This is set in Workflow Studio.
If you are using SMTP, follow the procedure outlined in the Configuring EmpowerID for authenticated SMTP Delivery section, including vaulting a user account; otherwise, following the procedure outlined in the Configuring EmpowerID for EWS section. After completing those steps, do the below steps.
- From the navigation sidebar, expand Admin, then EmpowerID Servers and Settings and click EmpowerID System Settings.
- Click the Edit button for the EmailApprovalByEmailEnabled setting.
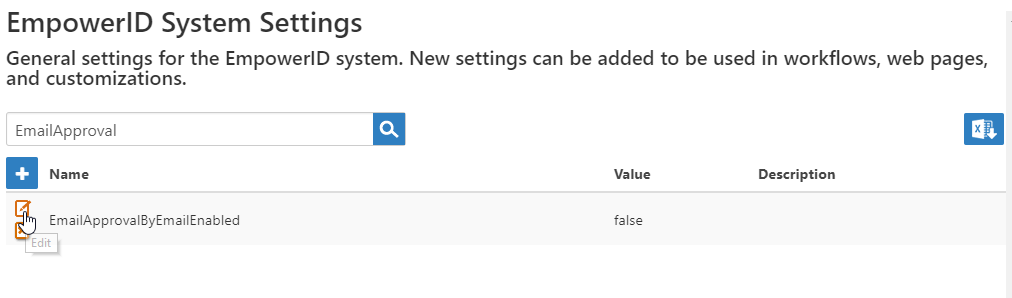
- Change the Value from false to true and click Save.