Vaulting Computer Credentials
In EmpowerID, computer credentials are vaulted user names and passwords for Windows computers or SSH keys for Linux computers. Users can check credentials out to initiate RDP or SSH sessions on computers using EmpowerID's Privileged Session Manager. When you vault a computer credential, you specify the type of computer credential you are creating and link it to the Shared Credential policy for that credential type.
To initiate computer credential vaulting, a user needs an access assignment that includes the Computer PAM User Full Access Management Role. This Management Role allows users to view and connect to computers, vault credentials, and link them to computers.
Users who vault computer credentials are the owners or Access Managers for those computer credentials. Access Managers can approve or deny access requests for the computer credentials they own, and can terminate RDP or SSH sessions on those computers.
To vault computer credentials
- In the navigation sidebar of the EmpowerID Web interface, expand Privileged Access and click Computers (In older versions: click on Resources and click Computers).
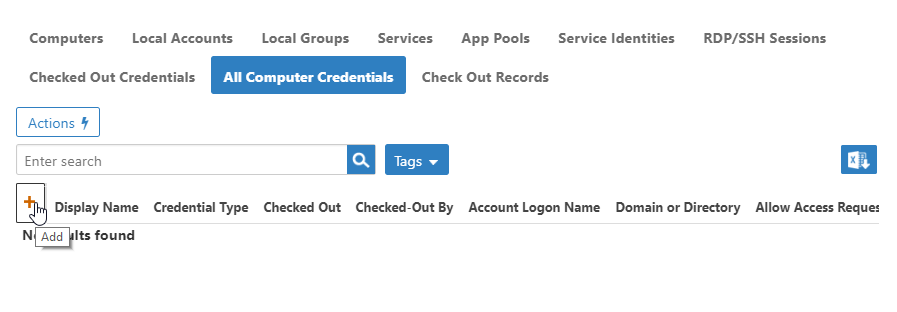
- Click the All Computer Credentials tab and then click the Add button.
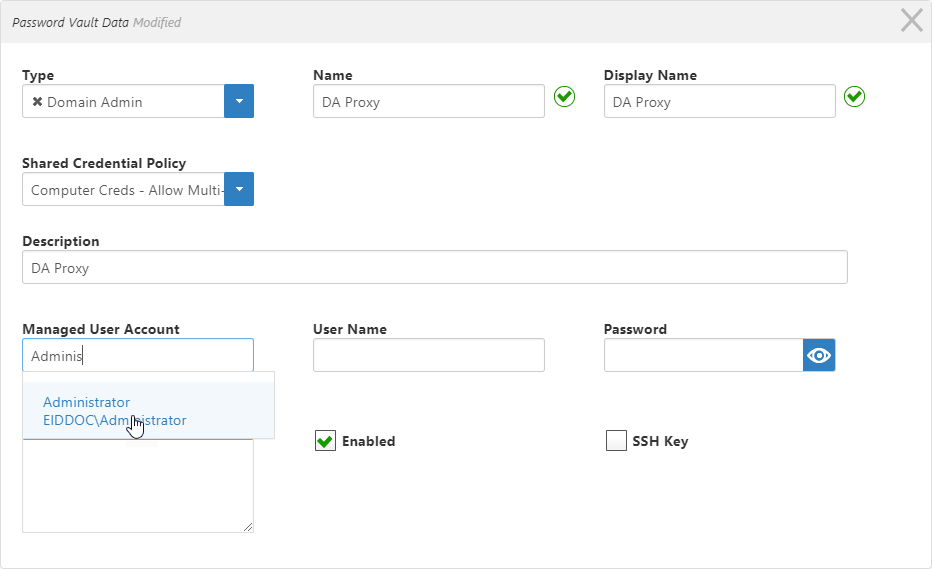
- In the Password Vault Data form that appears, from the Type drop-down, select the type of Computer Credential to create. EmpowerID encrypts the user name, password and notes information for all credential types. Available types include:
- Default Credentials — Select this standard credential type to vault any set of credentials that has significance in your environment.
- Domain Admin — Select this credential type to vault credentials for the administrator account in a domain managed in EmpowerID. Approved users are granted domain administrator permissions for all computers in the domain that you link to the credential.
Domain User — Select this credential type to vault credentials for a non-administrator account in a domain managed in EmpowerID. Approved users are granted user account permissions for each computer in the domain that you link to the credential.
When you first enter the password for a domain user account, EmpowerID validates it against the directory password hash for that account. This ensures that you vault the correct credentials.
Local Admin — Select this credential type to vault credentials for an administrator account on a local computer managed in EmpowerID. Approved users are granted administrator permissions on the local computer.
Enter a name for the Computer Credential in the Name and Display Name fields.
As a best practice, do not give a vaulted Computer Credential the same name as the account to which it is linked.
- From the Shared Credential Policy drop-down, select the Shared Credential policy to link to the Computer Credential. Here are the default options for computers:
- Computer Creds - Allow Multi-Check-Out - No Password Reset — Select this policy to create credentials that initiate an RDP or SSH session where more than one session (credential check out) is allowed and you do not want EmpowerID to reset the password for the account when a user checks in the credentials. The reset password on check-in option should be disabled for Multi-Checkout policies. For Multi-Checkout policies, you can rotate the passwords after hours using the scheduled reset feature.
Computer Creds - No Multi-Check-Out - Password Reset — Select this policy to create credentials that initiate an RDP or SSH session where more than one session is not allowed and you do want EmpowerID to reset the password for the account when the user checks in the credentials.
When using password reset, if the user checks out the credential but never actually sees the details and does not use it to connect to a privileged session, then the password is not reset on check in.
- MFA - Computer Creds - Allow Multi- Check-Out - No Password Reset — Select this policy to create credentials that initiate an RDP or SSH session where multi-factor authentication is required, more than one session (credential check out) is allowed, and you do want EmpowerID to reset the password for the account when the user checks in the credentials.
- Type a description in the Description field.
To vault credentials for a domain admin or user, in the Managed User Account field, enter a managed user account and click the tile for the account to select it. This field does not appear on the form if you select Default Credentials from the Type drop-down.
For EmpowerID to know about the domain admin account, the domain that hosts the account must be a domain that EmpowerID is managing.
- In the User Name field, enter the user name for the account you are vaulting.
- To vault credentials that initiate an RDP session with a Windows computer, in the Password field, enter the password for the account.
- To vault credentials that initiate an SSH session with a Linux computer, select the SSH Key checkbox, then browse for and select the SSH Key for the computer.
- Optionally enter notes in the Notes field.
- Click Save.
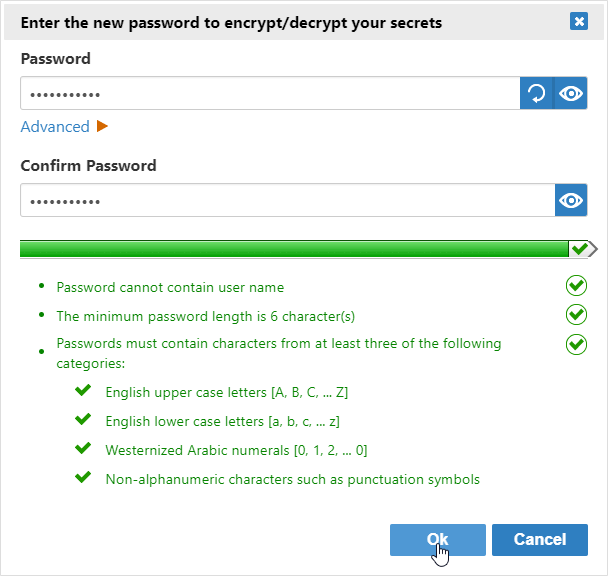
- If you have not yet entered your master password for this session, EmpowerID prompts you to do so. Enter your master password and click OK.
- If you have not yet created a master password for yourself, EmpowerID prompts you to do so. Enter a password in the Password and Confirm Password fields and click OK.
Please note that when creating a master password, you cannot use the same password associated with your EmpowerID Person.
For information on linking computer credentials to one or more computers, see Linking Credentials to Computers.
For information on linking computer credentials to domains, see Linking Credentials to Domains.


