Creating Accounts from People
Home / Identity Administration / People / Current: Creating User Accounts from People
This topic demonstrates how to create user accounts in external directories from existing EmpowerID people.
Prerequisites
EmpowerID must be connected to an external account directory like Active Directory.
For more information on connecting EmpowerID to external account directories, see Connecting to Directory Systems.
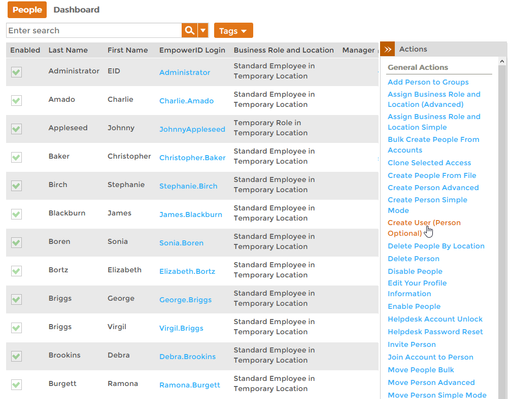
To create a user account for an existing EmpowerID Person
- In the Navigation Sidebar of the EmpowerID Web interface, expand Identities and click People.
- From the Actions pane of the Person management page, click the Create User (Person Optional) action.
This opens the Create User form, which contains several tabs with fields for setting user account attributes or properties.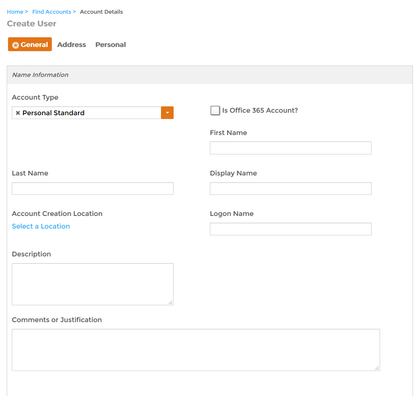
General tab of the Create User form
- Select an account type from the Account Type drop-down. Personal Standard is the default value, or you can select Personal Privileged.
- Enter first and last names for the user account in the First Name and Last Name fields.
- Enter display and logon names for the user account in the Display Name and Logon Name fields.
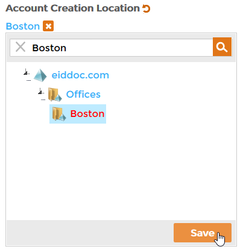
- Below Account Creation Location, click Select a Location and in the selector that opens do the following:
- Search for and select the appropriate external directory location for the user account.
- Click Save to close the Location Selector.
Select the appropriate UPN suffix from the UPN Suffix drop-down.
- Select Join Account to an Existing Person.
Type the name of the Person from whom you are creating the account in the Account Owner field and then click the tile for that Person.

Optionally, select Allow me to enter a password to set the password for the user account. In this example, we do. This changes the form to display the Password and Confirm Password fields.

Type the password in the Password and Confirm Password fields.
- In the Security section, select any settings you want to apply to the account.
- By default, Allow Joining Account to a Person and Allow Provisioning a Person from Account are selected. These two flags tell EmpowerID that it can join the account to a matching EmpowerID Person and that it can provision a Person for the account if none exist.
- When creating a user account for an existing person, as in this exercise, EmpowerID joins the user account to the Person and syncs the attributes based on the Attribute Flow Rules set for the account store.
In production, you generally set Must Change Password At Next Logon.

EmpowerID determines whether to join new accounts to existing people or provision new people from those accounts based on the Join and Provision rules set for your environment. For more information on these rules, see Overview of the Account Inbox and Reviewing Join and Provision Rules.
Optional tabs on the Create User form
- Optionally, click the Address tab and fill in address information for the user account you are creating.
- Optionally, click the Personal tab and fill in personal information for the user account you are creating.
Save changes
- Click Save.
After the user account is created, the account's View page appears.
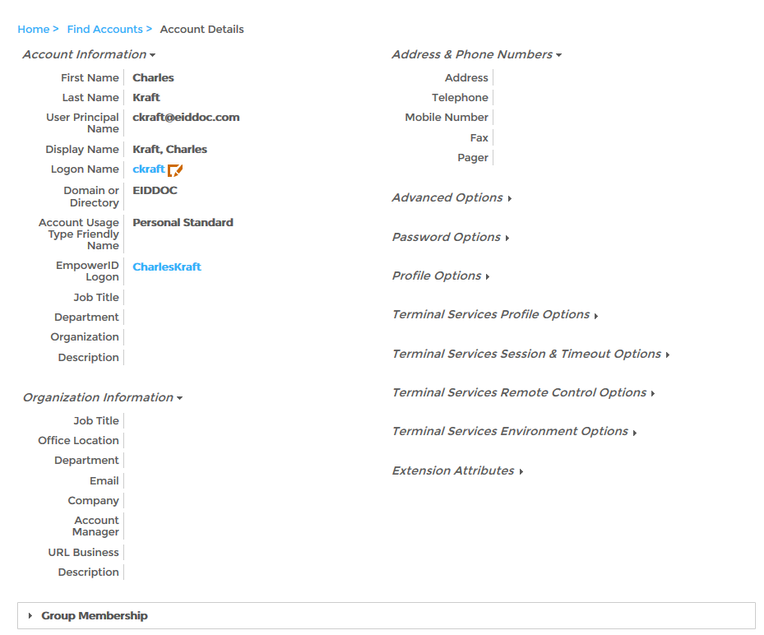
View pages allow you to view information about a selected resource and manage that resource as needed.The EmpowerID Logon attribute is noteworthy, as it points to the logon name of the EmpowerID Person owning the account. If this attribute is empty, the account does not belong to an EmpowerID Person.
To verify that the account is joined to the Person
- From the View page for the account, click the EmpowerID Logon link below the Account Information section.
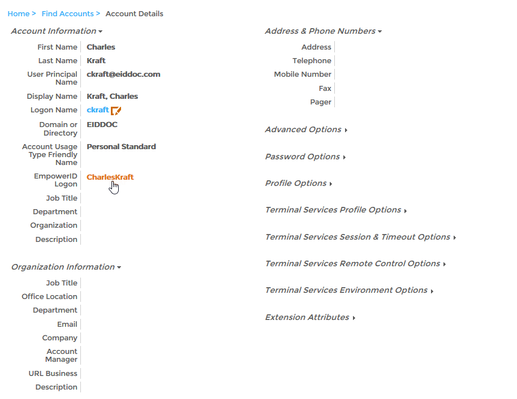
This leads to the View page for the EmpowerID Person owning the account. Verify that it is the same person you selected.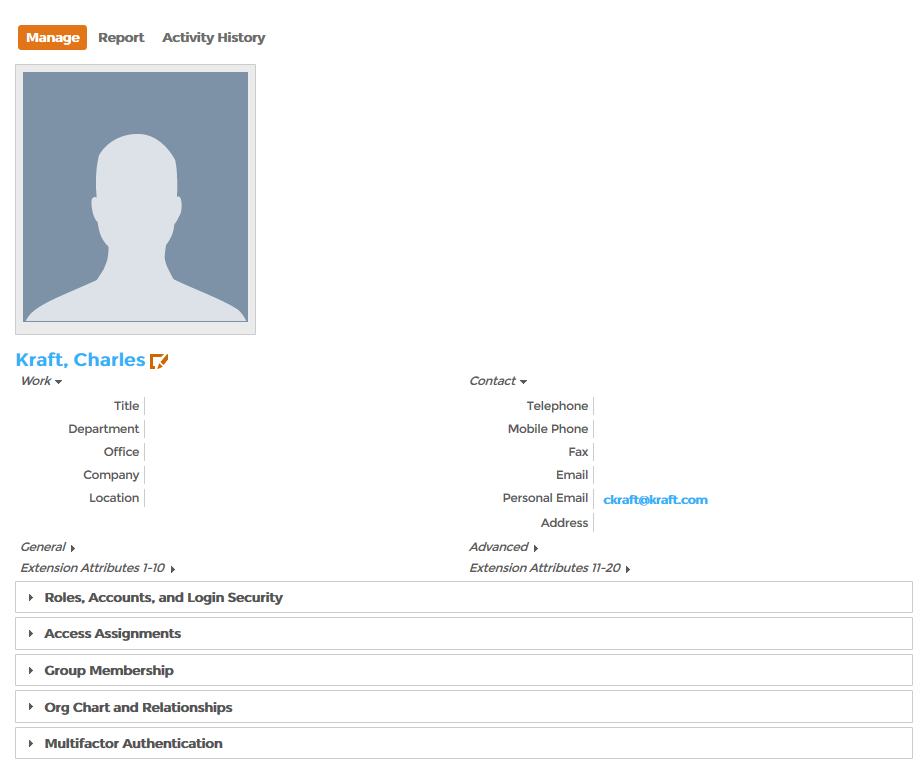
- On the View page for the Person, click the Roles, Accounts, and Login Security accordion to expand it.
Verify that the User Accounts Owned pane includes the user account you created for the Person.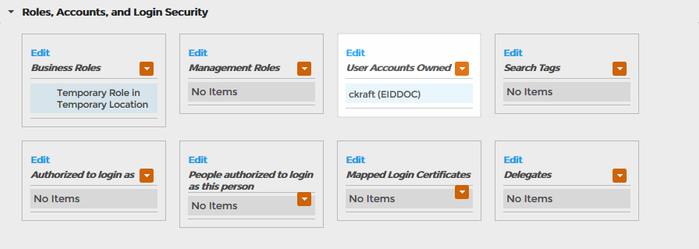
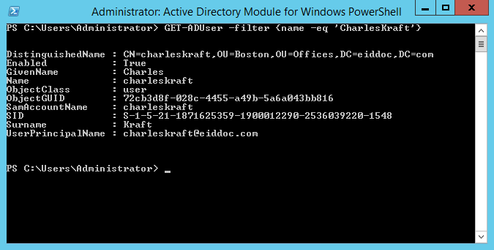
To verify that the account was created in Active Directory
On a machine with the Active Directory Module for Windows PowerShell installed, run the following cmdlet, substituting the name of the user with the user you created:
GET-ADUser -filter {name -eq 'CharlesKraft'}- Verify that the account you created appears in the output.
Related Content