Default Attribute Values Policies
Default Attribute Values policies are policies that allow you to automate the attribute values of any Person and flow those attributes to that Person's linked accounts in external account stores belonging to a target of the policy. (Policy targets can include any Management Roles, groups, Query Based Collections or Set Groups, individual people and Business Role and Location combinations.) For example, if you create Default Attributes Values policy that specifies that the Title attribute be set to "Contractor" for anyone assigned to the policy and then you assign the policy to a "Contractors" group, EmpowerID sets the Title attribute to Contractor for each Person in that group and then flow those changes to the corresponding attribute on each Person's user account.
This topic demonstrates how to create and assign a Default Attribute Values policy in EmpowerID.
Prerequisites
- EmpowerID must be connected to Active Directory. For more details, see Active Directory.
- To allow any attribute changes occurring in EmpowerID via the policy to flow to the external account store, the Attribute Flow Rules configured for the account store must be set accordingly. For more information, see Configuring Attribute Flow.
To create a Default Attribute Values policy
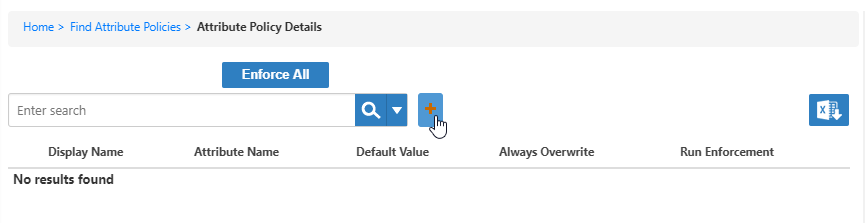
- In the Navigation Sidebar of the EmpowerID Web interface, expand Admin, then Policies, and click Default Attribute Values.
- On the Attribute Values management page, click the Add button.
- In the Policy Details form that appears, type a name and display name for the policy in the Name and Display Name fields, respectively.
From the Person Attribute drop-down, select the attribute for the Person that you want to set using the policy.
The values shown in this drop-down list include every type of attribute that could be associated with an EmpowerID Person, however, not all EmpowerID Person attributes correspond to attributes in Active Directory. Here is a list of the attributes and what attribute each corresponds to in Active Directory (if any):
- AboutMe
- BirthName
- CarLicense (carlicense)
- City (l)
- Company (company)
- Country (co)
- CustomAttribute1 through 9
- CustomAttribute27 (thumbnailPhoto)
- Department (department)
- DepartmentNumber (departmentNumber)
- Description (description)
- Division (division)
- EmailAlias (mailNickname)
- EmployeeID (employeeID)
- EmployeeIDOther
- EmployeeType (employeeType)
- ExtensionAttribute1 - 27 (extensionAttribute1-15 and 20)
- Fax (facsimileTelephoneNumber)
- FirstName (givenName)
- FriendlyName (displayName)
- Gender
- GenerationalSuffix (generationQualifier)
- HomeTelephone (homePhone)
- IMAddress
- Initials (initials)
- LastName (sn)
- Login (samAccountName)
- MiddleName (middleName)
- MobilePhone (mobile)
- Notes (info)
- Office (physicalDeliveryOfficeName)
- POBox
- Pager (pager)
- PersonalTitle (personalTitle)
- PhotoURL
- PositionCode
- PostalCode (postalCode)
- PreferredFirstName
- PreferredLastName
- Province
- SIPAddress
- SecondLastName
- State (st)
- Status
- StreetAddress (streetAddress)
- StreetAddress2
- Telephone (telephoneNumber)
- Title
- In the Default Value field, type the default value for the selected attribute.
- Select or clear Always Overwrite as appropriate for the policy. If selected (the default), EmpowerID reverts any changes made to the attribute value on an affected person back to the value specified by the policy.
- Click Save.

EmpowerID creates the policy and opens the Edit page for it. From this page, you can assign the policy to any EmpowerID Actor, such as a Group or Business Role and Location.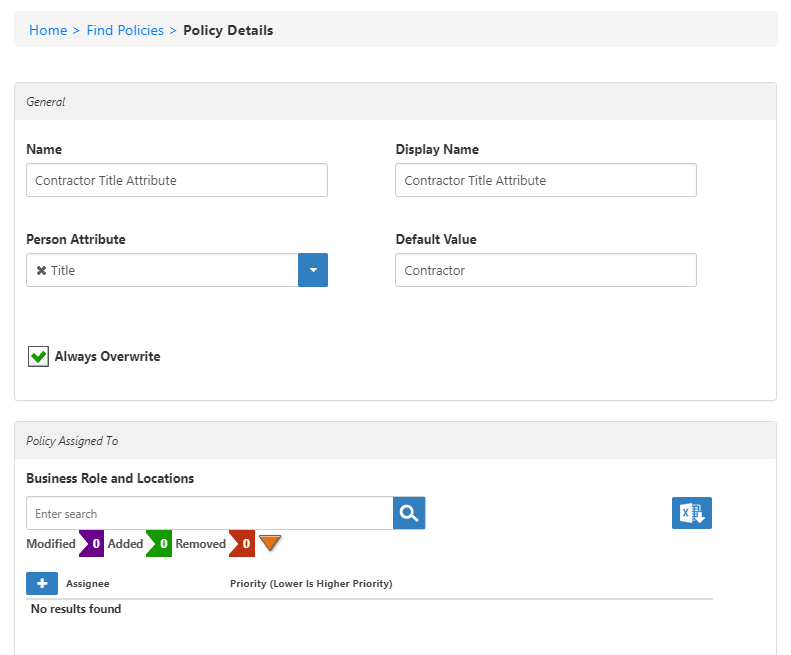
To assign the Default Attribute Policy
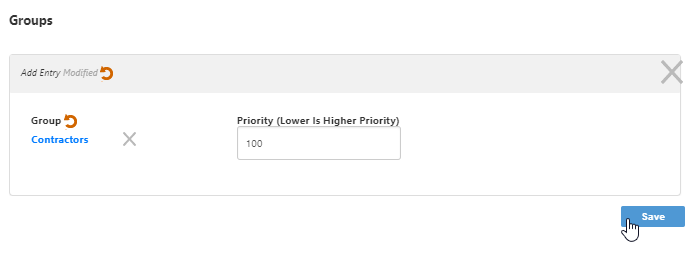
- On the Edit page of the policy you just created, in the Policy Assigned To section, scroll to the Actor type to which you want to assign the policy and click the Add (+) button on its grid. In our example, we assign the policy to a group, so we click the Add (+) button on the Groups grid.

- In the Group (or other Actor Type) field, type the name of the specific actor to which you want to assign the policy and then click the tile for that actor. In our example, we assign the policy to the Contractors group.
Type a numeric value from 1 to 100 for the policy in the Priority field.
The priority value determines how EmpowerID treats the users affected by the policy if those users have other Default Attribute Values policies. The lower the number, the higher the priority.
- Click Save.
- Repeat for each additional Actor type you want to add to the policy. For example, if you wanted to add a Business Role and Location to the policy, you click the Add (+) button on the Business Role and Location grid, select the specific Business Role and Location and assign a priority for the policy.
To verify the attribute value in Active Directory
On a server with the Active Directory module for PowerShell installed, run the following PowerShell cmdlet, substituting the attribute with that specified by your policy.
Get-ADUser -Filter {Title -eq "Contractor"}- A record is returned for each user account affected by the policy.
Related Content