Overview of Workflow Studio
WHAT IS WORKFLOW STUDIO?
EmpowerID is an extendable Identity and Access Management (IAM), Single Sign-On and workflow development platform that uses hundreds of workflows and thousands of workflow operations with real-time access checks to give organizations the security tools needed to control who can do what, where and when with their resources. Workflow Studio is the process designer and developer tool used by EmpowerID to create these workflows. As a developer, you can access these workflows from Workflow Studio, using them as templates for your own workflows. Or you can create altogether new workflows and workflow processes to meet any evolving needs your organization may have.
WHAT IS A WORKFLOW?
A workflow is a series of activities that model the steps involved in a business process. It is a logical, sequential representation of the actual activities performed by the people or systems that interface with a business model. In EmpowerID, the workflow is the primary means by which users interact with IT resources to accomplish specific organizational tasks. All workflows have at least two layers:
- a process layer that represents the workflow and how it functions in a business environment
- and a data layer that represents the information being captured by the workflow.
Workflows using these layers are generally automated and initiated by pre-determined processes and can be used to capture data for reporting, compliance, and other needs.
Other workflows are user-centric. They do not occur in response to automated system events, but require human interaction, whether that involves simply clicking a button to initiate a workflow or entering and manipulating data at various points of the workflow's lifecycle. Like automated workflows, user-centric workflows comprise process and data layers, but they contain an additional layer as well:
a presentation layer that presents itself to the end-user.
Known as the form or lookup, the presentation layer gives users functional access to a workflow by providing the interface that allows them to work with business objects and data.
In the EmpowerID model, users never directly interact with a workflow; rather, they interact with what is known as a request workflow. A request workflow is one of the resource types registered in the EmpowerID Identity Warehouse that is related to resource acquisition and management. A specific request workflow is an Identity Warehouse resource record corresponding to an EmpowerID workflow that is used to control who may interact with the workflow.
A typical EmpowerID workflow is comprised of a number of components. Depending on the purpose of the workflow, not all of these need to be present.
FORMS
Forms provide components that allow users to enter information into a workflow, which can then be captured and used throughout the workflow. Form data is incorporated into a workflow in this way through a compilation and publication process by which Workflow Studio creates a special type of activity, known as a "Form activity." Once published, Form activities can be added to workflows, where the drag-and-drop property binding capabilities of Workflow Studio can be used to send form data to and from other workflow objects at runtime.
Form Components
Form components used in Workflow Studio comprise two category types: Primitives and RBAC Components. Primitives allow you to place simple objects such as drop-downs, calendar controls, and fields on a form, while RBAC Components allow you to place the properties of objects bound to EmpowerID-protected resources on a form. Each of these RBAC components can be used to return the properties of these protected resources for use in a workflow. For example, if you want to capture data specific to a workflow initiator with an EmpowerID identity, you can add an RBAC Component for a Person object to a form, incorporating into your form design only those properties (person attributes) relevant to your data needs.
Form Types
Workflow Studio provides for two types of forms in workflow use: the User Input form and the User Decision form. The type of form used depends on the type of functionality needed at a given point in a workflow.
User Input forms allow users to enter information and submit the data back to the workflow for use in later activities. As such, User Input forms appear to any user running the workflow at that point in the process in which the User Input form is placed. User Input forms can be used anywhere within a workflow and in most cases are the first form encountered in a workflow. For example if you have a workflow that allows users to submit a request for resources or some other "actionable" event, you can add the shape derived from a User Input form by which those users can enter and submit the details of their request back to the workflow, where it can be routed for further review by a designated approver. Once submitted, the workflow resumes to the next step in the process as directed by the business requirements of the workflow.
User Decision forms appear within a workflow at a point where the process depends on further user input or an approval to continue. Generally speaking, User Decision forms derive their data from the information entered into a User Input form and are used when a response to that data is needed. Based on the User Decision Form Base Activity developed by The Dot Net Factory, User Decision forms offer routing options and create workflow tasks on the Workflow Task list of any "approvers" for that form step in the workflow. They also provide email notifications about the request to all interested parties. When a workflow process encounters a User Decision Form activity, the workflow enters an idled state until a response occurs (or an escalation occurs that ends the process). Thus, using the scenario mentioned above, if a workflow user submits a request for resources via a User Input form, you could add the shape derived from a related User Decision form as the next step in the process, requiring a user decision for the workflow to proceed to the next step.
ACTIVITIES
Activities, or shapes, are the building blocks of the EmpowerID workflow and contain the logic that defines a specific step or process within a given workflow. In EmpowerID, workflow activities can be Form activities, Lookup activities, or Operation activities.
Form and Lookup activities comprise the presentation layer of an EmpowerID workflow. They are what users see and interact with when working in a workflow. EmpowerID captures the data entered into the form fields and/or drop-downs of these user interface elements of a workflow, binding it to the workflow in a way that ensures the integrity of the data is maintained throughout the workflow lifecycle.
Operation activities are activities based on the EmpowerID workflow authorization framework that the workflow uses to determine at runtime if the current user in a workflow process can execute the code in that activity against a specific object (such as changing his or her own profile picture). If the person can perform the task, the workflow continues; if the person cannot perform the task, EmpowerID routes the task to any designated approvers, who must approve the request for the code to be executed. Activities are joined to one another by lines to allow the workflow to progress from one workflow process to another.
In Workflow Studio, activities are comprised of two types, Form activities and Operation activities.
Form Activities
When you publish a form in Workflow Studio, a special activity, known as a "Form activity," is generated and published to the EmpowerID Identity Warehouse. In this type of activity, the form fields are generated as dependency properties, enabling you to use the drag-and-drop property binding capabilities of Workflow Studio to send data to and from the form. To use an existing published form in a workflow, you simply add the generated activity into the workflow.
Operation Activities
Operation activities are activities based on the EmpowerID workflow authorization framework used to determine if the current user in a workflow process can execute the code contained in that activity. They determine at runtime if the current user has any EmpowerID roles with the necessary operations against the target resource(s) to perform the action being attempted, and handle any approval process required if they do not. Approvals are routed using the EmpowerID Rights-Based Approval Routing (RBAR) technology to any individuals that have been granted the ability to perform the operation against the target resource. The operation activities protect the execution of the "action" code for that activity as designed in Workflow Studio.
Each operation activity is derived from the OperationWorkflowBase activity, which exposes a number of methods and other members implemented by the deriving activities. Workflow Studio provides templates that allow for the quick creation of several different types of operation activities, depending on the number of resources involved in the workflow process. These include:
- Single Multi-Operation Activity - Used for creating Operation activities with one resource involved that could execute multiple operations.
- Dual Multi-Operation Resource Activity - Used for creating Operation activities with two resources involved that could execute multiple operations.
- Triple Multi-Operation Resource Activity - Used for creating Operation activities with three resources involved that could execute multiple operations. An example of a triple operation is the change Person primary Business Role and Location operation. To perform this operation, security is checked on the Person, Business Role, and the Location.
BUSINESS RULES
Often when developing workflows, business requirements call for the possibility of different outcomes depending on conditions at the time a workflow executes. For example, some users may be able to initiate a workflow but may not have the appropriate permissions to perform all the operations associated with some of the activities in that workflow, while others may have all the permissions necessary to execute every operation encountered by the workflow. In these cases, outcomes need to differ. In the case of users lacking permissions, the process should route their actions for approval before executing them and remove them from the process if approval is denied. And users with full permissions should be able to complete each business process task in the workflow without interruption. You meet these requirements through the use of Business Rules.
In Workflow Studio, Business Rules are Boolean expressions you write and apply to the lines that connect activities to one another at points where the process can flow in different directions depending on the conditions encountered by the activities. When you apply a Business Rule to an activity line, you are setting the conditions that determine whether the process can flow through that line or not. If the Business Rule expression evaluates to true, the process flows through the line and on to the next activity; conversely, if the Business Rule expression evaluates to false, the process cannot flow through the line and must take another path. Generally speaking, one Business Rule applies to any two lines that exit a given activity and must evaluate to true for one of the lines and false for the other.
The below image shows an example of how Business Rules determine the outcome of a workflow. In the image, a user initiates a workflow and encounters the first activity without event. The activity executes any code and the process flow to the Operation Activity, which contains operations against protected resources. In order to execute the operations, the user must have those operations allowed for the resources being acted against by the Operation Activity before continuing. If the user has those operations allowed or is approved to perform them, the code in the Operation Activity is executed against those resources and the process continues to other activities in the workflow. If the user does not have those operations allowed for the resources in question, and is denied them by an approver, the code in the Operation Activity is not executed and the process flows to the Exit Workflow activity. In both cases, the controlling factor for which path the process flow is the Business Rule applied to the activity lines.
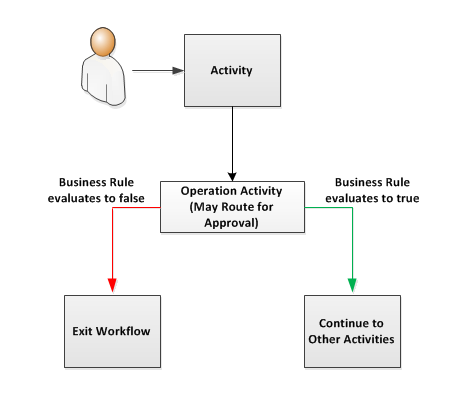
For both activity lines, the same Business Rule is applied. It is only the evaluation of the rule's logic that differs. For this example, the logic of the Business Rule could look like the following code:
return CurrentWorkflow.OperationActivity.OperationExecutedThis code simply returns the value of OperationExecuted. When using Business Rule with activity lines, you direct the flow by applying the evaluation of the Business Rule to the lines. Thus in the image above, the line connecting the Operation Activity to the other activities has a Business Rule applied with an evaluation of true and the line connecting the Operation Activity to the Exit Workflow activity has a Business Rule applied with an evaluation of false.
ESCALATIONS
In a Workflow Studio workflow application, Operation and Form activities can be configured with rules, known as Escalations, that direct the workflow to take specific actions when conditions required to complete a business task process do not occur within a specific timeframe. They are scheduled time interval objects you create to raise certain events within the workflow when the time interval defined by the escalation expires.
These events can range from the sending of emails and dashboard notifications to users when a workflow process requires human interaction to continue, to directing the workflow to complete the process if human interaction with does not occur within a given period of time. Escalations ensure that a workflow process does not idle indefinitely while waiting for user input and become disabled when tasks pertaining to them are completed.
Workflow Studio provides several default actions that you can apply to an escalation to define what occurs when the Escalations job raises the escalation. These actions are coded events that occur according to the schedule parameters entered in the wizard that allow you to define what occurs when the escalation is raised in a workflow without the need to write code for that event. These default actions are available via the Escalations wizard and you can add them to an escalation at any time. They include the following:
- Complete Task —This directs the escalation to complete the activity with a hard-coded form decision if human intervention does not occur after a specified amount of time. If a succeeding rule has been added to the activity, you can direct the escalation to override that rule.
- Notify Approvers Manager —This directs the escalation to send an email notification to the manager of the approver in the event the approver does not respond within a specified amount of time. This requires that the manager be set on an account owned by the person.
- Re-Notify Approvers —This directs the escalation to send a reminder email of the task awaiting their approval in the event the approver does not respond within a specified amount of time.
PUTTING IT ALL TOGETHER
Using these components, the process of a typical EmpowerID workflow could look like that depicted below. In the image, the Presentation Layer is separated from the Data and Process Layers to allow you to more easily see what happens when a workflow is initiated. Although we have separated the layers for depiction purposes, in reality, all three layers contain elements of one another and are inseparable in the workflow process.
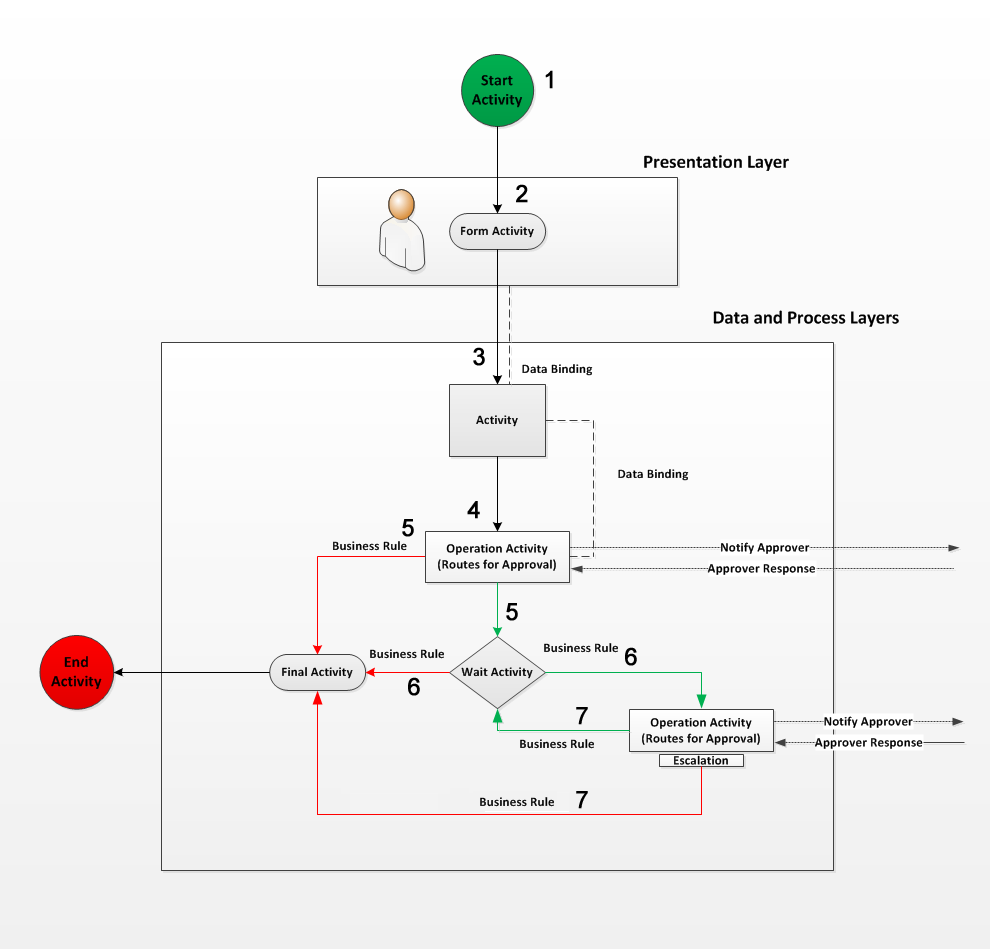
From the image, we can see that the workflow contains a number of activities, data bindings, and Business Rules. Each of these workflow components work together to direct what happens in a workflow and how it happens.
- The workflow is initiated by a person.
- EmpowerID presents a form or lookup (the Presentation Layer) to that person, which requires the input of data.
- The data entered in the form or lookup is bound to a second activity, which uses the data to perform some type of work.
- The workflow progresses to an Operation Activity, which checks the access of the person initiating the workflow before allowing its code to be executed. If the person initiating the workflow lacks the authority to proceed, EmpowerID routes the operation to any designated approvers, placing a task on their dashboards and sending email notifications as appropriate. At least one approver must approve the request before the workflow can progress.
- At this point, the process flows to one of two activities based on the response of the approver and the logic of the Business Rule applied to the lines connecting the Operation activity to those activities. In our example, the red line depicts where the process flows if the approver denies the request and the green line depicts where the process flows if the approver approves the request.
- If the request is approved, the workflow proceeds to the Wait activity (designated by the diamond shape), which idles the workflow for a predetermined period of time to allow the initiator to perform some tasks. If the request is denied, the workflow proceeds to the Final activity, designated by the oval shape, which then proceeds to exit the workflow.
- Once the idle time passes, the process flows either to the second Operation activity or the Final activity depending on the logic of the Business Rule applied to the two lines connecting the Wait activity to the those activities.
- If the request is approved, the workflow loops back to the Wait activity where the process outlined in step 6 above repeats itself. If the request is denied the workflow proceeds to the Final activity and exits the workflow.