EmpowerID includes a Salesforce connector that allows organizations to bring the user data (user accounts, permissions sets, profiles and roles) in their Salesforce domain to EmpowerID, where it can be managed and synchronized with data in any connected back-end user directories. When EmpowerID inventories Salesforce, it creates an account in the EmpowerID Identity Warehouse for each Salesforce user, a group for each Salesforce profile, a group for each Salesforce role, and a group for each Salesforce permission set. EmpowerID distinguishes these groups from one another by group type. Groups created for Salesforce profiles have a group type of ProfileGroup (GroupTypeID of 15), while groups created for roles have a group type of PrimaryRoleGroup (GroupTypeID of 16). This information becomes important if you use EmpowerID to create users in Salesforce as each Salesforce user must have a profile.
Additionally, EmpowerID provides Provisioning policies or Resource Entitlements that allow you to automatically provision Salesforce accounts for any person within your organization based on their role. For example, if your organization has a sales department, each time a new hire occurs within that department, EmpowerID can provision a Salesforce account for that individual with the profile specified in the Provisioning policy. For more information on Resource Entitlements and Salesforce, see Salesforce User Accounts.
| Info | ||
|---|---|---|
| ||
In order to connect EmpowerID to Salesforce:
|
This topic demonstrates how to connect EmpowerID to Salesforce in both the EmpowerID Web application and the EmpowerID Management Console.
To connect EmpowerID to Salesforce using the Web Application
- From the navigation sidebar of the EmpowerID Web interface, expand Admin > Applications and Directories and then click Account Stores and Systems.
- On the Find Account Store page that appears, click the Actions tab and then click Create Account Store.
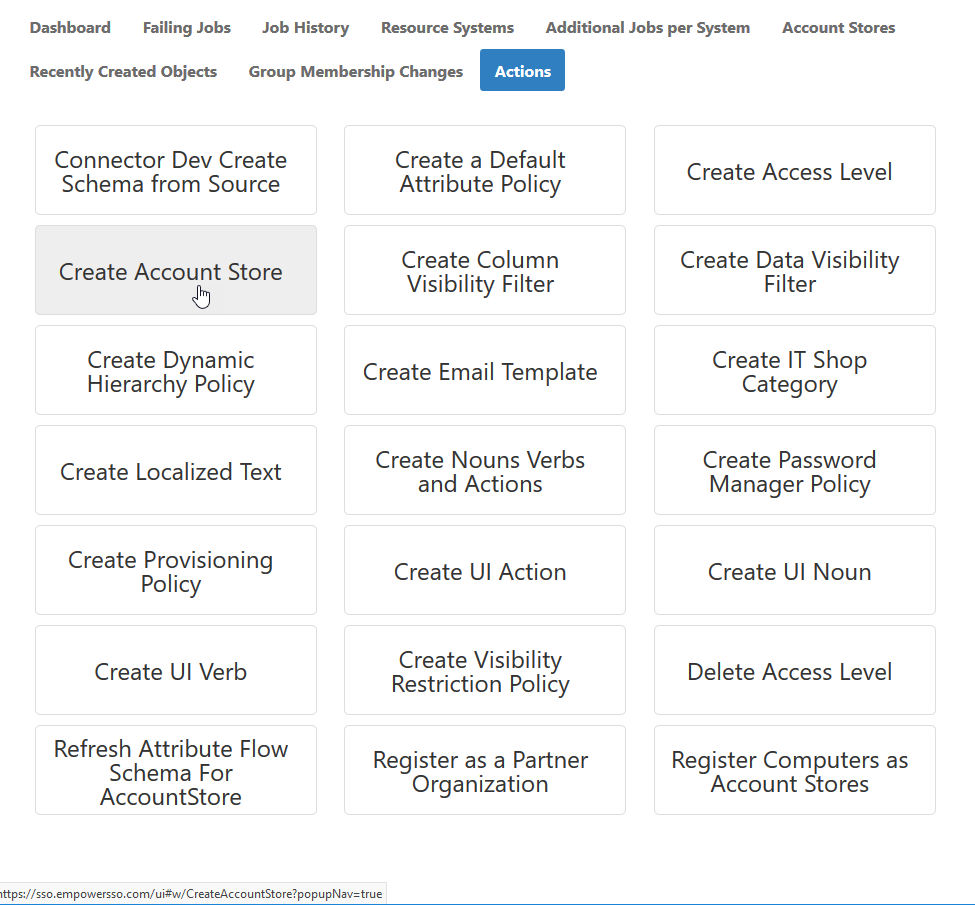
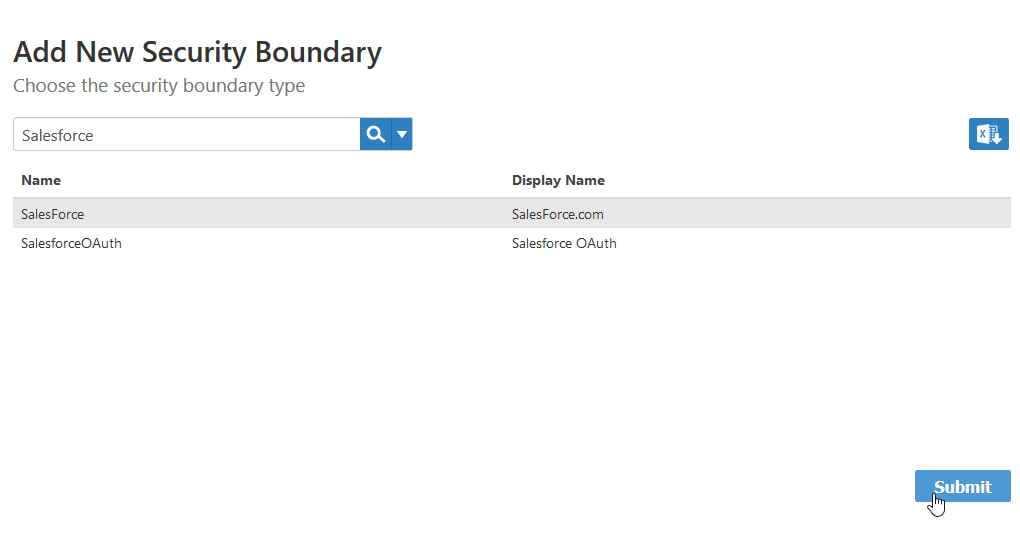
- From the Select a system type screen, search for Salesforce and then click the Salesforce.com record to select it.
- Click Submit.
- In the Salesforce settings page that appears, do the following:
- In the Username field, type the username of the Salesforce account you created in Salesforce for EmpowerID.
- Type the password for the account in the Password and Confirm Password fields.
- In the Service Account Token field, type the value of the token generated by Salesforce for the selected user account.
- In the URL field, enter https://<YourSalesforceDomain>/services/Soap/c/34.0.
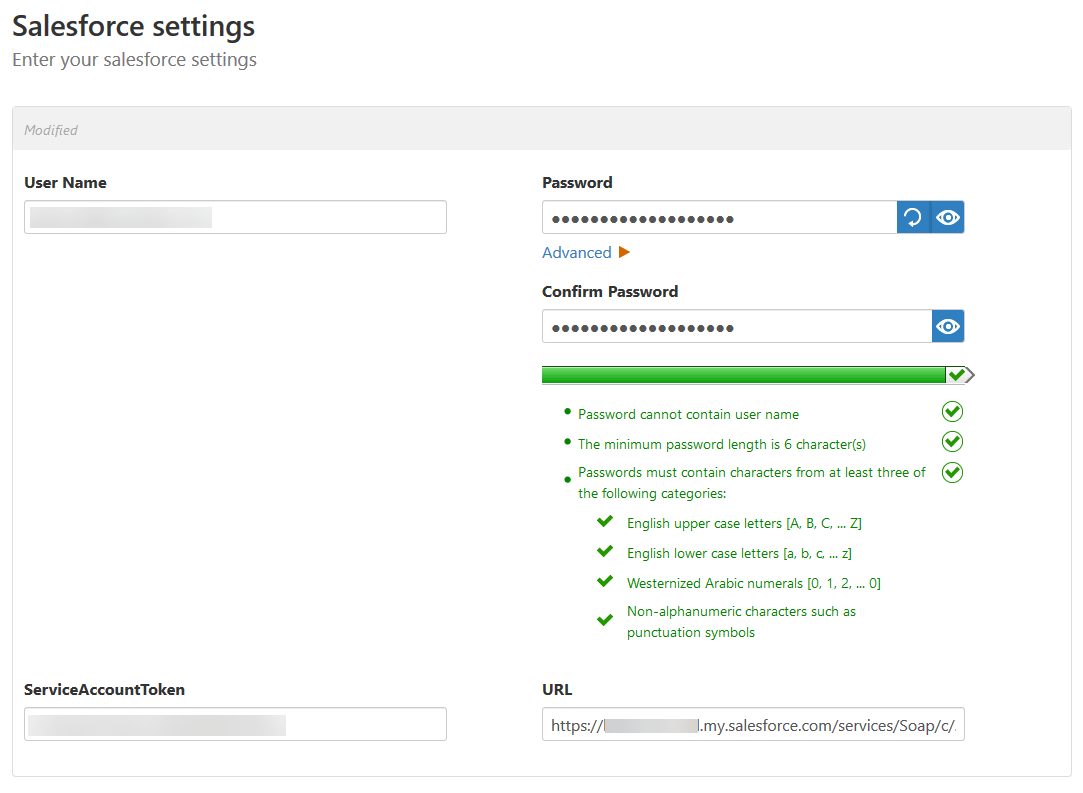
- Click Submit.
Next, configure how you want EmpowerID to manage the Salesforce account store by following the steps outlined in the To configure EmpowerID to manage the Salesforce account store section.
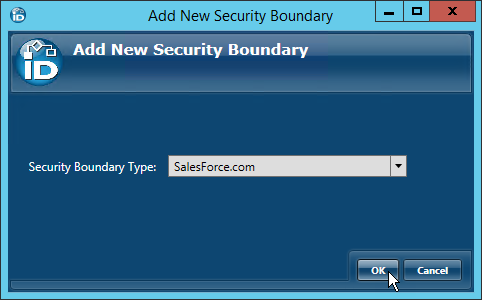
To connect EmpowerID to Salesforce using the EmpowerID Management Console
- Log in to the EmpowerID Management Console as an administrator.
- From the EmpowerID Management Console, click the EmpowerID icon and select Configuration Manager from the menu.
- In Configuration Manager, click the Account Stores node and then click the Add New button located above the grid.
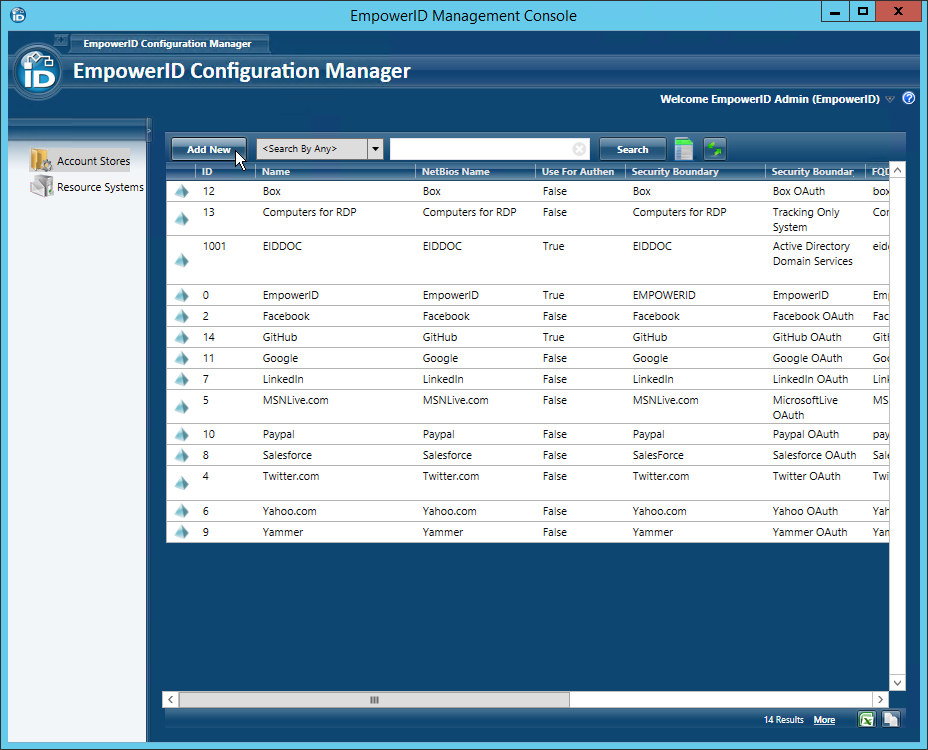
- In the Add New Security Boundary window that opens, select the Salesforce.com Security Boundary type from the drop-down list and then click OK.
- In the Add Salesforce Connection window that appears, do the following:
- In the Username field, type the username of the Salesforce account you created in Salesforce for EmpowerID.
- Type the password for the account in the Password and Confirm Password fields.
- In the Service Account Token field, type the value of the token generated by Salesforce for the selected user account.
In the URL field, replace login.salesforce.com with your domain.
Info If the values entered in the Add Salesforce Connection window are incorrect, EmpowerID cannot authenticate to Salesforce and the connection fails.
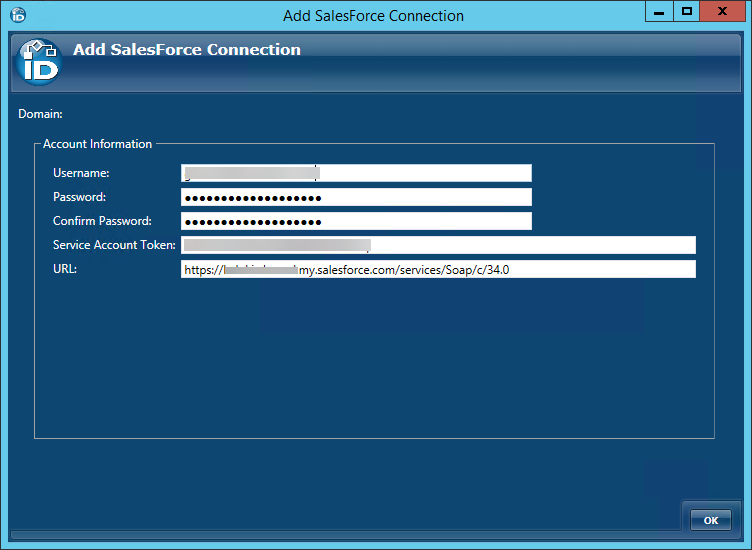
- Click OK to close the Add Salesforce Connection window.
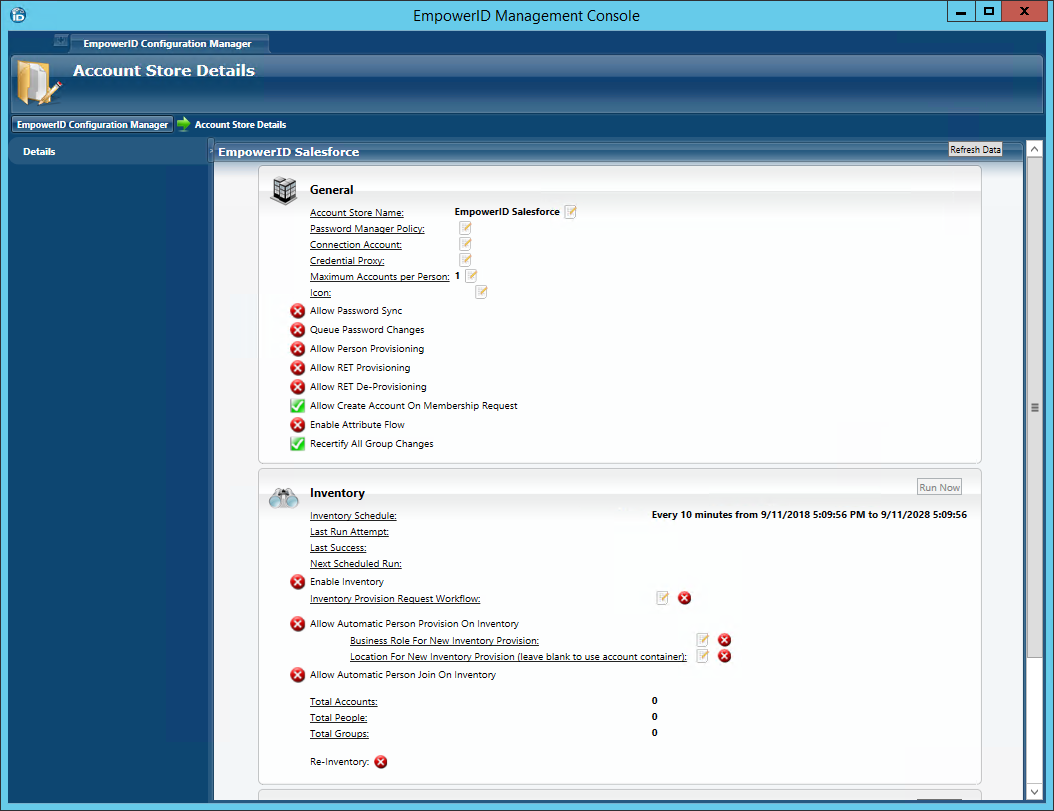
If the connection is successful, EmpowerID creates the Salesforce connection and opens the Account Store Details screen for the Salesforce account store. This screen contains settings for configuring how EmpowerID manages the Salesforce account store.
| Anchor | ||||
|---|---|---|---|---|
|
| Info |
|---|
Before configuring EmpowerID to manage the account store, determine whether you want EmpowerID to provision Person objects from the user records it discovers in the account store. If so, answer the following questions before turning on inventory.
For a greater discussion of these points within the context of connecting EmpowerID to an account store, see Active Directory. |
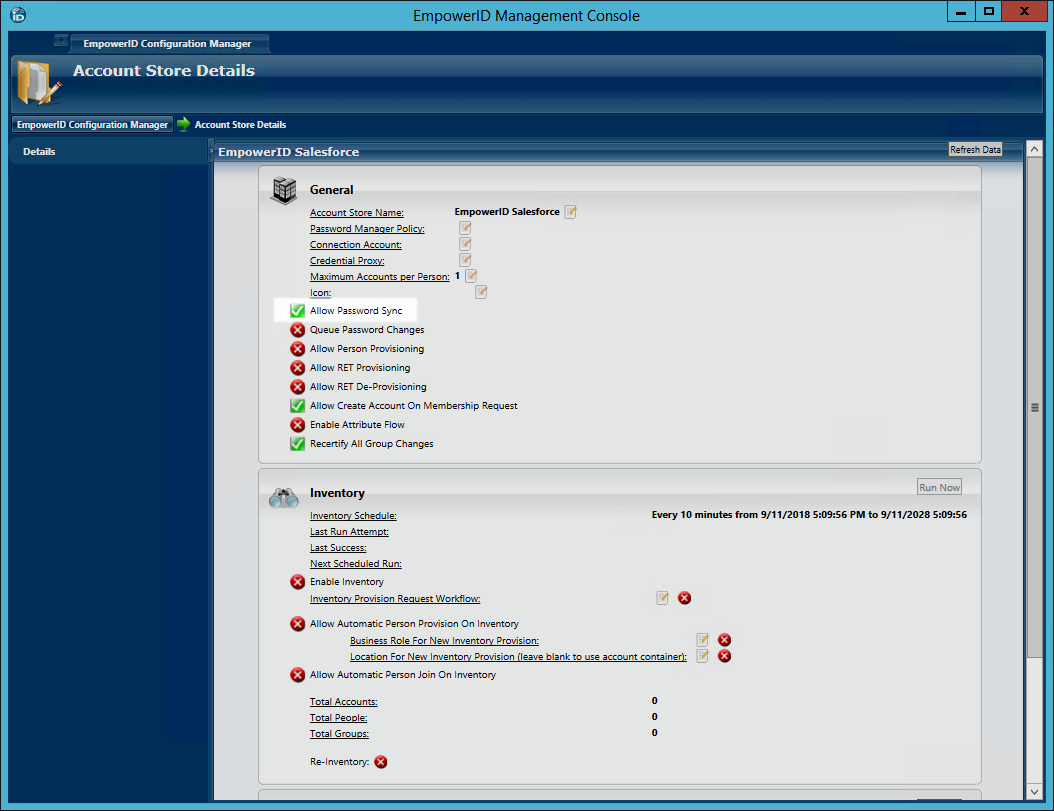
- From the General pane of the Salesforce Account Store Details screen, enable each desired feature by toggling the icon to the right of each feature from a red sphere to a green check box. For example, if you wish to allow password synchronization to occur between EmpowerID and Salesforce, toggle the red sphere to the right of Allow Password Sync to a green check box.
- In the Inventory pane of the Account Store Details screen for the Salesforce account store, toggle the icon to the right of the Allow Automatic Person Provision On Inventory setting from a red sphere to a green check box. This instructs EmpowerID to create a linked EmpowerID Person object for each new, unique Salesforce user account discovered during the inventory process.
- In the Inventory pane of the Account Store Details screen for the Salesforce account store, click the Edit button to the right of Business Role for New Inventory Provision and select a Business Role for each new Person provisioned during the inventory of your Salesforce.
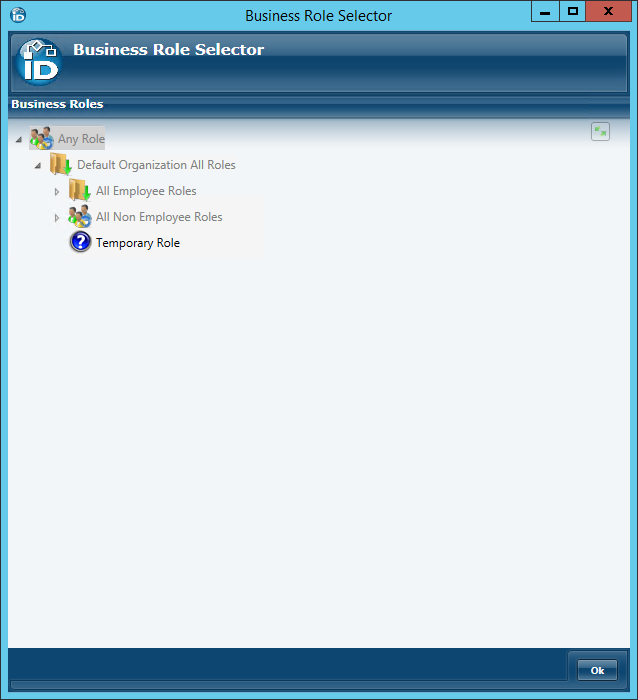
- Click OK to close the Business Role Selector.
- Back in the Inventory pane of the Account Store Details screen for the Salesforce account store, click the Edit button to the right of Location For New Inventory Provision and select a Location to use for each Person EmpowerID provisions during the inventory of your Salesforce from the Location Selector.
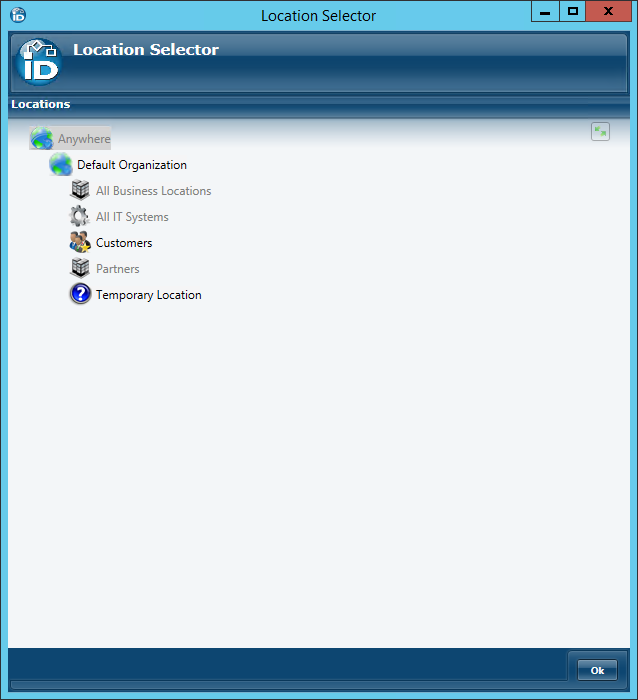
- Click OK to close the Location Selector.
To configure the attribute flow rules
- Navigate to the attribute flow rule configuration page located at https://<YourEmpowerIDServer>/ui#Common/Find/AttributeFlowRules
- In the advanced search, search for your Salesforce Account Store. By default, all Attribute Flow Rules are set to allow no attribute flow (indicated by the red sphere).
- From the Attribute Flow Rules editor, toggle each Attribute Flow Rule to achieve the desired behavior. When selecting the rules you have the following options for each attribute:
 No Sync - When this option is selected, no information flows between EmpowerID and Salesforce.
 Bidirectional Flow - When this option is selected, changes made within EmpowerID update Salesforce and vice-versa.
 Account Store Changes Only - When this option is selected, changes can only be made to the selected attribute(s) in Salesforce and passed to EmpowerID.
 EmpowerID Changes Only - When this option is selected, changes can only be made to the selected attribute(s) in EmpowerID and are then passed to Salesforce.
In our example, we have set the Attribute Flow Rules to EmpowerID Changes Only for all attributes except the Manager attribute, which is set to No Sync. In this way, all attributes except for the Salesforce ManagerId can only be changed in EmpowerID. - Return to the Account Store Details screen for the Salesforce domain.
- From the Inventory pane of the Account Store Details screen for the Salesforce account store, click the red sphere to the left of Enable Inventory so that the red sphere becomes a green check box. This allows EmpowerID to inventory your Salesforce domain and create the appropriate user accounts and Person objects in EmpowerID.
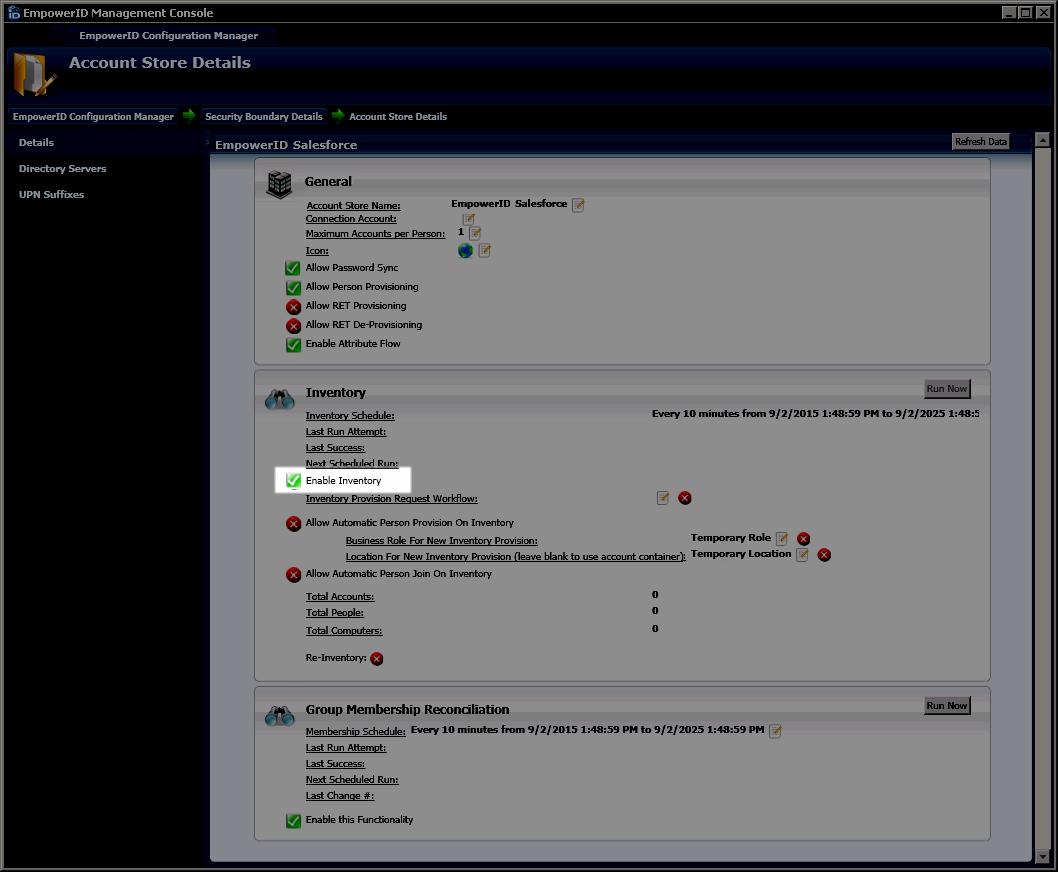
- After several minutes, refresh the Account Store data by pressing the Refresh Data button located a the top of the Account Store Details screen to see that EmpowerID has inventoried the accounts in your Salesforce domain and provisioned the requisite number of EmpowerID Persons for those accounts.
| Tip |
|---|
Once you have connected EmpowerID to Salesforce, you can view and manage the users and groups associated with it from the Salesforce Manager page in EmpowerID, located at https://<YourEmpowerIDServer>/ui/#Common/Find/SalesforceManager |
| Div | |||||||||
|---|---|---|---|---|---|---|---|---|---|
| |||||||||
| Div | |||||||||
| |||||||||
| Live Search | |||||||||
| spaceKey | E2D | ||||||||
| placeholder | Search the documentation | type | page|||||||
|