| Style | ||
|---|---|---|
| ||
This topic demonstrates how to create user accounts in EmpowerID by creating an Active Directory user account.
...
To create a new user account
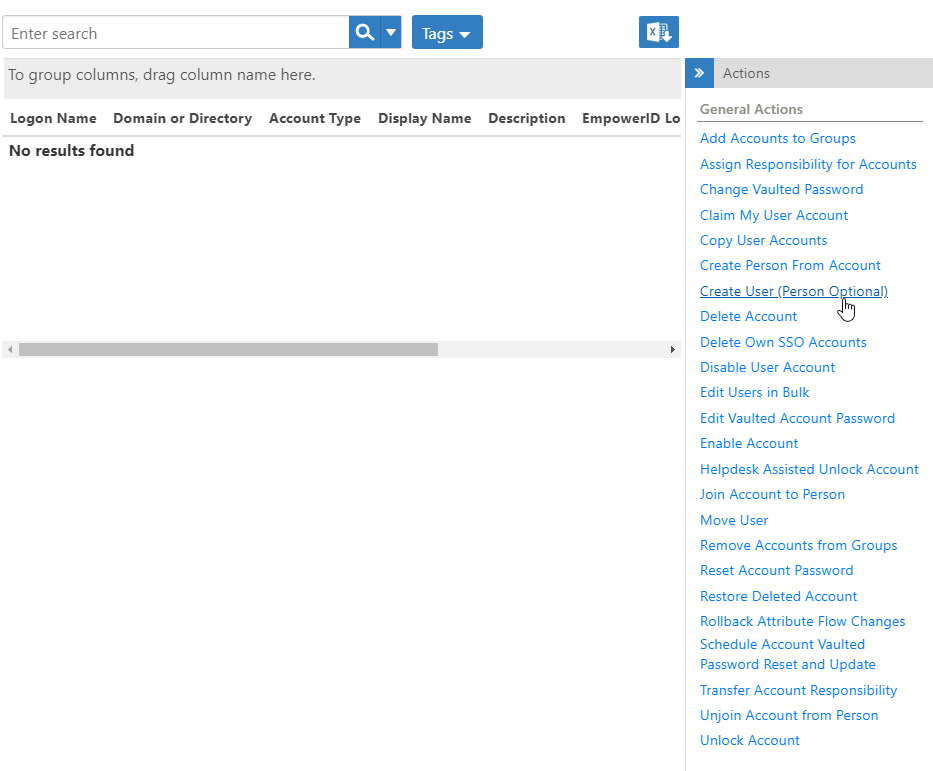
- In the Navigation Sidebar of the EmpowerID Web interfacenavigation sidebar, expand Identities and click User Accounts.
- From the Actions pane of the User Account management page, click Click the Create User (Person Optional) action.

This opens the Create User form, which contains a number of tabs with fields for adding user account properties or attributes.
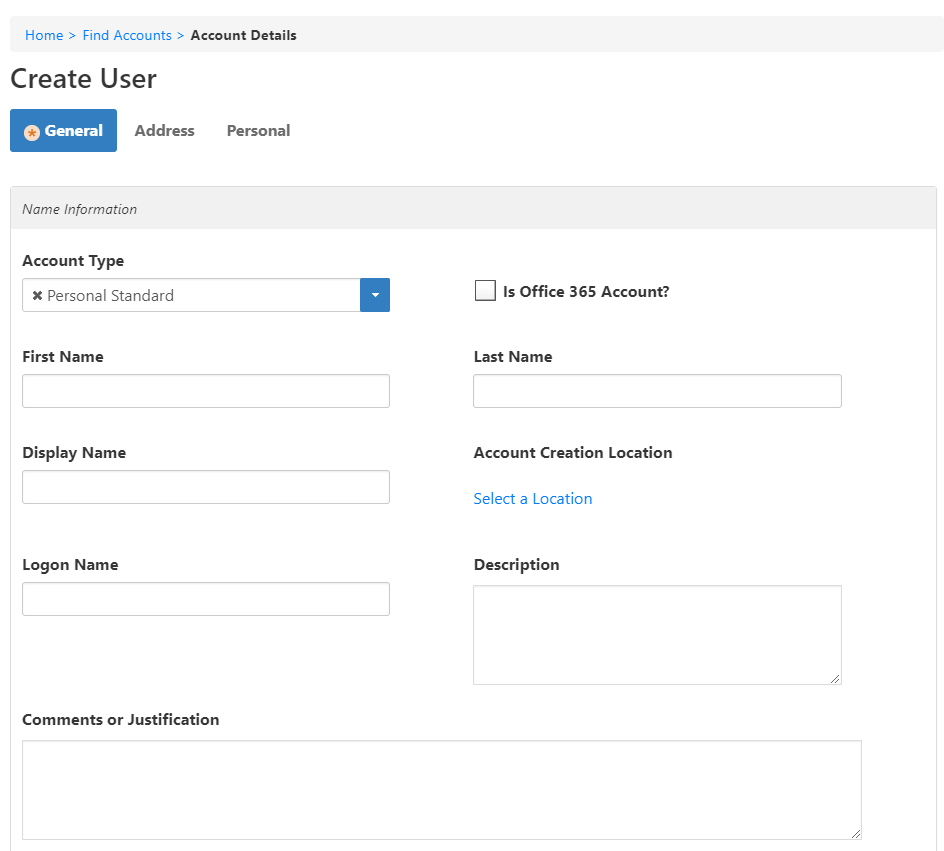
- Select an account type from the Account Type drop-down. Account types can include the following:
- Personal Standard - — A Personal Standard account is a basic user account owned by a person for performing everyday tasks. This is the default account type.
- Personal Privileged - — A Personal Privileged account is a highly privileged user account owned by a person.
- Application - — An Application account is an account used by applications to access databases or other applications.
- Contact - — A Contact account is an account that is used as an email contact.
- Emergency - — An Emergency account is a "break glass" usage account.
- Service - — Service accounts are special types of accounts that can be used.
- Shared Mailbox - — A Shared Mailbox account is a disabled user account required for room, equipment or shared mailboxes.
- Shared Privileged - — A Shared Privileged account is a non-personal account shared by administrative users.
Test User - — A Test User account is an account used for testing purposes.
Info In EmpowerID, account types are simply classifications for grouping user accounts into Set Groups, reports or different Recertification policies. They do not grant access.
- Enter a first name and last name for the user account in the First Name and Last Name fields.
- Enter a display name and logon name for the user account in the Display Name and Logon Name fields.
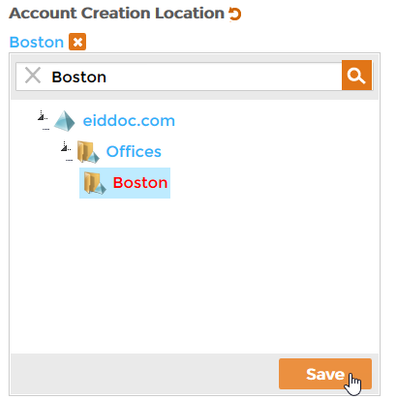
- Below Account Creation Location, click the Select a Location link and in the Location Selector that opens do the following:
- Search for and select the appropriate external directory location for the user account.
- Click Save to close the Location Selector.
- Select the appropriate UPN suffix from the UPN Suffix drop-down.
- Optionally, type a description in the Description field and any comments in the Comments or Justification field.
Optionally, if you want to join the user account to an existing EmpowerID Person, select Join Account to an Existing Person and search for and select the appropriate person.
Info To see an example of joining an account to an existing person, see Creating Accounts from People.
To create a new EmpowerID Person from the user account, select Create a new EmpowerID Person object and select the appropriate Business Role and Location for the person. For details, expand the drop-down section.
Rw ui expands macro Rw ui expand macro title To select the Business Role and Location - Below Person Business Role, click the Select a Role and Location link.
- In the Business Role and Location selector that appears, search for and select the appropriate Business Role for the person.
- Click the Location tab.
- Search for and select the EmpowerID Location for the person.
- Click Select to close the Role and Location Selector.
- Optionally, select Allow me to enter a password if you want to set the password for the user account.
Selecting this option changes the form to display the Password and Confirm Password fields.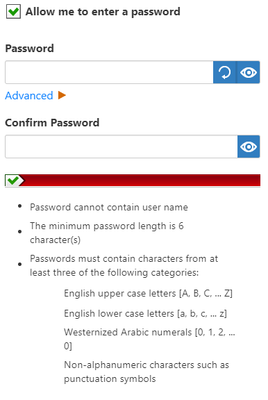

- If you have opted to enter a password for the user account, type the password in the Password and Confirm Password fields.
Scroll to the Security section and select any settings you want to apply to the account. By default, Allow Joining Account to a Person and Allow Provisioning a Person from Account are selected. These two flags tell EmpowerID that during the next inventory run, it can either join the account to an existing EmpowerID Person or provision a new person for the account if one does not currently exist. If you do not want EmpowerID to take this action, clear these options.
Info EmpowerID determines whether to join new accounts to existing people or provision new people from those accounts based on the Join and Provision rules set for your environment. For more information on these rules, see Account Inbox Overview and Reviewing Join and Provision Rules.
The account store must be configured to Allow Person Provisioning. If it is not, no person is provisioned for the user account.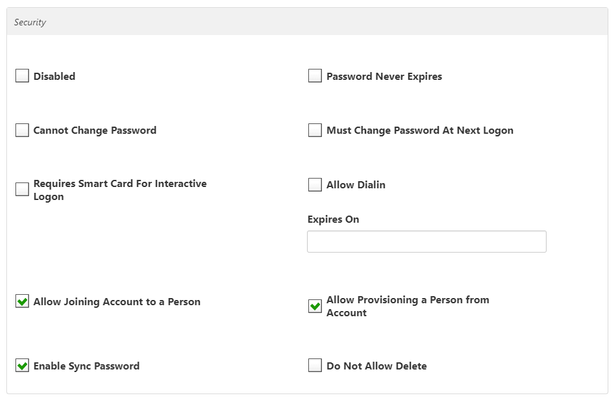
- Optionally, click the Address tab and fill in the appropriate information as needed.
- Optionally, click the Personal tab and fill in the appropriate information as needed.
When ready, click Save.
Tip For immediate processing, leave Wait to See Results selected. If you clear Wait to See Results and click Submit, the process idles and EmpowerID creates a task for it, routing it to any Person with the delegations to continue creating the account.
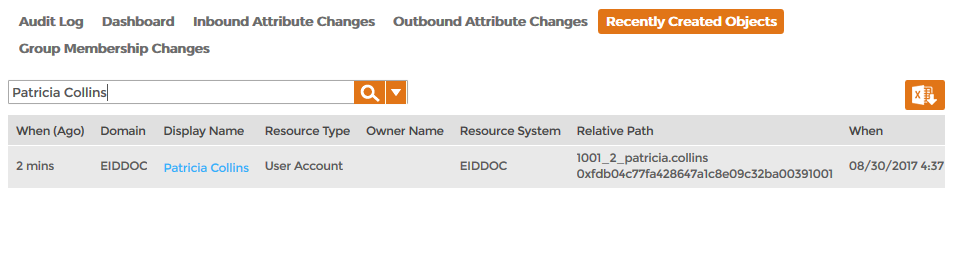
To verify that the account was created in EmpowerID
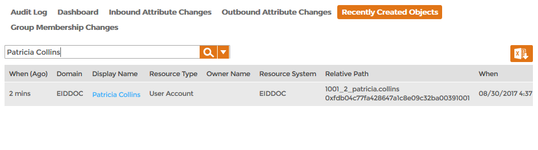
- In the Navigation Sidebarnavigation sidebar, expand System Logs and click Audit Log.
- Click the Recently Created Objects tab and search for the user account you just created to verify that there is a record for it.
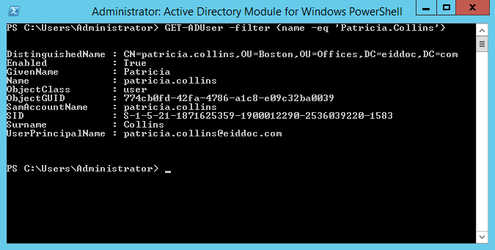
To verify that the account was created in Active Directory
On a machine with the Active Directory Module for Windows PowerShell installed, run the following cmdlet, substituting the name of the user with the user you created:
Code Block language powershell theme Emacs GET-ADUser -filter {name -eq 'PatriciaCollins'}- Verify that the account is returned.
| Info | ||||
|---|---|---|---|---|
| ||||
...