Home / Identity Administration / Exchange Mailboxes / Current: Assigning Mailbox Access Managers
Access Managers are resource owners with the ability to manage the access assignments against a particular resource in EmpowerID. Access Managers can give users access to any resources for which they are owners, as well as can approve or deny requests for access made by users against those same resources.
...
This topic demonstrates how to assign an Access Manager to an Exchange Mailbox.
| Info | ||
|---|---|---|
| ||
Before you can assign an Access Manager to an Exchange mailbox, EmpowerID must first be connected to an Active Directory domain with an Exchange organization and that Exchange organization must be added to EmpowerID as a resource system. For more information see Connecting to Active Directory and Adding Exchange. |
To assign an Access Manager to an Exchange Mailbox
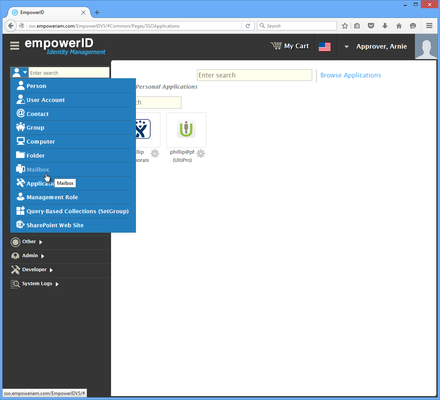
From the Navigation Sidebar of the EmpowerID Web interface, select Mailbox from the Search drop-down.
Info The number of menu items available to users varies depending on the Access Levels of those users. In the below image, the current user has the All Access Management Role, which grants that user the ability to see and manage all resources.
- In the search field to the right of the drop-down, type the name of the specific mailbox to which you want to assign an Access Manager and then click the tile for that mailbox.

This opens the View page for the mailbox. View pages allow you to view information about a selected resource and manage that resource as appropriate.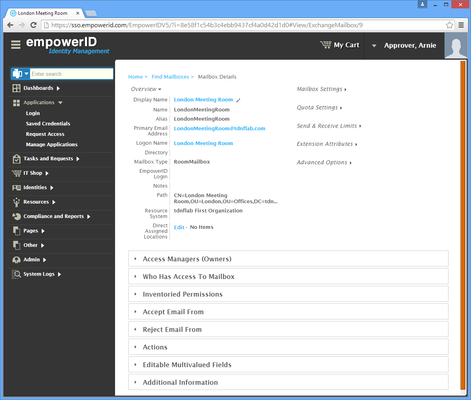
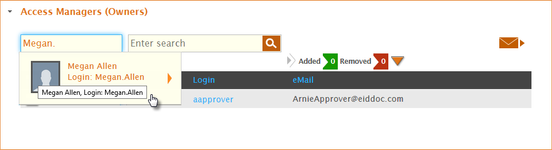
- From the View page, expand the Access Managers (Owners) accordion.
- From the expanded accordion, type the name of the person you want to make a resource owner in the Enter name to add field and then click the tile for that person.
- Click Submit.
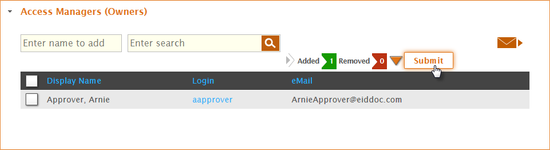
| Tip |
|---|
Click the Added flag to review the assignment before submitting. To remove the assignment, click the Remove button to the right of the selected person. |
| icon | false |
|---|---|
| title | Related Content |