The Data Migration Utility is a PowerShell based command line tool that gives users the ability to copy complex configuration information from one environment to another. For example, if a Management Role is configured and tested in a development environment, this tool can be used to transfer the Management Role and its various delegations to other environments, such as QA and production environments. At a high level, the steps for exporting configuration information from a source to target EmpowerID environment involve the following steps:
- Load the datamigrationutility.dll modulr
- Save itemsToExport.sql
The DataMigrationUtility is located in the installation folder on the EmpowerID server, as shown below.
C:\Program Files\TheDotNetFactory\EmpowerID\Programs\DataMigrationUtility.CommandLine.exe
The files included with the Data Migration Utility include the following:
- Syncconfig.xml — This file defines the components — Management Roles, Business Roles and Locations, SetGroups, etc., — and the data related to those components that are to be moved from the source environment to the target environment.
Prerequisites
To use the Data Migration Utility, the following prerequisites must be met:
- You must have SyncConfig files provided by EmpowerID.
- A source EmpowerID environment with existing configurations.
- A target EmpowerID environment with a clean EmpowerID installation
- The source and target EmpowerID systems must be the same versions
- Windows PowerShell launched in elevated mode
To Use the Data Migration Utility
- Log on to the source EmpowerID application server and open PowerShell in an elevated mode.
From the PowerShell command prompt, execute the following cmdlet to import the DataMigrationUtility.dll.
Import-Module "C:\Program Files\TheDotNetFactory\EmpowerID\Programs\DataMigration.dll"
- Verify the Data Migration Utility loaded successfully by running
Get-Help.

You should see the following cmdlets returned:
Explanations of the various modes for this utility are located below the screenshot.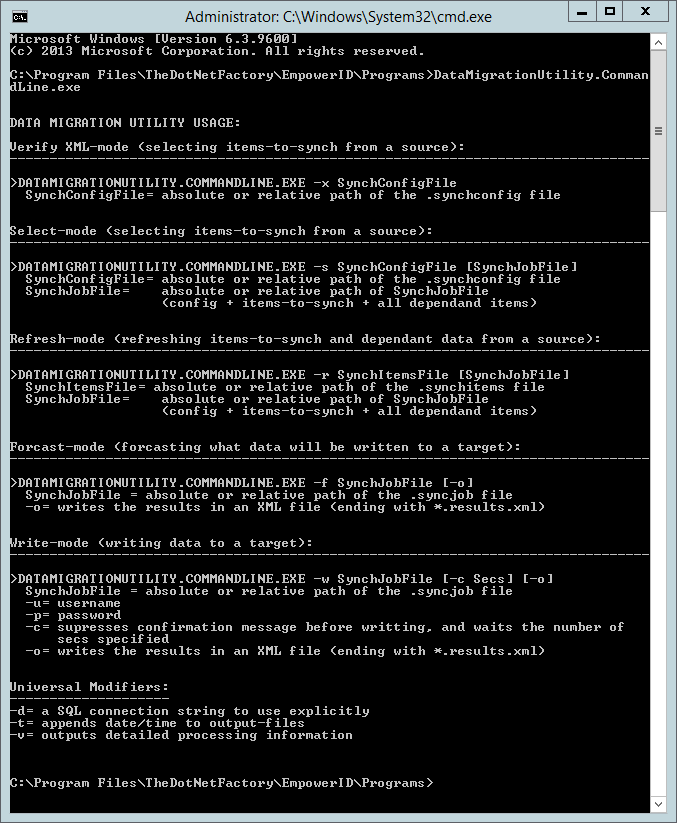
Select Mode
The first step usually involves extracting information from the source environment using the utility’s Select Mode. During this step, one or multiple SyncConfigFiles are used. The SyncConfigFiles are provided by EmpowerID and each is used for a specific purpose. In our example of moving a management role, a SyncConfigFile would be provided that helps extract a Management Role and all its corresponding delegation data. Other SyncConfigFiles would be provided to help move other types of policies and/or configurations such as Password Policies, Location hierarchy, etc.
The inputs of the Select-Mode are the SyncConfigFile, as well as the user’s input in specifying what is to be extracted. The output is a SyncJob file, which contains the data extracted from the source environment, as well as a copy of the configuration information from the SyncConfigFile.
DataMigrationUtility.CommandLine.exe -s [SyncConfigFile] [SyncJobFile]
Refresh Mode
The Refresh Mode is used when you need to update a SyncJob file with changes that have been made to either the configuration files (to include additional data) or in the source environment. This might be necessary, for example, if some time has gone by since the SyncJob file was created and changes have been made to the extracted data. Running the utility in Refresh Mode will update the SyncJob file with those changes.
DataMigrationUtility.CommandLine.exe -r [SyncConfigFile] [SyncJobFile]
Forecast Mode
The Forecast Mode is to be used before importing a SyncJob file into a new environment . As the name implies, it provides a forecast of this event. It forecasts what data will be written to a target database. The results will be written to an .xml file.
DataMigrationUtility.CommandLine.exe -f [SyncJobFile] -o
Write Mode
The Write Mode imports the information contained within the SyncJob file to the target environment. Various logs and result-files are outputted to help review what was added-to or modified-in the target environment. It is highly recommended that all EID services and processes be stopped, and a backup be taken before running in Write-Mode against a target environment.
DataMigrationUtility.CommandLine.exe -w [SyncConfigFile] [SyncJobFile] [-c (seconds)] -o
Write Mode Options
The following table provides information on the options available in Write Mode.
| Option | Meaning |
|---|---|
| -u | username |
| -p | password |
| -c | supresses confirmation message before writting and waits the number of seconds specified |
| -o | writes the results in an XML File ending with *.results.xml |
Universal Modifiers
The following table provides information on the options available Write Mode.
| Option | Meaning |
|---|---|
| -d | A SQL connection string to use explicitly. |
| -t | This option appends date/time to output—files |
| -v | This option outputs detailed processing information. |