Before connecting EmpowerID to an external directory, please review the Getting Started with Directory Systems topic. The topic walks you through the prerequisites you need to complete before connecting to an external directory for the first time. These prerequisites include:
Configuring the appropriate server roles for your EmpowerID servers
Reviewing the Join and Provision Rules for your environment
Reviewing the Join and Provision Filters for your environment
If you have already connected EmpowerID to another external directory, you can skip the above prerequisites.
EmpowerID provides connectors for a wide range of user directories and resource systems. As an administrator, you can use these connectors to quickly connect EmpowerID to your organization's identity-aware systems and applications. When you do so, you create an account store for that application in the EmpowerID Identity Warehouse and use that account store to configure how you want EmpowerID to manage the identity information in that system.
EmpowerID Office 365 connector uses PowerShell to allow organizations to perform administrative tasks in the connected domain, bringing the user, group and mailbox data in their Office 365 system to EmpowerID, where it can be managed and synchronized with data in any connected back-end user directories. Once connected, you can manage this data form EmpowerID in the following ways:
Account Management
Inventory user accounts
Create, Update and Delete user accounts (both licensed and unlicensed)
Enable and Disable user accounts
Group Management
Inventory groups
Inventory group memberships
Create and Delete groups
Add and Remove members to and from groups
Mailbox Management
Inventory mailboxes
Create and Delete mailboxes
Disable and Enable mailboxes
Attribute Flow
Users in Office 365 are inventoried as accounts in EmpowerID. The below table shows the attribute mappings of Office 365 user attributes to EmpowerID Person attributes.
Office 365 Attribute | Corresponding EmpowerID Attribute | Description |
|---|---|---|
givenName | FirstName | First Name of a user |
surname | LastName | Last Name of a user |
Initials | Initials | Middle Initial of a user |
displayName | Friendly Name | Display Name of a user |
AlternateEmailAddresses | Email of a user | |
mailNickName | EmailAlias | Email Alias of a user |
department | Department | Name of the department of a user |
Company | Company | Name of the company of a user |
HomePhone | HomeTelephone | Main home telephone number of a user |
mobile | MobilePhone | Primary mobile phone number of a user |
facsimileTelephoneNumber | Fax | Telephone number for facsimile terminal |
streetAddress | StreetAddress | Street Address of the user’s company |
city | City | City of a user |
country | Country | Country where the user’s company is located |
postalCode | PostalCode | Code for postal service for a user |
preferredLanguage | PreferredLanguage | Preferred written or spoken language for a user |
telephoneNumber | Telephone | Telephone numbers that comply with the ITU Recommendation |
jobTitle | Title | Title of a user within their organization |
physicalDeliveryOfficeName | Office | Physical address for postal delivery |
userPrincipleName | Login | UPN that is an internet-style logon name for a user, |
The account that EmpowerID uses to connect to Office 365 must have the ability to create a service principal that allows the application to access your Office 365 tenant’s information. By default, EmpowerID uses an Office 365 account with the Global Admin role to create the service principal. If you do not want to use a Global Admin account, you will need to provide a service principal account with either one of the below permissions (depending on whether the service principal account is to be used for tenant administration):
Directory Readers permissions — Read permission only; this type of account does not provide tenant administrative capabilities
User Account Administrator — This type of account provides user administrative capabilities within the tenant.
The service principal can be created in PowerShell. For more information, see Microsoft’s article at https://docs.microsoft.com/en-us/powershell/azure/create-azure-service-principal-azureps?view=azps-3.3.0. Please note that if you chose to provide your own service principal, the account must be maintained by your organization.
In order to connect EmpowerID to Office 365, the following prerequisites must be met:
Your organization must have an Office 365 Business or Enterprise account with Microsoft, and install the specified versions of the following modules on each EmpowerID server you want to use to manage the domain.
If your EmpowerID servers have Windows Azure AD Module for Windows PowerShell and MSOnline Sign-In Assistant installed, you must remove them before installing the required version.
You must install the following modules in the order indicated:
Windows Management Framework 5.1
This version provides functionality that EmpowerID uses to communicate with Office 365, including the newest version of Windows PowerShell.
Select the file with your server's version in the name, e.g. Win8.1AndW2K12R2-KB3191564-x64.msu for Windows Server 2012-R2.
This includes Windows Azure Active Directory Module for Windows PowerShell, which provides you with the Office 365 cmdlets to administer Office 365.To verify the version, in Powershell, run
$PSVersionTable.PSVersion
The version must be Major 5 Minor 1 or higher.In PowerShell, run this command:
Install-Module -name MSOnline -MinimumVersion 1.1.166.0 -MaximumVersion 1.1.166.0If you see these messages, enter Y for both.
PowerShellGet requires NuGet provider version '2.8.5.201' or newer
You are installing the modules from an untrusted repository
To confirm the version, in PowerShell, run these two commands:
Import-Module MSOnlineGet-Module MSOnlineThe version must be 1.1.166.0.
Version 1.1.183.8 is not compatible.
To create an Office 365 account store in EmpowerID
In the navigation sidebar, expand Admin > Applications and Directories and then click Account Stores and Systems.
On the Account Stores page, click Create Account Store.
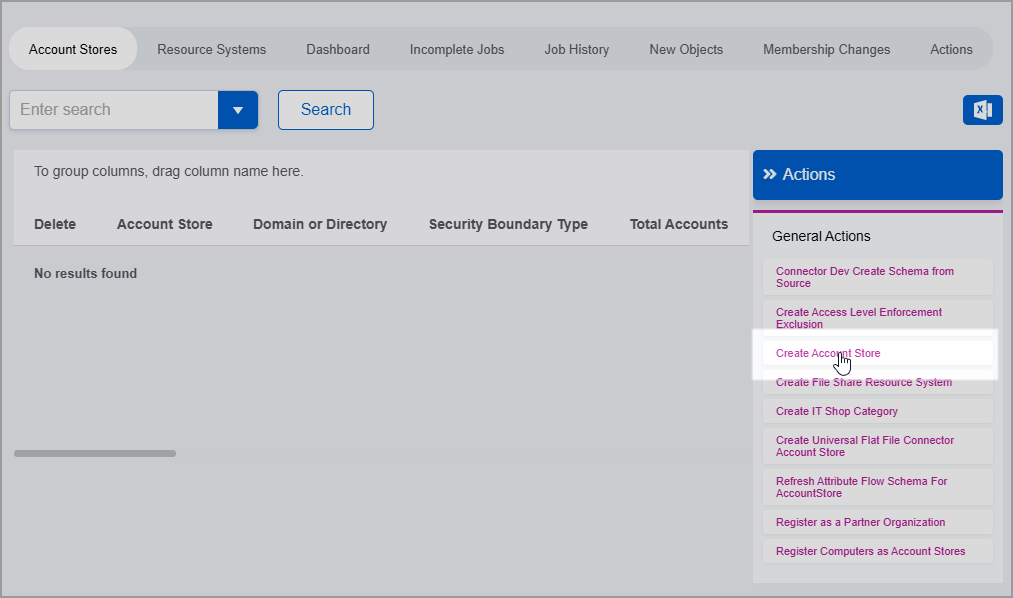
Under System Types, search for Office 365.
Click Office 365 to select the type and then click Submit.
This opens the Office 365 Settings form, which is where you enter settings needed by EmpowerID to connect to the system.
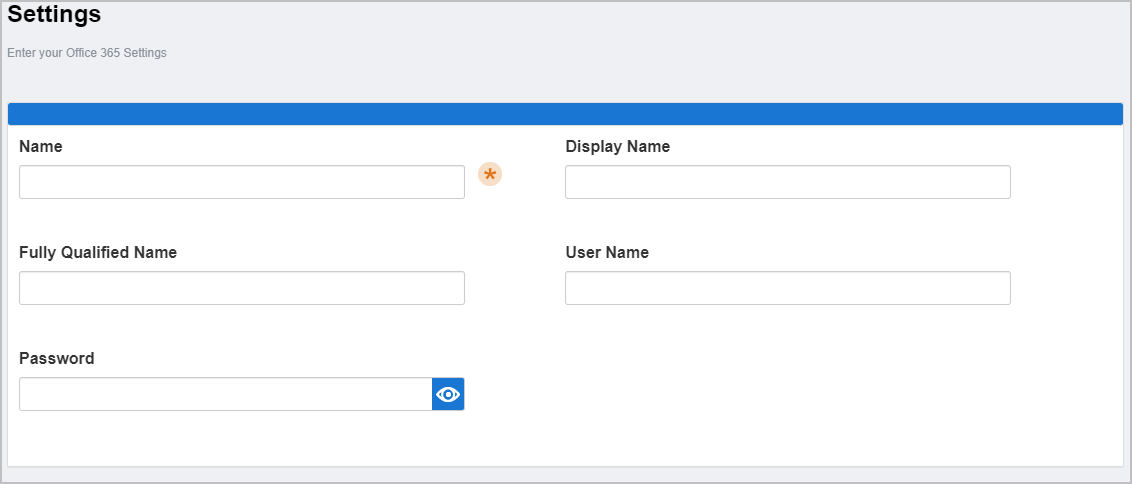
Enter the following information in the form:
Name — Enter a name for your account store.
Display Name — Enter a display name for your account store.
Fully Qualified Name — Enter the fully qualified name of your Office 365 account as it was originally issued from Microsoft, e.g.
myaccount.onmicrosoft.com.User Name — Enter the email address for the Office 365 account EmpowerID is to use to connect to your Office 365. Please note that if EmpowerID needs to create the service principal for making Graph API calls, this account must be a global administrator.
Password — Enter the password for the Office 365 account EmpowerID is to use to connect to your Office 365. Please note that if EmpowerID needs to create the service principal for making Graph API calls, this account must be a global administrator.
When finished, click Submit to create the account store.
EmpowerID creates the account store and the associated resource system. The next step is to configure the attribute flow between the account store and EmpowerID.
EmpowerID supports the configuration of attribute synchronization rules for flowing attribute changes between directories and the EmpowerID Identity Warehouse. Attribute Flow rules are visually configured and are always relative to the relationship between an attribute in a directory and the corresponding attribute in the EmpowerID Identity Warehouse. Attribute Flow rules define the specific fields and attributes that are synchronized between the EmpowerID Identity Warehouse person objects and the external user accounts to which they are linked. Additionally, Attribute Flow rules can be weighted by account store. For example, if you have connected EmpowerID to an HR system as well as Active Directory, and you want any changes made to an attribute in the HR system to take priority over changes made in Active Directory or EmpowerID (while allowing changes to be made in any system), you would give a higher score for each CRUD operation originating from the HR account store and correspondingly lower scores for the Active Directory account store.
The following flow rules are available:
No Sync ( Red Circle) — When this option is selected, no information flows between EmpowerID and the native system.
Bidirectional Flow (Bidirectional Green Arrow) — When this option is selected, changes made within EmpowerID update the native system and vice-versa. For most attributes, this is the default setting.
Account Store Changes Only (Left Pointing Arrow) — When this option is selected, changes can only be made in the native system and are then passed to EmpowerID.
EmpowerID Changes Only (Right Pointing Arrow) — When this option is selected, changes can only be made in EmpowerID and are then passed to the native system.
The following CRUD operations are available:
Create — This operation is used to create an attribute value for an existing attribute when the value of that attribute is null.
Update — This operation is used to update the value of an attribute.
Delete — This operation is used to delete the value of an attribute.
EmpowerID only considers scores for attribute CRUD operations when multiple account stores with the same user records are connected to EmpowerID, such as would be the case if an HR System and this account store were being inventoried by EmpowerID. |
Now that the attribute flow has been set, the next steps include configuring the account store and enabling EmpowerID to inventory it.
To configure account store settings
On the Account Store and Resource System page, click the Account Store tab and then click the pencil icon to put the account store in edit mode.
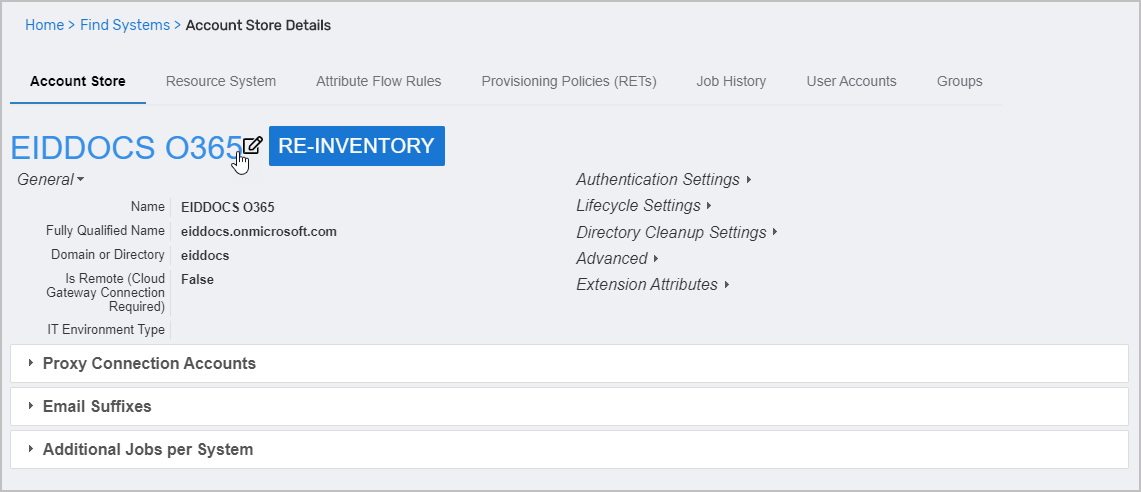
This opens the edit page for the account store. This page allows you to specify the account proxy used to connect EmpowerID to your Office 365 system as well as how you want EmpowerID to handle the user information it discovers in Office 365 during inventory. Settings that can be edited are described in the table below the image.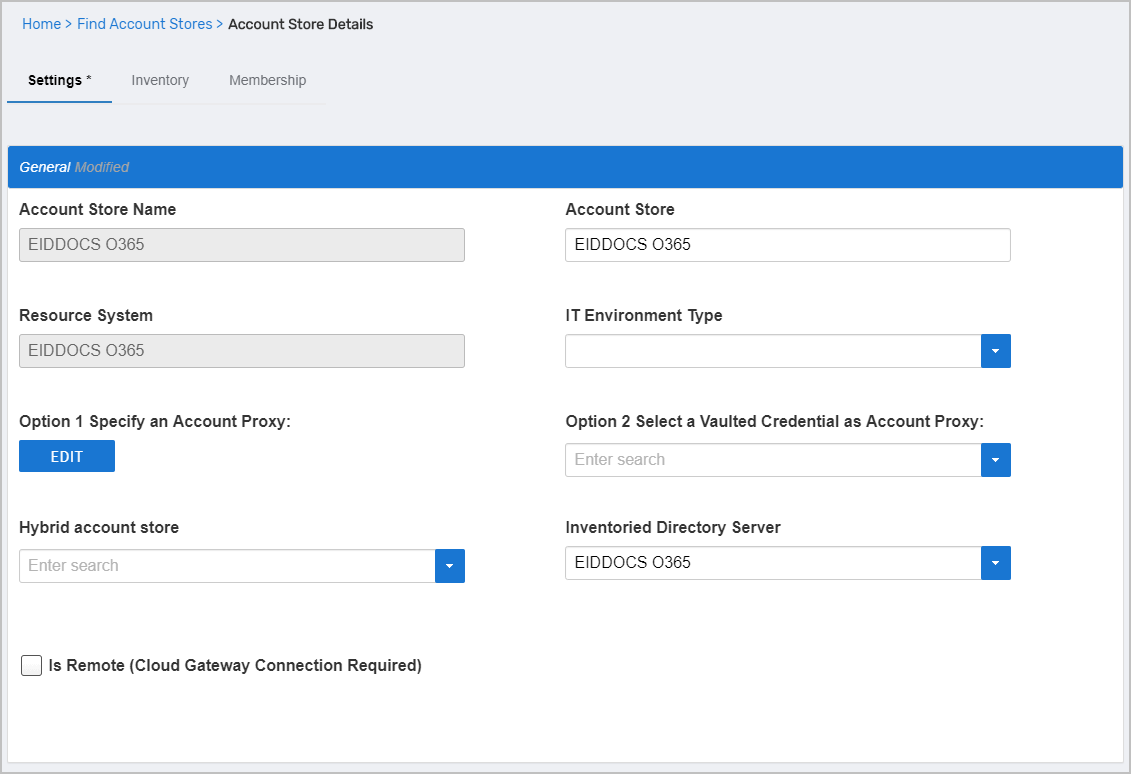
Account Store Settings
Setting
Description
General Settings
IT Environment Type
Allows you to specify the type of environment in which you are creating the account store.
Option 1 Specify an Account Proxy
Allows you to change the credentials for the account that EmpowerID uses to connect to and manage the account store.
Option 2 Select a Vaulted Credential as Account Proxy
Allows you to use a credential that you have vaulted in EmpowerID as the account that EmpowerID uses to connect to and manage the account store.
Hybrid Account Store
If your organization is migrating user mailboxes from on-premise Exchange to Office 365 using Azure AD Connect (formerly known as the Directory Synchronization tool, Directory Sync tool, or the DirSync.exe tool), select your on-premise Active Directory (AD) account store. When an AD account store is entered in this field and a RET policy is configured for the Office 365 account store, any AD user accounts provisioned from Office 365 will have Remote Mailbox Enabled set to true. In this way, EmpowerID prevents Active Directory from creating on-premise Exchange mailboxes for those users.
Inventoried Directory Server
Allows you to select a connected server as the directory server for the account store.
Is Remote (Cloud Gateway Connection Required)
This setting appears for account stores with local directories, such as Active Directory, LDAP, SAP, etc. When enabled, this tells EmpowerID to use the Cloud Gateway Connection for that account store. The Cloud Gateway Connection must be installed on an on-premise machine. For installation information, please see Installing the EmpowerID Cloud Gateway Client.
Authentication and Password Settings
Use for Authentication
Specifies whether user credentials in the external system can be used to authenticate to EmpowerID.
Allow Password Sync
Enables or disables the synchronization of password changes to user accounts in the domain based on password changes for the owning person object or another account owned by the person. This setting does not prevent password changes by users running the reset user account password workflows.
Queue Password Changes
Specifies whether EmpowerID sends password changes to the Account Password Reset Inbox for batch processing.
Password Manager Policy for Accounts without Person
Specifies the Password Manager Policy to be used for user accounts not joined to an EmpowerID Person.
Provisioning Settings
Allow Person Provisioning (Joiner Source)
Specifies whether EmpowerID Persons can be provisioned from user accounts in the account store.
Allow Attribute Flow
Specifies whether attribute changes should flow between EmpowerID and the account store.
Allow Provisioning (By RET)
Allows or disallows the Resource Entitlement (RET) Inbox process to auto-provision accounts for this domain for users who receive RET policy-assigned user accounts, but have not yet had them provisioned.
Allow Deprovisioning (By RET)
Allows or disallows the Resource Entitlement Inbox process to auto de-provision accounts for this domain for users who still have RET policy-assigned user accounts, but no longer receive a policy that grants them a user account in the domain. De-provisioning only occurs if the de-provision action on the Resource Entitlement policy is set to De-Provision.
Max Accounts per Person
This specifies the maximum number of user accounts from this domain that an EmpowerID Person can have linked to them. This prevents the possibility of a runaway error caused by a wrongly configured Join rule. It is recommended that this value be set to 1 unless users will have more than 1 account and you wish them to be joined to the same person.
Allow Account Creation on Membership Request
Specifies whether EmpowerID creates user accounts in the account store when an EmpowerID Person without one requests membership within a group belonging to the account store.
Recertify All Group Changes as Detected
Specifies whether detected group changes should trigger recertification.
Default Person Business Role
Specifies the default EmpowerID Business Role to be assigned to each EmpowerID Person provisioned from the user accounts in the account store.
Default Person Location (leave blank to use account container)
Specifies the default EmpowerID Location to be assigned to each EmpowerID Person provisioned from the user accounts in the account store.
Directory Clean Up Enabled
Directory Clean Up Enabled
Specifies whether the SubmitAccountTermination permanent workflow should claim the account store for processing account terminations. When enabled, accounts in the account store that meet the qualifications to be marked for deletion are moved into a special OU within the external directory, disabled and finally deleted after going through an automated approval process. This process involves setting a number of system settings in EmpowerID and requires multiple approvals by designated personnel before an account is finally removed from the account store.
Report Only Mode (No Changes)
When enabled, a report of what the Directory Clean Up process would do is written to the log. The process itself is ignored and all accounts are set to Termination Pending,
Special Use Settings
Automatically Join Account to a Person on Inventory (Skip Account Inbox)
Specifies whether EmpowerID should attempt to join user accounts in the account store to an existing EmpowerID Person during the inventory process. When enabled, the Account Inbox is bypassed.
Automatically Create a Person on Inventory (Skip Account Inbox)
Specifies whether EmpowerID should create new EmpowerID Persons from the user accounts discovered in the account store during the inventory process. When enabled, the Account Inbox is bypassed.
Queue Password Changes on Failure
Specifies whether EmpowerID should send password changes to the Account Password Reset Inbox only when the change fails.
Inventory Settings
Inventory Schedule Interval
Specifies the time span that occurs before EmpowerID performs a complete inventory of the account store. The default value is 10 minutes.
Inventory Enabled
Allows EmpowerID to inventory the user information in the account store.
Membership Settings
Membership Schedule Interval
Specifies the time span that occurs before EmpowerID runs the Group Membership Reconciliation job. The default value is 10 minutes.
Enable Group Membership Reconciliation
Allows EmpowerID to manage the membership of the account store’s groups, adding and removing user to and from groups based on policy-based assignment rules.
Edit the account store as needed and then click Save to save your changes.
Next, enable the Account Inbox permanent workflow to allow the Account Inbox to provision or join the user accounts in Office 365 to EmpowerID Persons as demonstrated below.
EmpowerID recommends using the Account Inbox for provisioning and joining.
|
|
Monitor inventory
On the navbar, expand System Logs > Policy Inbox Logs and click Account Inbox.
The Account Inbox page appears. This page provides tabbed views of all information related to processing new user accounts discovered in a connected account store during inventory. An explanation of these tabs follows.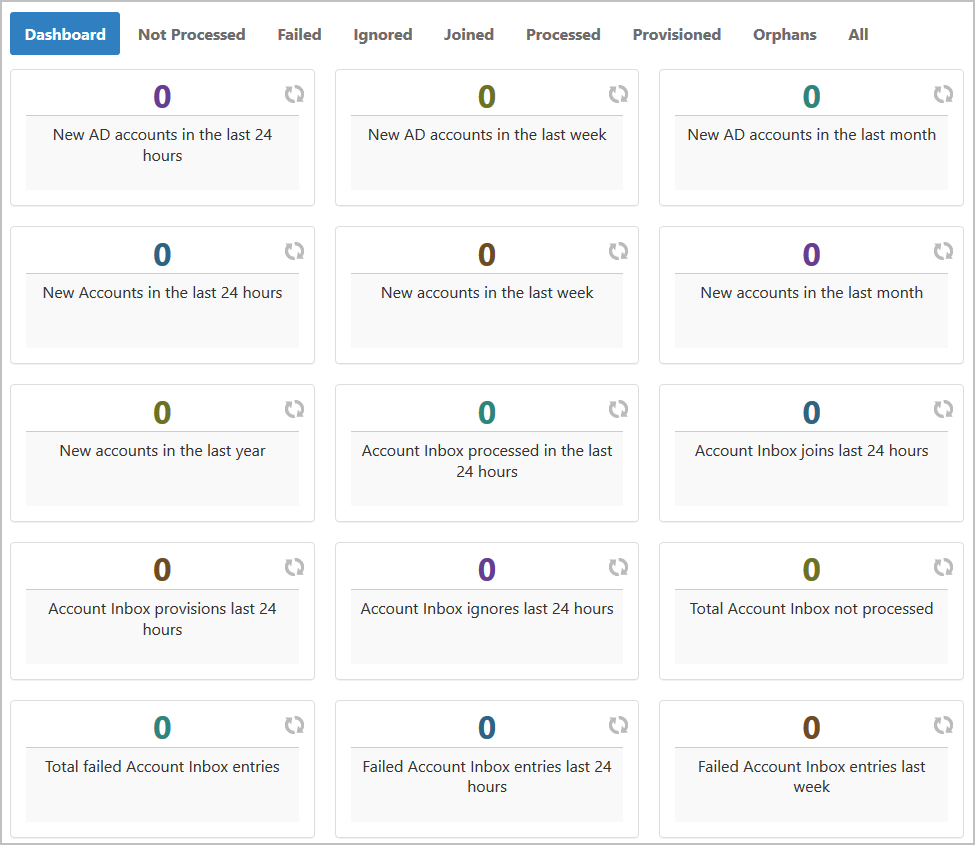
Dashboard — This tab provides a quick summary of account inbox activity.
Not Processed — This tab displays a grid view of all inventoried user accounts not yet used to provision a new EmpowerID Person or joined to an existing Person. Any accounts that fail to meet the Join and Provision rules are displayed here as well.
Failed — This tab displays a grid view of any account joining or provisioning failures.
Ignored — This tab displays a grid view of all accounts ignored by the account inbox. Accounts are ignored if they do not qualify as user accounts.
Joined — This tab displays a grid view of all accounts joined to an EmpowerID Person. Joins occur based on the Join rules applied to the account store.
Processed — This tab displays a grid view of all accounts that have been used to either provision a new EmpowerID Person or joined to an existing EmpowerID Person.
Provisioned — This tab displays a grid view of all accounts that have been used to provision an EmpowerID Person. Provisioning occurs based on the Provision rules applied to the account store.
Orphans — This tab displays a grid view of all user accounts without an EmpowerID Person.
All — This tab displays a grid view of all user accounts and the status of those accounts in relation to the Account Inbox.
If your Office 365 subscription includes Exchange Online, you can configure EmpowerID to inventory and enforce permissions for Exchange, as well as to perform batch processing for Exchange Online actions. For more information, see Configuring EmpowerID for Exchange Online Management
IN THIS ARTICLE