AD LDS (ADAM)
Before connecting EmpowerID to an external directory, please review the Getting Started with Directory Systems topic. The topic walks you through the prerequisites you need to complete before connecting to an external directory for the first time. These prerequisites include:
- Enrolling the EmpowerID Admin for password self-service reset
- Configuring the appropriate server roles for your EmpowerID servers
- Reviewing the Join and Provision Rules for your environment
- Reviewing the Join and Provision Filters for your environment
If you have already connected EmpowerID to another external directory, you can skip these prerequisites.
AD Lightweight Directory Service (AD LDS) is a lighter version of Active Directory Domain Services that provides the means to maintain extranet directories separate from your Active Directory, create information consolidation stores, and authenticate web users with LDAP-based authentication. EmpowerID manages AD LDS in the same way that it manages an Active Directory account store.
This topic serves as a quick "how-to" on connecting EmpowerID to an AD LDS account store. For a fuller discussion of the process involved with connecting to account stores, see Connecting to Active Directory.
To create an account store for AD LDS on the web
- From the Navigation Sidebar, expand Admin, then Applications and Directories, and click Account Stores and Systems.
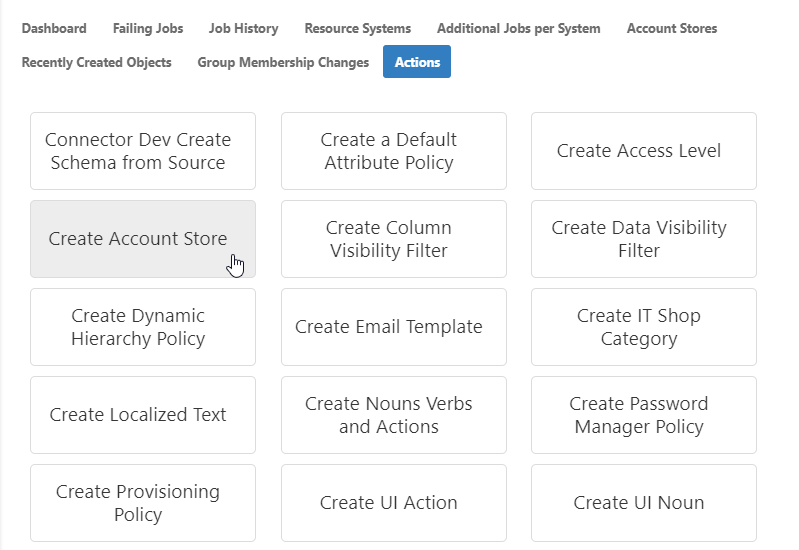
- Click the Actions tab, and then click the Create Account Store action.
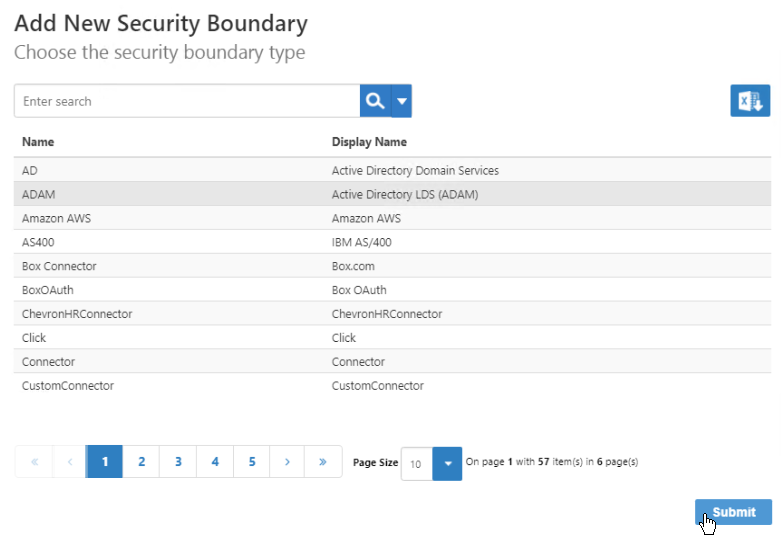
- Select Active Directory LDS (ADAM) from the list of Security Boundary types.
In the Choose Servers page that appears, there is a list of servers running the EmpowerID Web Role service.
This list contains servers running the EmpowerID Web Role Service where the LDAP Management Host Web Service is enabled. (The LDAP Management Host Web Service is responsible for LDAP communications and is enabled by default on each server running the EmpowerID Web Role service.) The EmpowerID Web Role service must be started on a server for that server to show up on the Choose Servers page.
Select the server or servers to register and click Submit.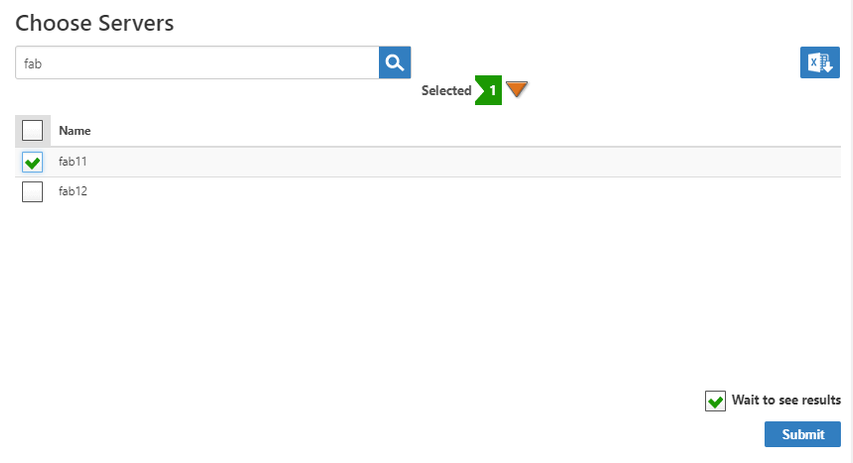
The AD LDS (ADAM) Settings page appears, where you enter settings to connect to your Active Directory LDS to allow EmpowerID to discover and connect to it.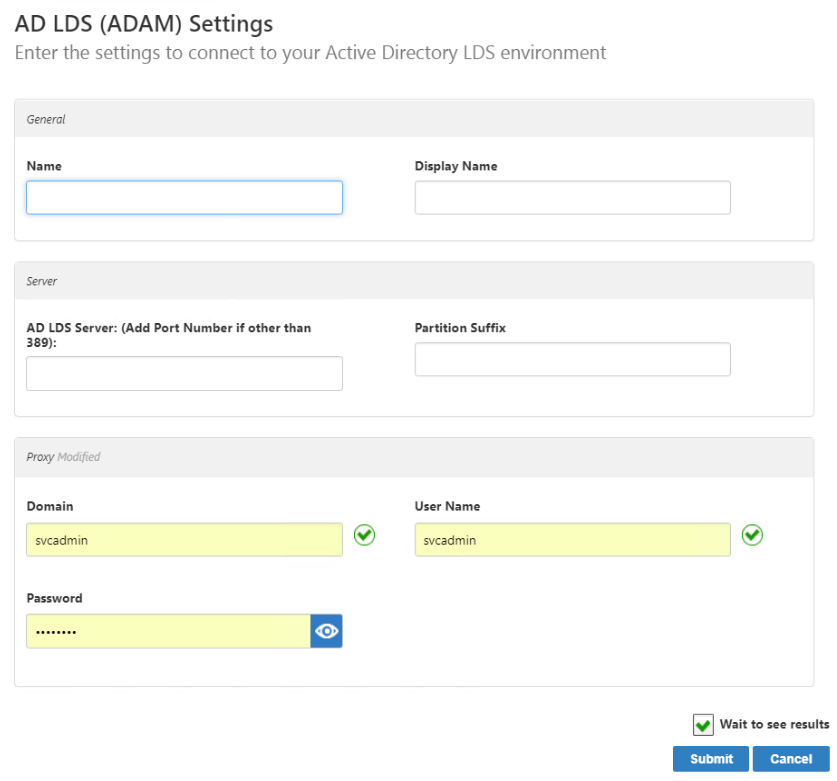
- On the AD LDS Settings page, provide the following values:
- Enter a Name and Display Name for the new Account Store.
In the AD LDS Server field, enter the name of the Active Directory LDS server and the port number if other than 389. The format is Server Name:Port Number.
If you are using LDAPS, type the Subject name of the certificate for the domain controller to which you are connecting followed by port 636 in the FQDN of Forest field. Thus, if the Subject name is "dc01.eiddoc.com," you enter dc01.eiddoc.com:636.
- In the Partition Suffix field, enter the partition suffix, for example: CN=PROD,DC=TheDotNetFactory,DC=COM
In the Domain field, leave blank if using a native AD LDS user account or enter the name of the domain that the server hosting the AD LDS instance is a member of, e.g., PROD
In the User Name field, enter the AD Account or the distinguished name of the AD LDS account, such as CN=Directory Manager,CN=Roles,DC=MyCompanyLDS,Dc=Com
If you are using LDAPS, only a native AD LDS user account is supported.
This user account must have read access to the partition that holds the objects in the AD LDS instance. You can change this at any time.
In the Password field, enter connection credentials that EmpowerID can use to manage AD LDS.
Click Submit.
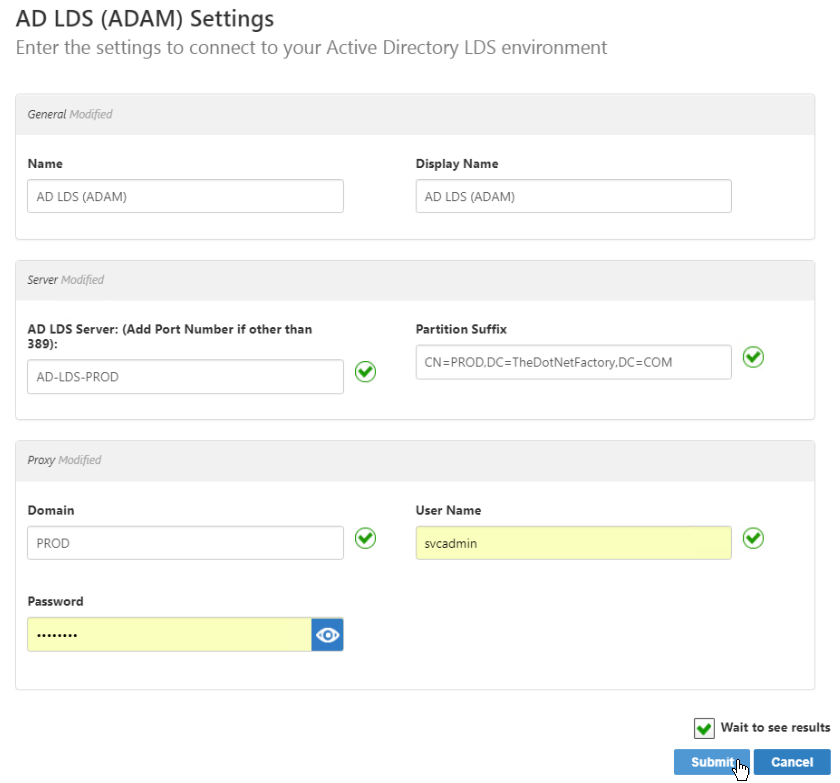
- The Account Store is created and appears in the list of Account Stores in both the web application (expand Admin, then Applications and Directories, select Account Stores and Systems, and click the Account Stores tab) and in the Management Console.
To edit account store settings on the web
- In the Navigation Sidebar, expand Admin, then Applications and Directories, and click Account Stores and Systems.
- On the Account Stores tab, search for the account store you just created and click the link to go to its details page.

- On the Account Store Details page, click the Edit button or the name of the account store.
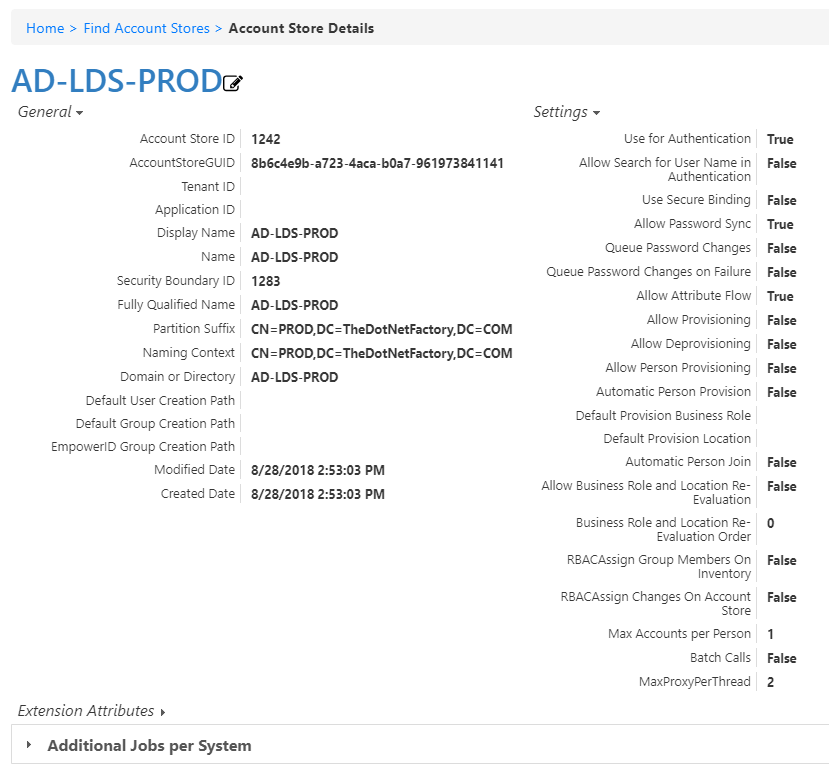
- In the edit view of the page, you can edit values in any of the enabled fields. In the General section, these are:
- Display Name – Edit the name of the account store as it appears in the list of account stores.
- Proxy Connection Account – Change the domain, user name, and password for the connection.
- Account Store Proxy Shared Credential – Click in this box and press Enter to see a list of shared credentials in your system to use for the proxy connection.
- Password Manager Policy – Select a password manager policy to use for the account. If not selected, it uses the Default Password Manager Policy.
- Application ID – If the account store is a one-to-one match with a Tracking Only application, enter the Application Resource GUID of the application. (This value is supplied automatically if you select the Create a New Account Directory option when creating a Tracking Only application.)
Tenant ID – Enter the Tenant ID, if supplied by the connection account. (AWS uses this.) - Use Secure Binding – Toggle to bind accounts with encryption.
- Show in Tree – Toggle to show the account store in the Locations tree.
- Default User Creation Path – Select a location in which to create users if none is specified.
- Default Group Creation Path – Select a location in which to create groups if none is specified.
- EmpowerID Group Creation Path – Select a location in which to create EmpowerID groups if none is specified.
- Max Accounts per Person – Enter the maximum number of user accounts from this domain that an EmpowerID Person can have linked to them. This prevents the possibility of a runaway error caused by a wrongly configured Join rule. We recommended setting this value to 1 unless users commonly have multiple accounts and you want them to be joined to the same person.
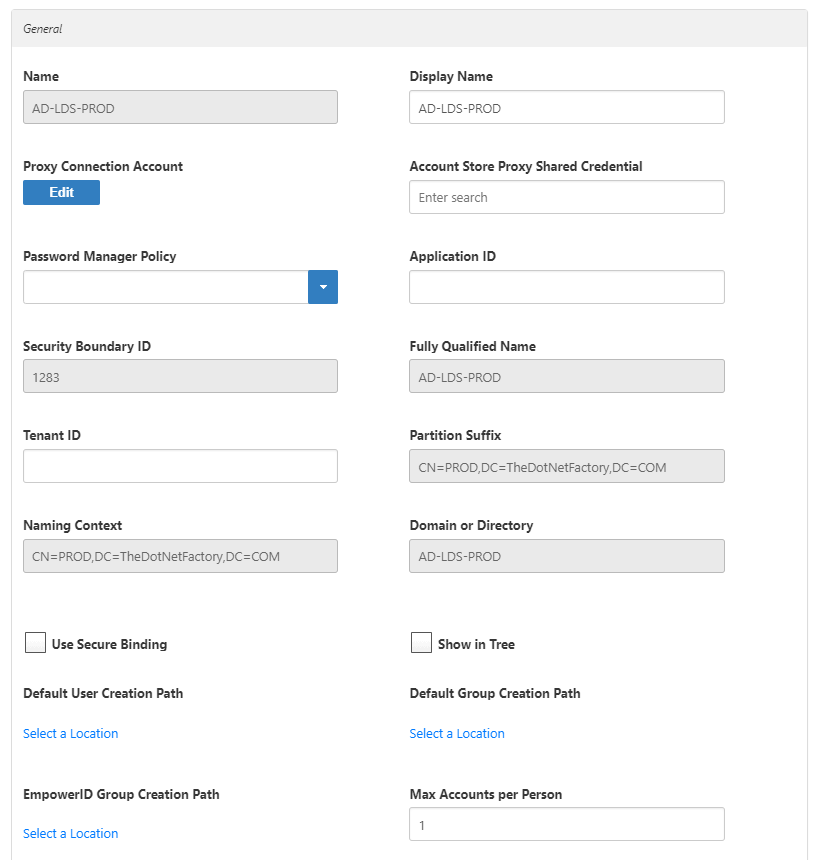
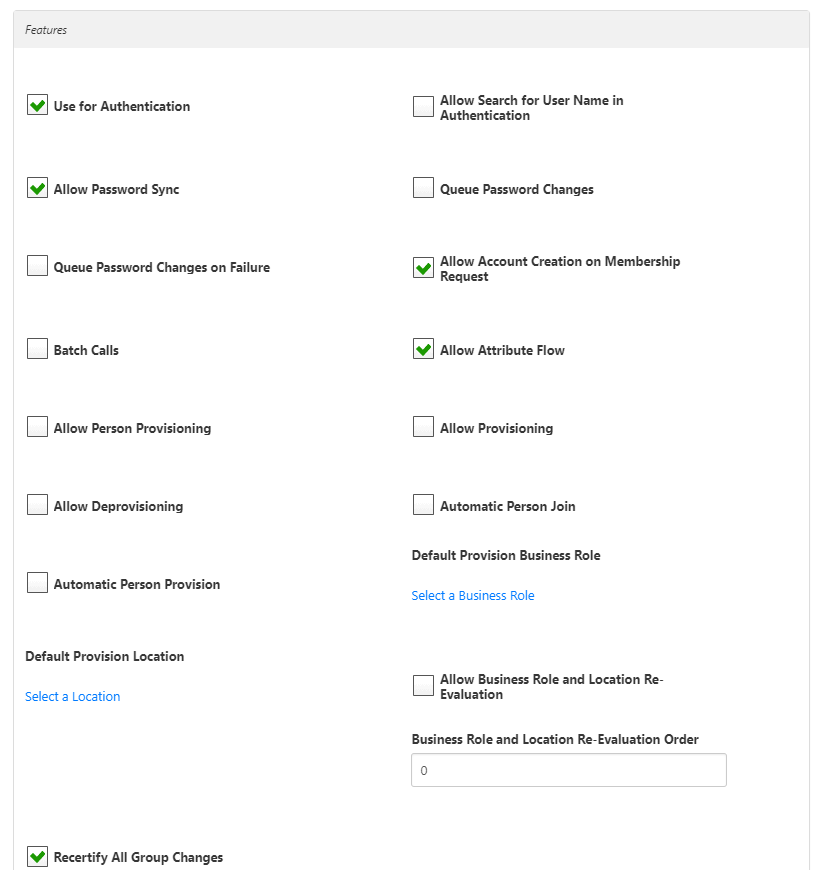
- In the Features section, you can select any of these values:
- Use for Authentication –
- Allow Search for User Name in Authentication –
- Allow Password Sync – Toggle to allow EmpowerID to sync password changes discovered during inventory.
- Queue Password Changes – Toggle to have EmpowerID send password changes to the Account Password Reset Inbox for batch processing.
- Queue Password Changes on Failure – Toggle to have EmpowerID send password changes to the Account Password Reset Inbox only when the change fails.
- Allow Account Creation on Membership Request – Toggle to allow users without accounts to request group membership and automatically have an account created.
- Batch Calls –
- Allow Attribute Flow – Toggle to allow attribute changes to flow between EmpowerID and the account store.
- Allow Person Provisioning – Toggle to allow EmpowerID to create Person objects from the user records discovered during inventory.
- Allow Provisioning – Toggle to allow EmpowerID to create new Groups in ServiceNow from requests discovered during inventory.
- Allow Deprovisioning – Toggle to allow EmpowerID to delete Groups in ServiceNow based on requests discovered during inventory.
- Automatic Person Join – Toggle to allow EmpowerID to join newly discovered accounts to people during the inventory process if they meet the Join Rule as specified by the Custom_Account_InventoryInboxJoinBulk SQL stored procedure.
- Automatic Person Provision – Toggle to allow EmpowerID to provision EmpowerID people for new accounts discovered during the inventory process if they meet the Provision Rule specified by theCustom_Account_InventoryInboxGetAccountsToProvision SQL stored procedure.
- Default Provision Business Role – Set a default Business Role to assign people if none is specified.
- Default Provision Location – Set a default Location to assign people if none is specified.
- Allow Business Role and Location Re-Evaluation – Toggle if you have multiple account stores to manage and want to specify a priority for each.
- Business Role and Location Re-Evaluation Order – Enter a number to specify the priority of the account store for determining the Business Roles and Locations to assign to a Person. Account Stores with a higher value take precedence.
- Recertify All Group Changes – Toggle to allow EmpowerID to generate recertification review tasks for all changes in ServiceNow Groups.
- When you have finished editing, click Save.
To connect to AD LDS (ADAM) using the EmpowerID Management Console
- Log in to the EmpowerID Management Console as an administrator.
- Click the application icon and select Configuration Manager from the menu.
- In Configuration Manager, select the Account Stores node and then click the Add New button above the grid.
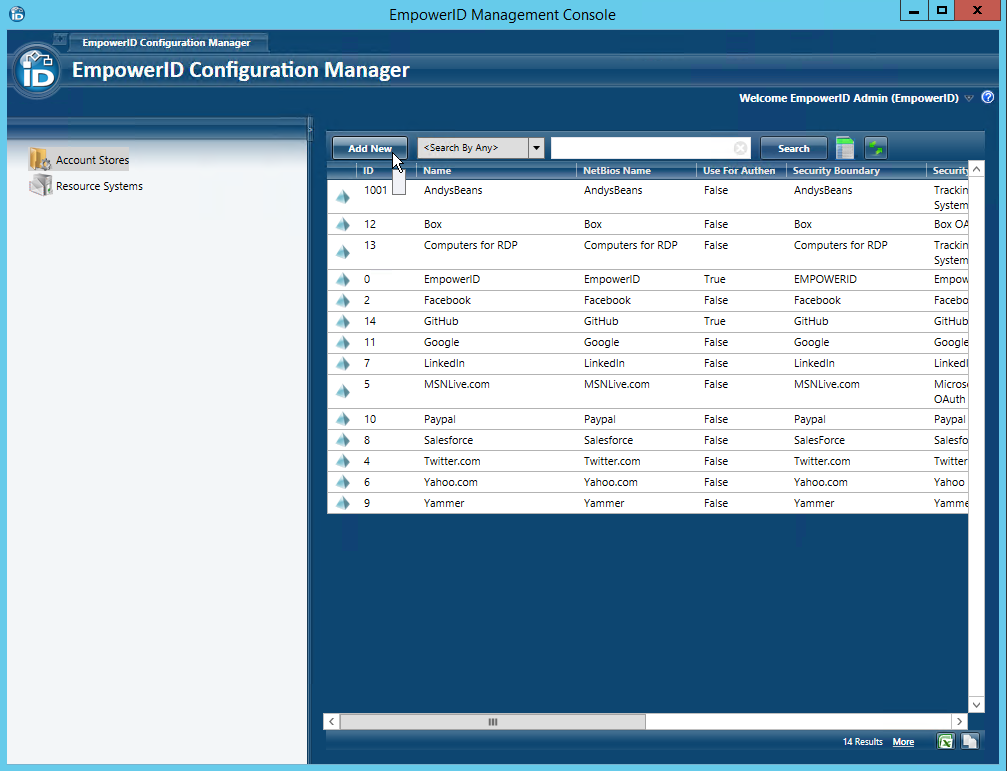
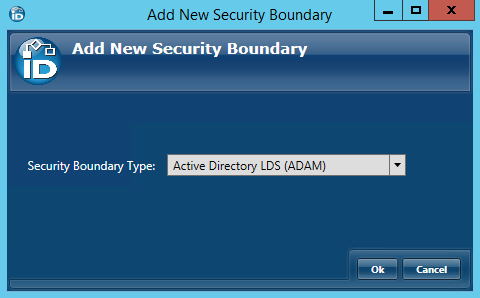
- In the Add New Security Boundary window that opens, select Active Directory LDS (ADAM) from the drop-down and then click OK.
- In the AD LDS (ADAM) Directory window that appears, do the following:
- Enter the name of the AD LDS server as well as the port number if other than 389. The format should be Server Name:Port Number.
- Enter the partition suffix in the Partition Suffix field, such as "CN=DOCS,DC=EIDDOC,DC=COM".
- Enter the proxy information:
- NetBIOS Domain — This is the domain in which the server hosting the AD LDS instance is a member, such as "EIDDOC".
- Proxy User and Password — This the proxy account (connection credential) that EmpowerID uses to manage AD LDS. The user account must have read access to the partition that holds the objects in the AD LDS instance. You can change this at any time.
- Click the Choose button below the Proxy Information panel to open the Choose Servers window. This window provides the interface for selecting the server(s) with the EmpowerID Web Role service installed.
- In the Choose Servers window, toggle the Server button from a red sphere to a green checkbox for one or more servers running the EmpowerID Web Role service, where the LDAP Management Host Web Service is enabled. (The LDAP Management Host Web Service is responsible for LDAP communications and is enabled by default on each server running the EmpowerID Web Role service.)
- Click OK to close the Choose Servers window.
The AD LDS (ADAM) Directory window should look similar to the below image.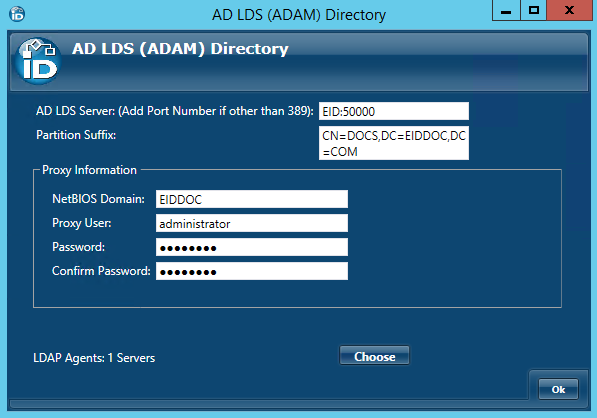
- Click OK to close the AD LDS (ADAM) Directory window.
In the Security Boundary Details screen that appears, click the Account Stores tab and then double-click the Account Store in the Account Stores grid or right-click it and select Edit from the context menu.
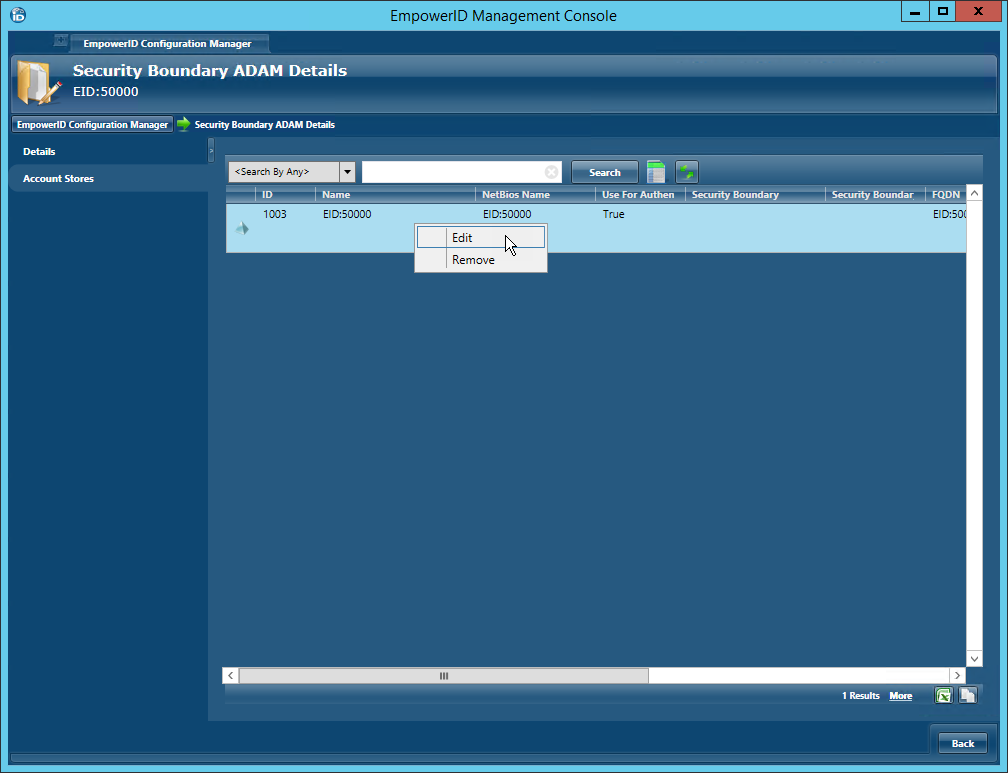
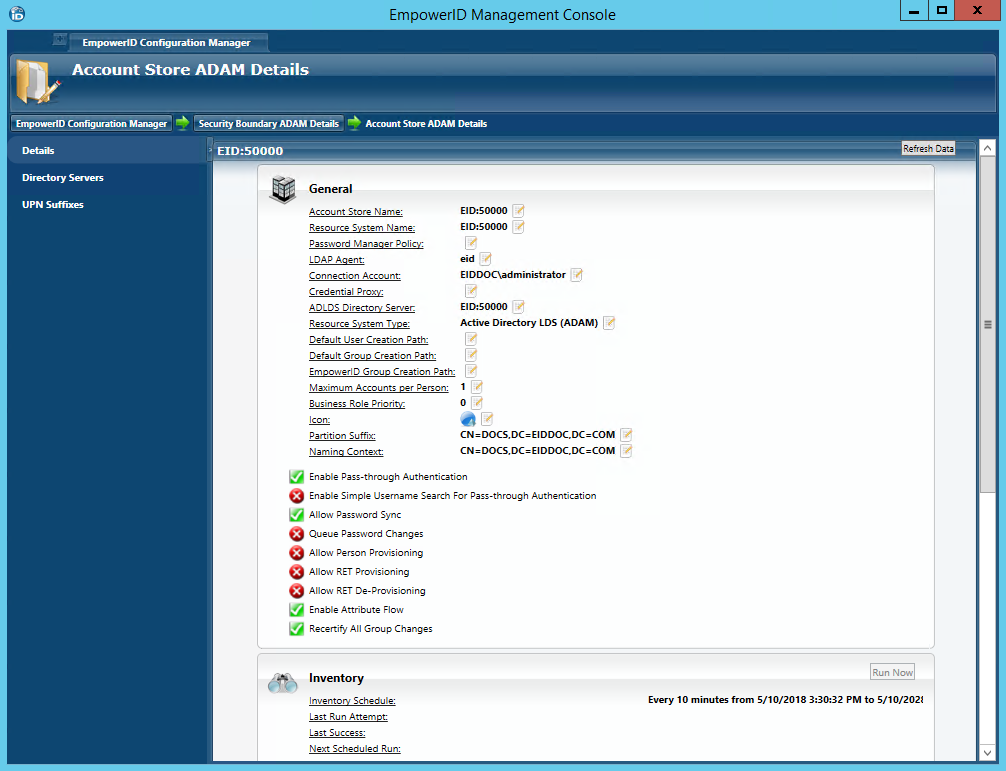
This opens the Account Store ADAM Details screen, which is where you adjust the settings for managing the AD LDS account store.